

You nudge the toilet with your knee and feel it move under you. The caulking around the base has turned yellow and brittle, and when the bathroom fan runs, a sewer-gas smell seems to drift up from the floor. Before you buy another wax ring, stop and inspect the toilet flange. A worn seal can leak, but a cracked flange, loose closet bolts, low finished-floor height, or rotten subfloor will bring the problem straight back.
Learning how to repair a toilet flange is less about forcing a replacement part into place and more about diagnosing what still has structural support. This guide walks through the repair from the first visual check to the final leak test, with particular attention to material matching, stable anchoring, and the BC Plumbing Code requirements that matter in Vancouver and the Lower Mainland.
Table of Contents
- Spotting the Signs Your Toilet Flange Needs Attention
- Tools, Parts, and Materials You Will Need
- Shutting Off, Draining, and Removing the Toilet
- Choosing and Installing the Right Flange Fix
- Resealing and Reinstalling the Toilet
- When to Stop and Call a Licensed Plumber
- Final Checklist and Quick Answers
Spotting the Signs Your Toilet Flange Needs Attention
A toilet that rocks doesn't automatically need a new flange. The bowl may have a cracked base, the subfloor may be soft, or the wax ring may have lost its seal. The useful question is whether the movement or leak starts at the flange and its connection to the floor.
Start with the toilet still in place. Press down firmly on each corner of the bowl with a plunger-style motion. Watch the base, not just the water in the bowl. If the porcelain shifts while the closet bolts remain loose or visibly tilted, the flange may no longer be holding the fixture. Yellow, brittle caulking, a damp halo around the base, or recurring staining on the finished floor also deserves investigation.
Look before you lift
Once the toilet is removed, use a flashlight and inspect the ring from every angle. Look for:
- Cracked plastic: ABS or PVC can split around the bolt slots or where the ring meets the drain connection.
- Rust scaling: Cast iron rings may look intact until corrosion has eaten away the areas that hold the closet bolts.
- Empty bolt slots: If the closet bolts spin, pull through, or no longer have a solid keyhole to sit in, tightening the toilet won't create a lasting repair.
- A low flange: Daylight between the flange and finished floor is a warning that the seal may not compress properly.
California guidance illustrates why finished-floor height matters. The plumbing code requires the bottom of the flange to sit on top of the finished floor, and it describes closet rings as approximately 7 inches (178 mm) in diameter, with a 1.5-inch (38 mm) sealing face when used with the soil pipe. See the California plumbing fixture connection requirements for the detailed standard.
Separate the seal problem from the flange problem
A failed wax ring usually leaves a clean flange behind. The ring may be compressed, split, or smeared, but the plastic or metal flange should still be solidly attached and able to hold new bolts. A flange failure leaves something structural wrong, such as broken bolt channels, a ring that lifts from the floor, or a drain connection that moves when the flange is loaded.
A dye test can help locate a leak. Add toilet-safe dye to the bowl, wait without flushing, and check the flange perimeter and the ceiling below if accessible. If coloured water appears at the base during a flush, the seal or flange area is suspect. If moisture shows farther along the closet bend or drain route, don't cover it with another ring.
Tools, Parts, and Materials You Will Need
Set out the tools before you disconnect the toilet. The job becomes awkward quickly once the bowl is off the flange, and a missing screwdriver or rag can leave the drain open while you're searching through a toolbox.
Your basic hand kit should include an adjustable wrench, locking pliers, a utility knife with fresh blades, a flat pry bar, and a cordless drill with Phillips and square-drive bits. Add a wet/dry vacuum, a small bucket, heavy nitrile gloves, safety glasses, and a drop cloth. The vacuum matters because a toilet tank and bowl can retain more water than expected, even after several flushes.
If the home was built before 1990 and the old gasket or surrounding flooring may contain asbestos, don't sand, grind, or scrape suspect material casually. Wear appropriate respiratory protection and have the material assessed before disturbing it. A respirator isn't a substitute for proper identification and safe handling.
Match the replacement to the drain
On the parts side, compare the flange to the pipe before buying. A Sioux Chief or Oatey PVC replacement flange may suit a compatible plastic connection, while a cast-iron assembly may need a stainless repair ring instead of a plastic replacement. For the seal, a Fluidmaster Better Than Wax rubber seal is one option, while a standard Harvey wax ring with a polyethylene sleeve remains a familiar choice.
Brass closet bolts sized to 1/4-inch by 2-1/4 inches are a practical replacement when the existing hardware is damaged. If the flange body is sound and only the bolt slots are cracked, a stainless repair ring can restore the anchoring surface without opening the floor.
| Item | Purpose | Watch-out |
|---|---|---|
| Adjustable wrench and locking pliers | Remove the supply connection and closet nuts | Don't twist the valve stem or supply line inside the wall |
| Wet/dry vac and bucket | Remove tank and bowl water | Keep the electrical lead away from standing water |
| PVC replacement flange | Replace a damaged compatible plastic flange | Match the pipe material and connection type |
| Stainless repair ring | Reinforce a sound flange with damaged bolt slots | It won't fix rotten subfloor or a misaligned drain |
| Flange extender | Raise a low flange after flooring changes | Stack only where the existing flange remains structurally sound |
| Brass closet bolts | Anchor the toilet to the repaired flange | Zinc-plated hardware can corrode or snap during tightening |
| New wax or rubber seal | Restore the watertight connection | Never reuse the old seal |
One common shopping mistake is forgetting that a new tile floor can leave the flange below the finished surface. Another is buying a flange that fits the toilet but not the pipe. Confirm both before you cut anything.
Shutting Off, Draining, and Removing the Toilet
Turn the angle stop clockwise until it stops, then test the toilet handle. Hold the stem nut with pliers while you work near the supply connection, especially if the valve feels stiff. You don't want to twist the pipe or flexible line inside the wall while trying to shut off water.
Flush and keep the handle held down to empty the tank. Sponge out the remaining tank water, then remove water from the bowl with the wet/dry vacuum. Leave a small bucket and towel beside you because the supply line and trap can still release water as the toilet moves.
Lift without stressing the floor
Pop the plastic caps off the closet bolts and loosen the nuts with the adjustable wrench. If a nut spins because the bolt has corroded into the flange, use a mini hacksaw blade to cut through the hardware. Muscling a seized nut can tear a weak flange or damage the floor around it.
Break the wax seal with a firm side-to-side rock. Once the bowl releases, lift it straight up. Use a helper if the toilet is awkward or weighs more than 50 pounds, and carry it to a drop cloth in the next room rather than dragging it across the bathroom floor.
Scrape the old wax from the toilet horn with the plastic side of the utility knife. Remove the old wax from the flange as well, then stuff a rag into the open closet bend to block sewer gas while you inspect the connection. Don't keep working by guesswork. You need a clear view of the actual flange, drain connection, and subfloor before choosing a repair.
Practical rule: If you can't tell whether the ring, the pipe, or the floor is moving, the inspection isn't finished.
Choosing and Installing the Right Flange Fix
With the flange exposed, choose between a repair ring, an extender, and full replacement. The correct option depends on the material, the height of the finished floor, and whether the existing flange still transfers toilet loads into a firm base.
ABS or PVC flanges glued into a stub-out can often be replaced with a matching spigot-fit or twist-in flange, but the replacement must match the existing drainage material and connection. Cast-iron rings commonly fail around the bolt slots, where corrosion removes the metal needed to hold the closet bolts. In that situation, a stainless repair ring or sleeve may be appropriate.
Compare the three repair paths
| Option | Best Use Case | Material | Install Time | Code Fit |
|---|---|---|---|---|
| Repair ring | The existing flange is attached firmly, but bolt slots are cracked or worn | Stainless or coated steel | Shorter than full replacement | Fits when the original flange, base, seal, and anchoring remain sound |
| Flange extender | The flange is structurally sound but sits below the finished floor | Plastic, rubber, or metal system matched to the installation | Moderate | Fits when the completed flange and seal sit correctly on the finished floor |
| Full replacement | The flange or drain connection is broken, loose, badly corroded, or misaligned | Matching ABS, PVC, cast iron, brass, or approved system | Longest and most disruptive | Requires material, watertightness, gas-tightness, and anchoring to meet applicable code |
The 2024 BC Plumbing Code requires a floor flange to be securely set on a firm base, with watertight and gas-tight joints. It also requires corrosion-resistant fasteners when the flange or toilet is anchored, and generally calls for brass unless cast-iron or plastic pipe is used, in which case the matching material may be used. These requirements are summarised in the BC Plumbing Code plumbing guidance.
Install the selected repair
For a repair ring, dry-fit the ring over the existing flange first. Confirm that the closet-bolt slots line up with the closet bend and that the ring sits flat on a firm surface. Set it with the product-approved sealant or bedding method, then drive corrosion-resistant screws into sound flooring. Don't rely on the ring's metal alone if the screws are entering rotten wood.
Slide new brass closet bolts into the keyholes before the ring is fully seated. Keep both bolts aligned so the toilet horn will drop over them without forcing the bowl sideways. If the new tile or vinyl leaves the flange low, use a compatible extender or spacer ring, but don't use stacked parts to hide a flange that moves.
A stripped screw hole in a soft subfloor is the point where a simple ring repair stops being simple. A wood block may need to be sistered alongside the damaged area, and the drain connection may need support or replacement. An overlay ring can restore bolt anchoring, but it can't correct a rotten floor, an out-of-position drain horn, or a loose pipe.
California rules provide another useful compliance check. Current guidance doesn't permit offset, eccentric, or reducing closet flanges with floor-mounted, back-outlet water closet bowls, and the California Plumbing Code text also covers toilet-clearance planning. A flange repair shouldn't create a new problem with the finished toilet position.
Resealing and Reinstalling the Toilet
Most DIY flange repairs fail during the reset, not while the new ring is going in. The toilet must land squarely, compress the new seal without sliding, and sit firmly without putting excessive stress on the porcelain.
Scrape every trace of old wax from the toilet horn and flange with a plastic putty knife. Throw away the old wax ring, old bolts, and old gasket. Centre a new wax ring, plain or fitted with a polyethylene horn, over the flange so the bolts pass cleanly through the keyholes. If the installation uses a rubber or silicone seal, press it into the flange groove according to the seal manufacturer's directions.
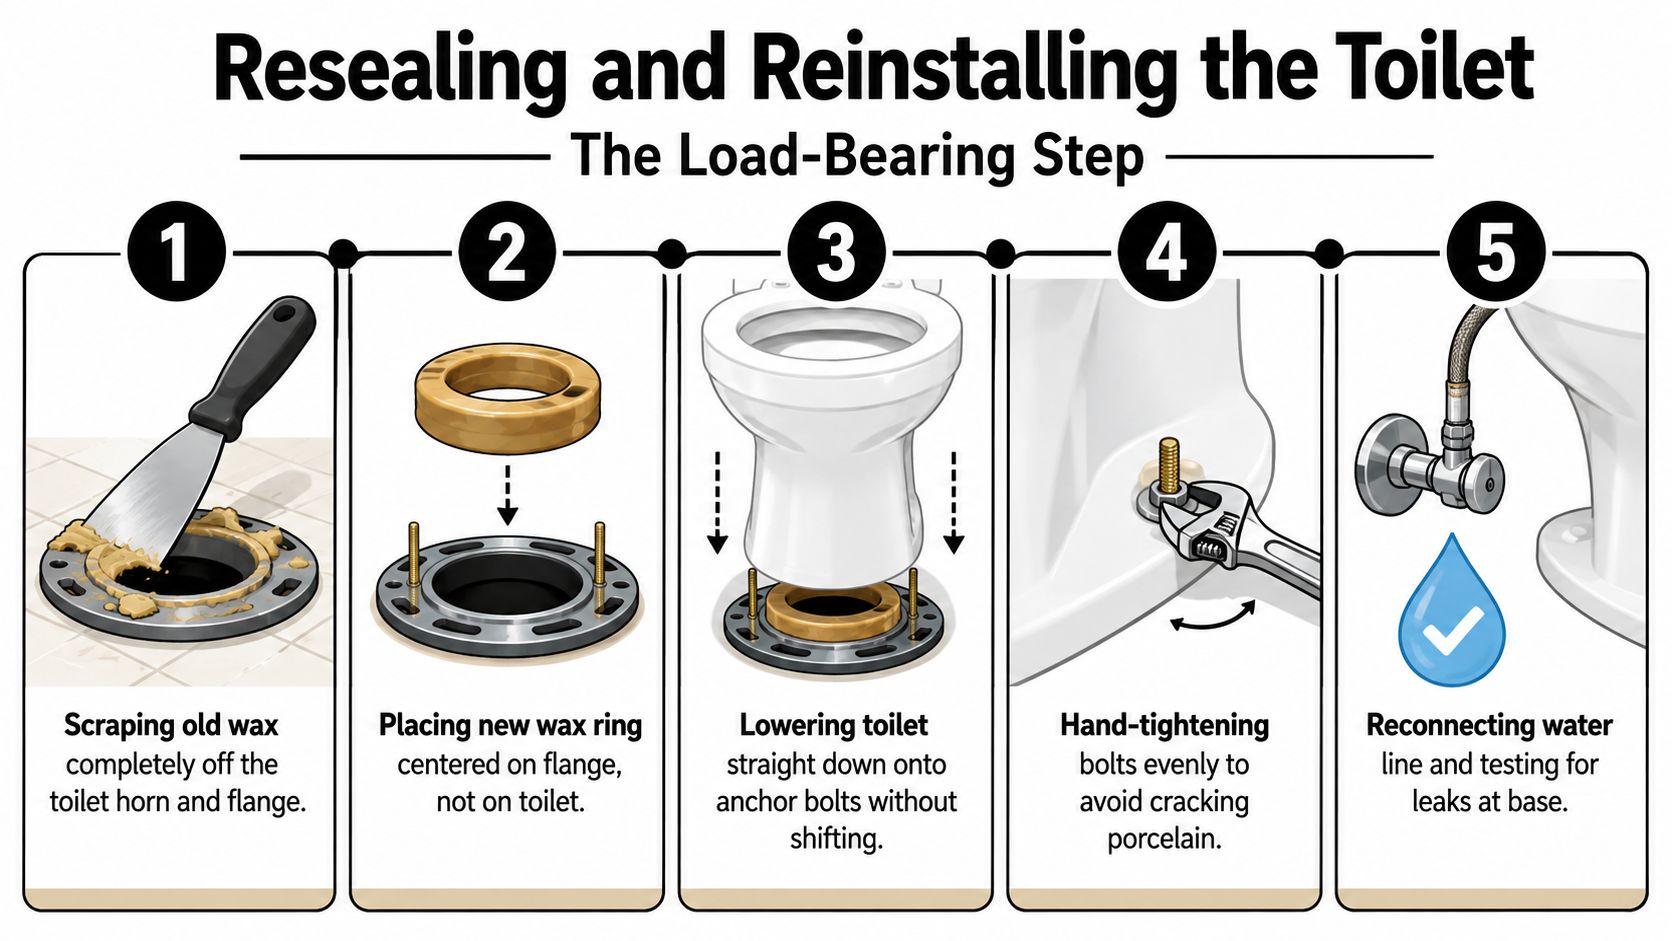
Lower the toilet straight down over the bolts. Don't slide it across the seal, because sliding can smear the wax away from the horn. Press down with your body weight to compress the ring, then hand-thread the washers and nuts onto the closet bolts.
Tighten gradually from side to side. Stop when the base sits flat and the bowl feels stable. Porcelain cracks when someone keeps cranking on a bolt that has already done its job.
Level, shim, and test
Use plastic shims under the rim if the tile leaves a small gap or the bowl rocks. Trim the exposed shim, then seal the gap with paintable silicone before fitting the bolt caps. Leave a caulk opening at the front three-quarters of the base so a future leak has a path to show itself instead of being trapped underneath.
Reconnect the supply line, open the valve slowly, and flush repeatedly while checking the base, supply connection, and tank. For a visual walkthrough of the reset sequence, this toilet flange repair video shows the general process.
When to Stop and Call a Licensed Plumber
A flange repair crosses into professional territory when the damage involves the drainage system rather than a removable fixture connection. Stop if the cast-iron or PVC stack below the floor is moving, if a flange is glued into an ABS DWV system and must be cut out, or if the subfloor around the flange feels soft or rotten.
The BC Plumbing Code treats the flange as part of the toilet's plumbing and stability connection. Every floor flange for a floor-mounted water closet must be securely set on a firm base, bolted to the trap flange, and sealed with a resilient watertight and gas-tight seal, as described in the BC Plumbing Code update document. The code also requires corrosion-resistant screws, bolts, nuts, and washers for relevant flange and water-closet connections, covered in the BC code fastener revision guidance.
Red flags that change the job
Call a licensed plumber when:
- The floor won't hold screws: A repair ring can't carry the toilet load if the subfloor is rotten.
- The pipe moves below the flange: Movement may indicate a failed joint, damaged closet bend, or unsupported drainage connection.
- The smell returns: Sewer gas after a new seal points toward the closet bend, vent, or stack rather than a simple ring.
- The material is uncertain: Older homes may contain lead bends or asbestos-containing materials around the flooring, changing the safety requirements.
- The repair needs permitted drainage work: British Columbia adopted the 2024 BC Plumbing Code for projects with building permits applied for on or after March 8, 2024, according to the provincial code adoption bulletin.
A licensed plumber can expose and repair the drain properly, verify the connection, and document the work. The BC Building Code Appeal Board has also confirmed that a floor-mounted water closet must be securely attached to the floor by means of a flange and remain stable in use, as outlined in this BC Building Code guide.
Final Checklist and Quick Answers
Before you leave the bathroom, run through the repair in order. Test that the shut-off valve closes fully, disconnect or cap the water line to control drips, and remove the toilet with help if needed. Plug the open drain while the flange is exposed, then inspect the ring, drain connection, floor anchoring, bolt slots, and finished-floor height.
Choose a repair ring only when the existing flange and base remain sound. Use an extender when the flange is structurally secure but too low after flooring work. Replace the flange or call for help when the pipe, floor, or ring is loose, broken, or badly corroded.
Fit a new seal, set the toilet straight down, and snug the closet bolts evenly. Check for rocking, add shims where necessary, trim them cleanly, and leave the front caulk gap open. Reconnect the water, flush repeatedly, inspect the base, and monitor the floor for 24 hours before grouting or fully closing the base.

Quick answers
How long does a flange repair take? A first-timer should allow 2 to 4 hours, rather than expecting a short video-style repair. Stubborn closet bolts, concealed floor damage, and a low flange can extend the job quickly.
Does a wobbly toilet always mean a bad flange? No. A cracked toilet base or rotten subfloor can cause the same movement. Replacing the flange without repairing the floor only hands the wobble back to the new installation.
What does a licensed plumber cost in the Lower Mainland? A straightforward replacement is commonly quoted at $250 to $450, with more added when the pipe or flange must be cut out. For comparison, Greater Toronto service guidance cites general toilet repairs at C$150–C$350 and toilet installation at C$250–C$600, excluding the fixture, in its toilet flange repair guidance.
Keep the repaired toilet dry and under observation for 24 hours before grouting the base.
If the flange, subfloor, or drain connection in your Vancouver, Richmond, Burnaby, or nearby Lower Mainland home isn't holding solidly, Encano Plumbing & Drainage Ltd. can inspect the toilet base, repair or replace the flange, and handle related toilet, drain, and leak-detection work. Book a scheduled visit or request emergency service when sewer gas, active leakage, or an unstable toilet makes the Saturday repair unsafe to continue.