

You've chosen the sink, cleared the cabinet, and probably discovered that the job is less tidy than the showroom suggested. Under the basin, shutoff valves may be stiff, the drain may not line up with the new strainer, and a small amount of trapped water is waiting to spill across the cabinet floor. A proper kitchen sink installation is not just lowering a basin into a countertop. It's a plumbing, cabinetry, drainage, sealing, and service-access job that has to work together.
Table of Contents
- Why Kitchen Sink Installation Matters in Your Vancouver Home
- Tools and Preparation for a Smooth Installation
- Step-by-Step Removal and Installation Process
- Choosing the Right Sink and Faucet for Your Kitchen
- Permits and Code Requirements in Vancouver
- When to Call a Professional Plumber
Why Kitchen Sink Installation Matters in Your Vancouver Home
A sink can look fine from above while causing trouble underneath. I've seen a homeowner remove an old basin expecting a quick Saturday upgrade, only to find a swollen cabinet base, supply valves that wouldn't close fully, and a drain arm positioned for a sink that had been discontinued years earlier. The new fixture fitted the countertop, but the plumbing didn't. That's where an apparently simple replacement becomes a repair project.

The modern kitchen sink depends on infrastructure that developed over time. A historical study of Canadian kitchen sinks reports that readily available municipal hot water didn't become fully established in Ontario until the 1960s. That mid-twentieth-century milestone helped make fixed sinks, connected faucets, and permanent drainage practical for ordinary households.
Older homes reveal the hidden scope
Vancouver-area housing includes installations from several technological eras. One home may have clean, standardised supply connections and a well-positioned drain. Another may contain older valves, unusual cabinet dimensions, limited pipe capacity, or a countertop opening that was cut for a very different sink.
That history matters because a replacement can expose weaknesses that were hidden by the old fixture. A deeper bowl may interfere with the dishwasher hose. A farmhouse sink may require cabinet modification. An undermount replacement may demand a new countertop opening and a different support method. A new faucet may not fit the existing hole pattern.
Kitchen work is also a recurring renovation category. A federal residential-renovation study found that 11% of Canadian homeowners who had renovated undertook kitchen work, compared with 9% in British Columbia, and reported average B.C. kitchen-renovation expenditure of $3,385. Those figures come from the federal residential-renovation study. They describe broader kitchen projects, not the price of an individual sink installation, but they show why scope needs to be considered before ordering a fixture.
Practical rule: The sink is only the visible part of the installation. The cabinet opening, countertop, faucet, trap, shutoffs, dishwasher connection, and drain alignment decide whether the job succeeds.
A good installation leaves the next person able to reach the shutoff valves, remove the trap, inspect the strainer, and deal with a blockage without dismantling the cabinet. That serviceability is especially important in condos, rental properties, and older Vancouver homes where access is already restricted.
Tools and Preparation for a Smooth Installation
Preparation prevents most of the avoidable mess. Before disconnecting anything, measure the existing sink from below and above, record the cabinet width and depth, and compare the new manufacturer's cutout template with the actual countertop opening. Don't assume a replacement described as the same size will use the same clips, bowl depth, faucet holes, or drain position.
A practical example is a homeowner who had the new sink ready but hadn't brought a flashlight or shop vacuum into the kitchen. The cabinet was dark, the old strainer released dirty water, and the vacuum would have removed the residue far faster than towels. Small omissions like that turn a controlled job into repeated trips through a wet kitchen.
Start with a parts and access check
Have a bucket, absorbent towels, a headlamp or flashlight, a shop vacuum, adjustable pliers, a basin wrench, screwdrivers, a utility knife, a tape measure, a level, and a sharp pencil. Keep the new basket strainer, mounting hardware, supply connectors, trap components, approved sealant, and replacement shutoff valves nearby. Use eye protection when cutting old sealant or working beneath a countertop.
The table below focuses on tools that make the work safer and more controllable.
| Tool | Purpose |
|---|---|
| Basin wrench | Loosens and tightens faucet mounting nuts in confined spaces |
| Adjustable pliers | Removes slip-joint nuts and holds fittings during disassembly |
| Bucket and towels | Catch residual water from supplies, trap, and strainer |
| Headlamp or flashlight | Illuminates valves, cabinet penetrations, and connection points |
| Shop vacuum | Removes spilled water and debris from the cabinet base |
| Utility knife | Cuts old sealant and trims exposed caulking |
| Tape measure and level | Checks cabinet clearance, opening dimensions, and sink position |
| Screwdrivers | Removes clips, brackets, and cabinet obstructions |
| Approved sealant | Creates the required watertight seal around the fixture |
| Eye protection and gloves | Protects against sharp metal, residue, and cleaning chemicals |
If you're unsure whether a product is suitable for a particular plastic drain assembly, review this plumber glue guide before applying adhesive. Many drain connections rely on compression fittings and removable joints, not glue, so bonding the wrong component can make future servicing difficult.
Measure the parts that actually matter
Check the sink's length, front-to-back depth, bowl depth, corner radius, faucet-hole arrangement, overflow design, and drain location. Under the counter, measure from the cabinet base to the underside of the countertop, then compare that space with the bowl and trap. Confirm that doors, drawers, garbage-disposal equipment, and dishwasher hoses won't be crowded by the new fixture.
Protect the countertop with cardboard or a folded moving blanket, but don't use protection as a substitute for support. A heavy sink can damage an edge if it slips during removal. Clear the cabinet completely, label hot and cold supplies, and keep the manufacturer's installation instructions with the hardware.
The most useful preparation question is simple: what will be different after the replacement? If the answer includes a new drain position, a new dishwasher connection, altered cabinet framing, relocated shutoffs, or a different vent arrangement, the project may be more than a same-location fixture swap.
Step-by-Step Removal and Installation Process
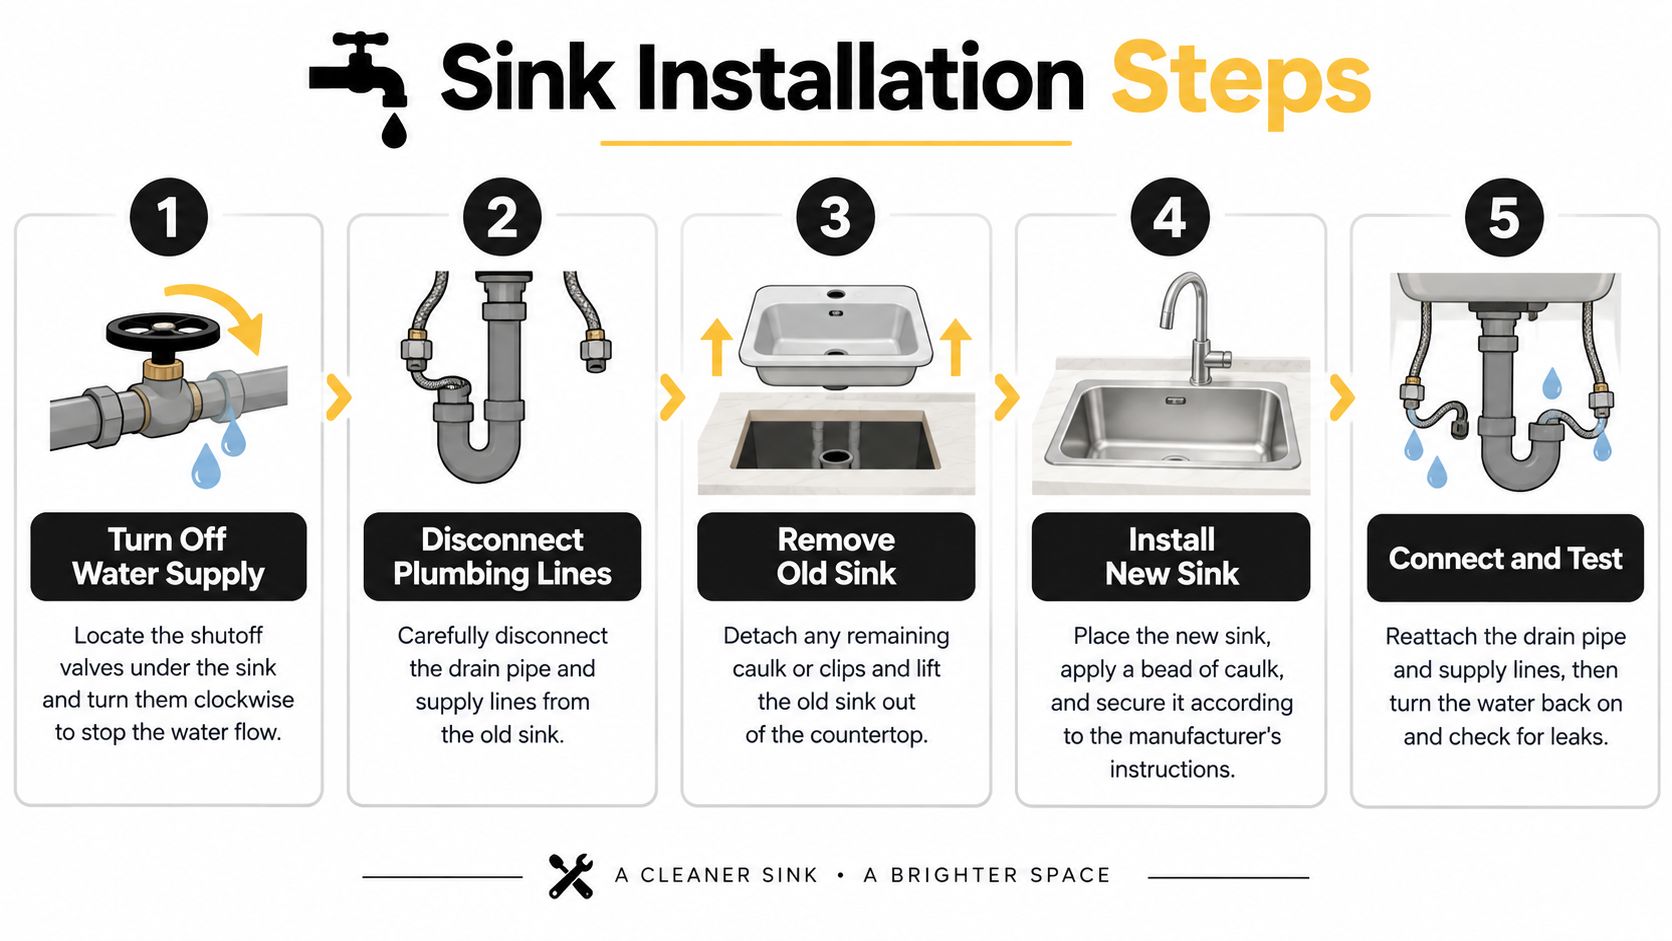
Start by clearing the cabinet and placing a bucket beneath the trap. Close the hot and cold shutoff valves, then open the faucet to release pressure. If either valve continues passing water, stop there and arrange a proper isolation method before removing the supply lines. A valve that only partly closes can flood the cabinet as soon as the connector is loosened.
Disconnect the supply lines with adjustable pliers while supporting the valve or faucet shank. Remove the trap and keep the parts oriented so you can understand the existing arrangement. If a dishwasher hose or disposal outlet is connected, photograph the connections before removal. That record is useful when the new sink has a different bowl layout.
Cut through the old sealant from above, release the sink clips or supports from below, and lift the fixture out with care. Don't lever against a stone countertop edge with a screwdriver. Once the basin is out, scrape away old sealant, vacuum the opening, and inspect for swelling, staining, loose laminate, or cracks around the cutout.
Set the fixture without forcing the plumbing
For a drop-in sink, test-fit the basin dry before applying sealant. Confirm that the rim sits evenly, the clips can be reached, and the bowls don't strike the cabinet sides. Apply the specified sealant continuously around the rim, lower the sink into position, and secure it without overtightening. Excessive pressure can distort a thin sink or squeeze out too much sealant.
An undermount installation needs a stable support system and a clean, properly prepared countertop edge. Follow the sink and countertop manufacturer's method rather than improvising with unsupported brackets. The basin must remain secure when filled, not merely look aligned while empty.
Install the basket strainer according to the manufacturer's instructions and wipe away excess sealant before it hardens. Keep the trap removable. A permanent, inaccessible connection may appear neat but creates unnecessary work during a blockage or future replacement.
Handle double bowls and dishwashers correctly
A Richmond condominium provides a useful example. With a double-bowl sink, one permitted common trap may serve both compartments when the waste piping is arranged correctly. The BC drainage provisions for kitchen sinks and dishwashers also allow a domestic dishwasher with a drainage pump to discharge through a direct connection to the adjacent sink or garbage-disposal outlet.
The dishwasher hose should rise as high as possible beneath the countertop before connecting on the inlet side of the sink trap through a Y fitting, or to the disposal unit. A low, loose hose can create an unsuitable drainage arrangement. If the project includes disposal equipment, review the garbage-disposal installation information before choosing the sink and drain layout.
Reconnect the supplies with accessible shutoffs, then open each valve gradually. Test first with the faucet closed, checking every threaded and compression connection. Run hot and cold water, fill each bowl, drain them together, operate the dishwasher connection if present, and inspect beneath the cabinet while water is flowing.
A seal that has not cured properly can shift when the sink is loaded or the counter is cleaned. Follow the sealant manufacturer's cure instructions before treating the installation as finished.
Choosing the Right Sink and Faucet for Your Kitchen
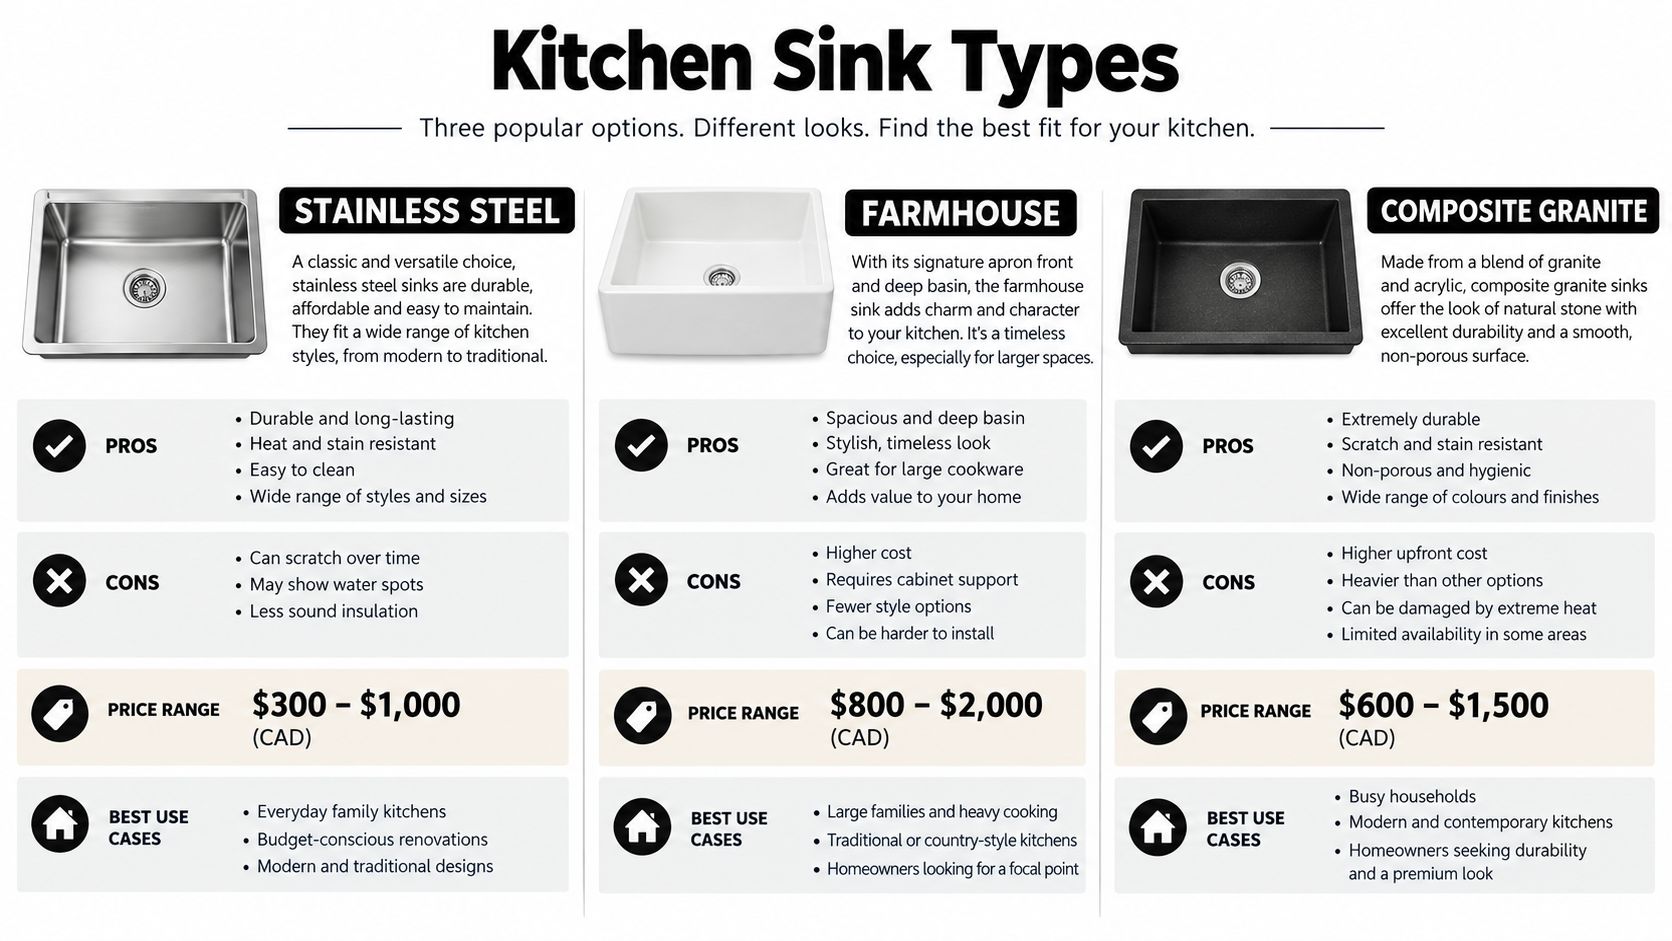
The best sink is the one that suits the cabinet, countertop, drainage, and daily work pattern. Stainless steel is forgiving and relatively light. Farmhouse models can provide a generous front-to-back basin, but they often require cabinet alterations and careful support. Composite granite can be quiet and visually substantial, though its weight and rigid dimensions demand accurate preparation.
Match material to the room
| Material | Durability | Maintenance | Cost |
|---|---|---|---|
| Stainless steel | Resilient and lighter than many alternatives | Easy to clean, but can show scratches and water marks | Varies by gauge, finish, and construction |
| Farmhouse | Strong visual presence and useful bowl capacity | Requires attention to exposed front and surrounding seal | Often involves added cabinet and countertop work |
| Composite granite | Solid feel and good resistance to everyday wear | Needs suitable cleaning products and careful handling | Varies with brand, thickness, and installation requirements |
A deep bowl isn't automatically an upgrade. It may reduce space for the trap, disposal, or dishwasher hose. A wide farmhouse front can also affect cabinet doors and flooring transitions. Before ordering, place a straightedge across the cabinet opening and check how much vertical room remains below the countertop.
Faucet selection needs the same discipline. The BC Plumbing Code requires every dwelling kitchen with a piped water supply to receive hot and cold water connections at the kitchen sink. A BCIT institutional plumbing specification lists a 6.8 L/min kitchen-faucet flow target and notes the BC Building Code limit of 8.3 L/min. Verify the faucet's stated flow rather than assuming a high-flow pull-down model is suitable.
Choose service access over showroom drama
A pull-down faucet is convenient when the hose retracts smoothly and the counterweight has room to move. A compact single-handle model may work better in a narrow cabinet or condo kitchen. Check the number and position of faucet holes, the thickness of the countertop, the reach of the spout, and whether the handle can operate without striking a wall or backsplash.
A sink with concealed overflow arrangements may also be unsuitable for the intended use. BC code states that dishwashing and food-preparation sinks must not have concealed overflows. Your installer should verify the fixture type, overflow design, cabinet geometry, and connection arrangement before the sink is cut in.
For a faucet replacement where the sink itself remains, compare the mounting hardware and supply connectors before removing the old fixture. The faucet replacement guide can help identify the practical checks that are easy to miss beneath a crowded cabinet.
Permits and Code Requirements in Vancouver
The common assumption is that every sink swap is permit-free. That's only safe when the work remains a same-location fixture replacement and doesn't alter the plumbing system. The City of Vancouver plumbing-permit guidance says a permit is required to install, change, or upgrade any part of a plumbing system. Same-location fixture replacement is generally exempt, as are faucet or valve replacements, leak repairs, and stoppage clearing, but moving the drain or adding a dishwasher connection can change the permit question.

A Burnaby homeowner replacing a sink in the same cabinet may be dealing with a straightforward fixture change. If that homeowner relocates the drain to suit a deeper bowl, adds a new dishwasher branch, or moves the water lines through the wall, the work has crossed into a different category. The right decision comes before cutting the countertop, not after the inspector identifies a problem.
Apply the current code to permitted alterations
The 2024 BC Plumbing Code applies to projects where a building permit application was submitted on or after March 8, 2024. The Province describes the code as governing the design, installation, alteration, and repair of plumbing systems, including water-use requirements. That means an existing home isn't automatically exempt from current requirements when a permitted plumbing alteration is undertaken.
Check the municipality first. Vancouver, Richmond, Burnaby, Surrey, and other jurisdictions may have their own application and inspection processes. Strata owners should also check building rules before shutting down shared services or altering a kitchen wall, cabinet, or drainage route.
Before ordering the sink, confirm four things: the municipality, the permit trigger, the rough-in location, and the inspection-access requirements.
Island sinks need deliberate venting
Island installations deserve special attention because conventional vent routing can be disruptive. British Columbia permits an air admittance valve as a venting method for a fixture in an island counter. A BC Building Code Appeal Board decision on island-counter AAVs explains that an island fixture is one of the listed situations where an AAV may be used, so the installer doesn't also have to prove that conventional venting is impractical.
That doesn't mean any valve in any position is acceptable. The valve, drain, trap, and access arrangement still need to be installed according to the applicable requirements. Poor venting can contribute to slow drainage, trap problems, and unpleasant odours, while an inaccessible valve turns routine maintenance into cabinet demolition.
The BC Plumbing Code also identifies 1 1/2 inches as the relevant drainage and trap size for domestic kitchen sinks, including single and double configurations in the cited table. It assigns a domestic kitchen sink flowing at 8.3 L/min or less a fixture-unit value of 3/8, while a sink flowing above that rate receives 1.5 fixture units in the applicable table. These details matter when a replacement changes the drainage or water-demand arrangement, not as permission to force mismatched fittings into an existing cabinet.
When to Call a Professional Plumber
A same-location replacement with sound shutoffs, matching dimensions, accessible connections, and no plumbing-system change may be manageable for a careful homeowner. The risk rises quickly when the job involves cutting stone, modifying cabinets, relocating a drain, adding a dishwasher branch, changing an island vent, or correcting old work that was already poorly arranged.
Call a licensed plumber when:
- The shutoff valves won't close: Don't loosen supply connectors against a live or partially isolated line.
- The drain must move: A new waste position can trigger permit and code questions.
- The cabinet has water damage: Swollen particleboard may no longer support the sink or hold mounting hardware.
- The trap is inaccessible: A clean-looking installation that can't be serviced will create trouble later.
- The sink is unusually deep or heavy: Confirm clearance, support, waste alignment, and countertop suitability first.
- The installation is in a condo or rental: Coordinate access, building rules, and any required shutdowns.
- Inspection may be required: Get the permit and rough-in questions settled before sealing the fixture in place.
For a Greater Vancouver plumber, look for someone who can explain the proposed drain arrangement, identify the permit trigger, and show how the shutoffs and trap will remain accessible. Ask for a written scope that distinguishes fixture replacement from cabinet, countertop, drainage, and remediation work. Local experience matters because older Vancouver-area homes and multi-unit buildings often hide constraints that aren't visible in a product listing.
Hiring help isn't admitting defeat. It's a sensible choice when water damage, code compliance, or an inaccessible repair point could cost more than the original installation.
Encano Plumbing & Drainage Ltd. handles kitchen sink and fixture installation, drain connections, leak checks, garbage-disposal work, and related plumbing repairs across Vancouver, Richmond, Burnaby, and nearby communities. If your replacement involves a tight condo cabinet, damaged plumbing, a relocated drain, or a permit question, visit Encano Plumbing & Drainage Ltd. to arrange practical help for the installation.