

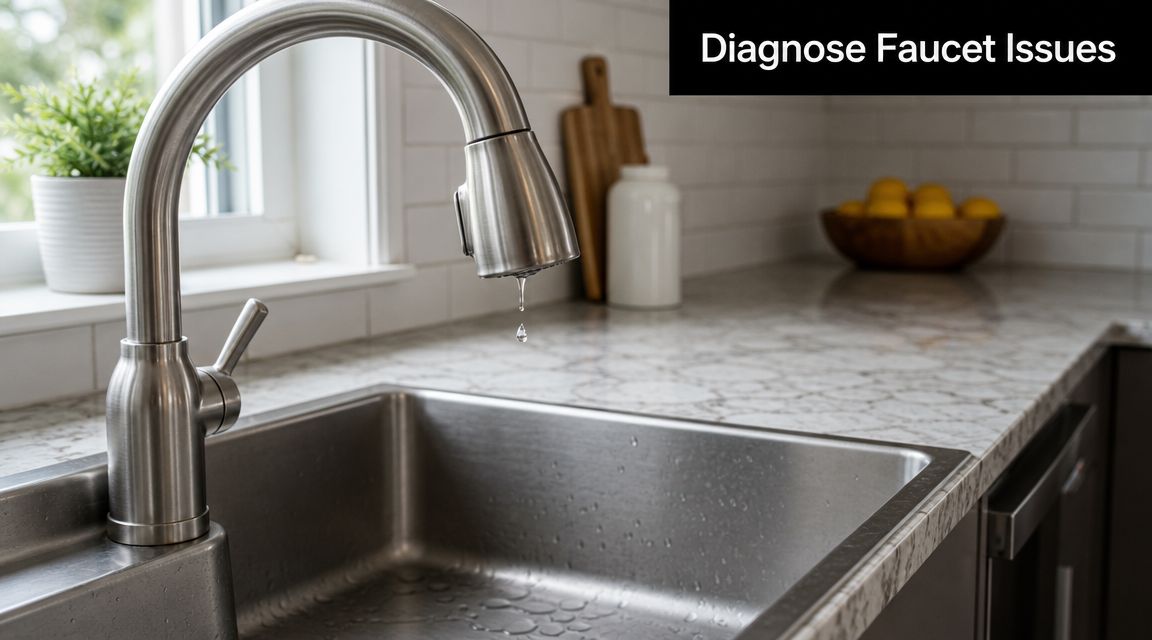
You're usually not thinking about faucet replacement until the sink gives you a reason. It starts with a drip that keeps you awake, a handle that feels loose, or water that comes out in a weak, uneven stream while everything else in the house seems fine. In Vancouver and Richmond homes, that last one causes the most confusion. People assume the faucet is done, buy a new one, install it, and then realise the actual problem was under the sink or farther back in the line.
That's why honest plumbing advice starts with diagnosis, not shopping. A faucet swap can be a clean, worthwhile upgrade, especially when the old fixture is worn, corroded, or awkward to use. But if the issue is a half-open shutoff valve, debris in the supply line, or a bad cartridge, replacing the whole faucet won't fix much.
Table of Contents
- Is It a Drip or a Downfall? Diagnosing Your Faucet Issues
- Choosing the Right Faucet for Your Metro Vancouver Home
- Gathering Your Tools and Prepping the Workspace
- A Plumber's Guide to Removing and Installing Your Faucet
- Common Faucet Installation Problems and Solutions
- DIY vs Calling a Pro: When to Trust Encano Plumbing
Is It a Drip or a Downfall? Diagnosing Your Faucet Issues
A lot of faucet problems look worse than they are. A homeowner hears a steady drip, feels a sticky handle, or notices weak flow and assumes the whole fixture has reached the end. Sometimes that's true. Sometimes the faucet is telling you a smaller part has failed.
What usually points to replacement
Replacement makes sense when the faucet body itself is the problem. That includes visible corrosion around the base, pitting on the spout, repeated leaking from multiple points, or mounting hardware that's so rusted it won't tighten properly anymore. If the finish is failing and the internals have already been repaired once or twice, putting more money into the old unit often stops making sense.
Temperature control matters too. When a single-handle faucet swings from hot to cold unpredictably, the cartridge may be failing. If the faucet is otherwise solid and parts are available, a cartridge replacement is often the smarter first move. If parts are discontinued or the fixture was cheaply made to begin with, replacement is usually cleaner and faster.
A faucet that leaks from the spout may need a repair. A faucet that leaks from the body, mounting area, and connections all at once usually isn't worth saving.
A practical example. If your bathroom faucet drips overnight but the handle still moves smoothly and the base is dry, I'd check the cartridge or seats before I'd tell you to buy a new fixture. If that same faucet also wobbles on the sink, shows green corrosion under the escutcheon, and leaves moisture in the cabinet below, I'd lean toward full faucet replacement.
What often gets misdiagnosed in Metro Vancouver
In this region, low flow gets blamed on the faucet far too quickly. In Metro Vancouver, where water is naturally soft, persistent low flow isn't always from mineral scaling inside the faucet. Before buying a new fixture, it's worth ruling out partially closed shutoff valves, debris in the supply lines from nearby plumbing work, or a failing cartridge, as noted in this Metro Vancouver faucet problem guide.
Run through this short checklist before replacing anything:
- Check both shutoff valves: Make sure the hot and cold stops under the sink are fully open.
- Compare hot versus cold flow: If one side is weak and the other is normal, the faucet may not be the only suspect.
- Remove and inspect the aerator: Debris from line work can collect there fast.
- Look inside the cabinet: Staining, dampness, or cabinet swelling can point to a hidden leak rather than a faucet-only issue.
- Watch the handle behaviour: Grinding, slipping, or sticking often points to internal wear.
If you're finding damp cabinet walls or stains that don't match what you see above the counter, it helps to review the warning signs of hidden plumbing leaks in your home. That keeps you from replacing a faucet when the actual problem is already spreading behind the sink.
Choosing the Right Faucet for Your Metro Vancouver Home
Once you know replacement is the right call, the next mistake is buying by appearance alone. The shape and finish matter, but the internal mechanism and body construction decide how the faucet will feel after months of daily use.
How the internal mechanism changes the experience
The four common faucet types each have their place. Some are easier to live with than others.
| Faucet Type | Common Use | Durability | Repairability |
|---|---|---|---|
| Ball | Older kitchen faucets, some single-handle models | Moderate | Repairable, but more parts can mean more wear points |
| Disc | Modern kitchen and bathroom faucets | High | Usually reliable, parts service varies by brand |
| Cartridge | Many mid-range single-handle and two-handle faucets | High | Often straightforward to repair if parts are available |
| Compression | Older two-handle faucets | Lower in daily use | Usually repairable, but washers and seals wear more often |
Ceramic disc and cartridge faucets are usually the safer bet for homeowners who want smooth operation and fewer call-backs. Compression faucets still work, but they tend to feel dated and need more attention over time. Ball faucets can perform well, but they have more small internal components, so they're not always the first choice when durability is the priority.
Practical rule: If you're choosing between a cheap decorative faucet and a plain, well-built brass-body model, buy the better body every time. The finish gets your attention in the showroom. The internal build decides whether you're still happy next year.
There's also the water-efficiency side. California's plumbing rules require residential bathroom sink faucets to have a maximum flow rate of 1.2 gallons per minute at 60 psi, with kitchen faucet limits also defined under code and appliance-efficiency standards, according to this faucet replacement cost and standards overview. BC code isn't the same document, but the market trend is clearly toward lower-flow, more efficient fixtures. For homeowners, that means a newer faucet isn't just a style update. It can also be a practical water-saving upgrade.
Finishes and build quality that hold up better
Chrome is still the easiest finish to live with. It hides less than brushed finishes, but it cleans easily and doesn't usually create surprises. Matte black looks sharp, especially in renovated kitchens and powder rooms, but it tends to show soap residue and mishandled cleaning faster. Brushed nickel is forgiving in family bathrooms because it masks fingerprints and water spotting better.
The bigger issue is what's under the finish. A lightweight faucet with plastic mounting hardware can feel acceptable on day one and loose by the time you've used it through one busy season. A mid-range faucet with a brass body, solid mounting plate, and serviceable cartridge usually costs more upfront, but it's less likely to twist, seep, or crack during installation.
A simple comparison makes the point. If you're outfitting a rental ensuite that sees regular use, a flashy low-cost model may save money on purchase day, but the handles often loosen and replacement parts can be hard to find. A straightforward, heavier faucet with standard connections is easier to maintain, easier to tighten, and less likely to become a nuisance job later.
Gathering Your Tools and Prepping the Workspace
Most DIY faucet replacement problems start before the old faucet even comes out. The cabinet is packed, the wrong wrench is on hand, and the water isn't fully isolated. Good prep makes this a manageable job.
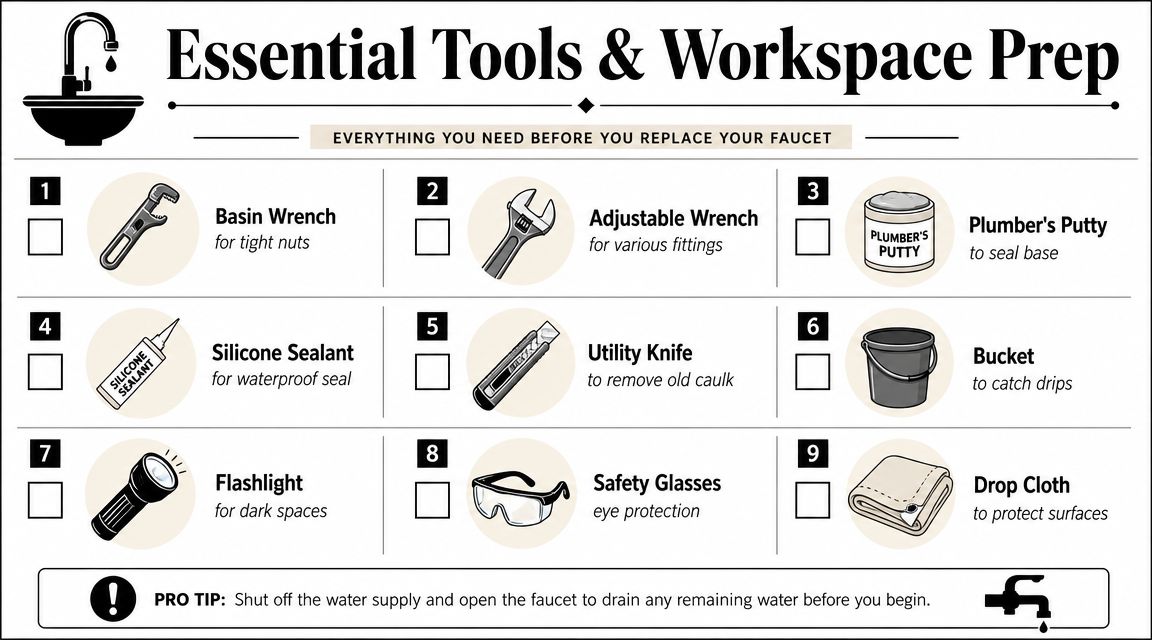
What to lay out before you start
You don't need a van full of gear, but you do need the right basics within arm's reach.
- Basin wrench: Best tool for reaching the mounting nuts tucked behind the sink bowl.
- Adjustable wrench: Useful for supply connections and hold-back work.
- Plumber's putty or sealant: Use what the faucet manufacturer calls for at the base or deck plate.
- Utility knife: Helps cut away old caulk or crusted putty.
- Bucket and old towel: Catch the water that always seems to be left in the lines.
- Headlamp or flashlight: Under-sink work is harder when you can't see the back nut.
- Safety glasses: Worth wearing when you're underneath old fittings and rust flakes start dropping.
A towel in the sink drain is one of those small habits that saves frustration. Drop a mounting nut or clip into an open drain once, and you'll start doing it every time.
Prep work that saves you grief later
Clear out the cabinet completely. Don't work around cleaning bottles and storage bins. You need room for your shoulders, your tools, and a bucket under the valves.
Then turn off both shutoff valves and open the faucet to drain what's left. A vetted installation workflow starts with shutting off hot and cold valves, disconnecting supply lines, installing the faucet body, and reconnecting everything in order, which is the same sequence covered in this kitchen faucet installation guide. If the valves don't shut cleanly, stop there. That's one of the clearest signs this may no longer be a DIY faucet replacement.
If you're already dealing with multiple fixture issues in the same bathroom, it may help to look at related plumbing repairs for shower fixtures and drains before deciding whether to tackle everything in one go or split the work into separate calls.
A Plumber's Guide to Removing and Installing Your Faucet
The cleanest faucet replacement jobs follow a simple rhythm. Disconnect and remove. Clean and prepare. Set the new faucet carefully. Then make the final connections without forcing anything.
A quick visual walk-through helps before you get under the sink.
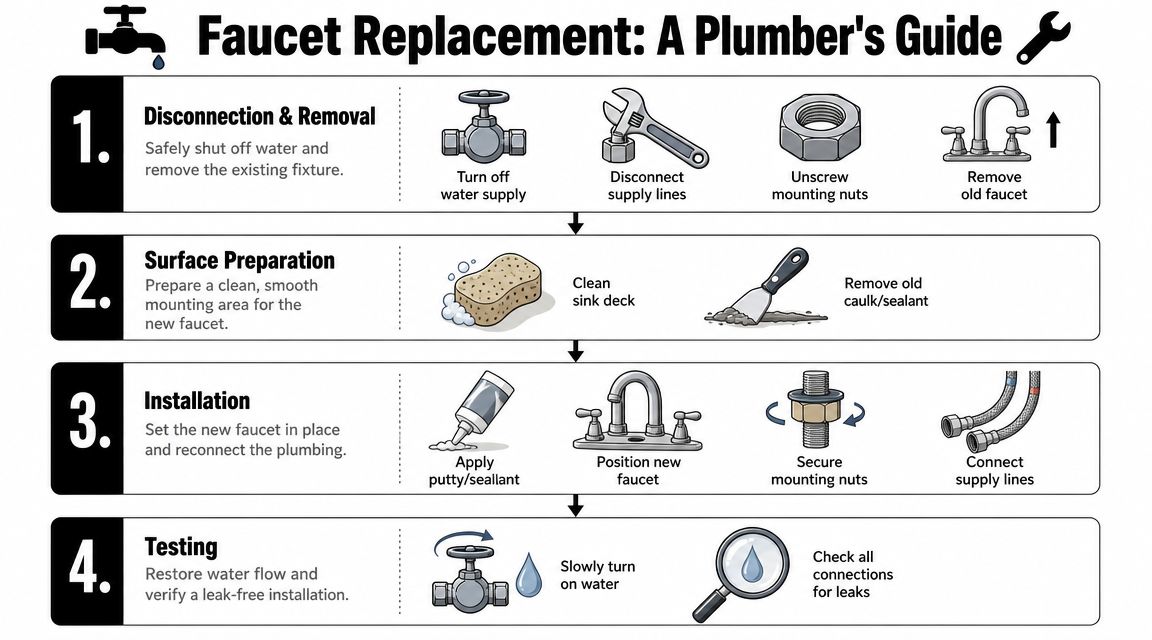
Disconnection and removal
Start with the supply lines. Put the bucket underneath, loosen the hot and cold connections, and let the remaining water drain out. If the supply lines are old, kinked, or corroded, replace them rather than trying to reuse them.
Next come the mounting nuts. This is where a basin wrench earns its keep. Older faucets often have rusted or cramped hardware, and the back nut can be the worst part of the job. Work patiently. If you round off a fitting or snap a brittle mounting piece, the job gets longer fast.
Once the hardware is off, lift the old faucet straight up. If it won't budge, old putty or scale may still be bonding it to the sink deck. A little careful cutting around the base usually frees it.
Surface prep and faucet placement
A new faucet only seals as well as the surface underneath it. Scrape away old putty, old sealant, grime, and corrosion. Wipe the sink deck until it's smooth and dry.
Then dry-fit the new faucet before sealing anything. Check hole spacing, handle travel, backsplash clearance, and whether the supply lines sit naturally without twisting. This matters most on tighter vanity tops where the faucet body can look fine from above but bind against the wall once tightened.
For many models, the manufacturer will specify whether to use plumber's putty or a supplied rubber or foam gasket. Follow the faucet instructions on that point. Don't stack materials just because more seems safer. Too much sealant can create a poor seat rather than a better one.
Before tightening the new faucet fully, make sure it's square to the sink. A faucet that's off by a few degrees will bother you every day, and fixing it later means climbing back under the cabinet again.
For readers who prefer to watch the sequence before doing it, this video gives a useful visual reference:
Final connections and leak testing
The final connection sequence is where many DIY jobs go sideways. Industry guidance warns that most homes use 3/8-inch supply-line fittings, and overtightening those connections can damage the seals and create leaks, as noted earlier in the linked installation guidance.
Hand-tighten the supply line first so the threads seat properly. Then give it only a small final snug with the wrench. If you muscle it down hard, you can deform the seal and create the leak you were trying to prevent.
If you're wrapping threaded valve connections, use Teflon tape in a clockwise direction so it stays in place as the fitting turns. Keep it neat. Tape hanging into the connection doesn't help anything.
Once both lines are connected, open the shutoff valves slowly. Watch the connections while the pressure builds. Don't just test the spout above. Put a dry hand or tissue around each connection under the sink and around the faucet base. Even a small seep matters, because cabinet leaks often go unnoticed until the shelf swells.
If the install goes smoothly and the shutoffs behave, faucet replacement is one of the more contained plumbing projects. Broader cost guides say the work is usually 1 to 2 hours of labour, and bathroom faucet replacement commonly falls in the $170 to $360 range nationally, with many homeowners paying about $270 and labour often accounting for $130 to $350, while more complex work can reach $2,800, according to this replacement cost guide. In Vancouver-area homes, labour can trend higher, but the job is still often worth doing well rather than rushing.
Common Faucet Installation Problems and Solutions
The service call usually goes like this. A homeowner says the new faucet looks great, but something isn't right. Most of the time, the problem comes down to one of three things.
Leak at the supply line
I open the cabinet and the first clue is a bead of water hanging from the nut. That usually means the connection cross-threaded, the seal shifted, or the fitting was overtightened. The fix is to shut the water back off, disconnect the line, inspect the seal, and reconnect it cleanly. If the rubber seal looks chewed up or flattened, replace the line.
Water around the faucet base
This one often shows up after the sink has been used for handwashing a few times. The homeowner assumes the faucet body is cracked, but the usual culprit is poor seating at the deck plate or base gasket. Sometimes the sink surface wasn't cleaned properly. Sometimes the faucet shifted while the mounting nut was tightened.
If water shows up at the base only when the faucet runs, don't blame the supply lines first. Check the seal and the faucet alignment on the sink deck.
A simple reset often solves it. Loosen the mounting hardware, reseat the base, and tighten evenly while keeping the faucet centred.
Weak flow from a brand-new faucet
This catches people off guard. The old faucet had weak flow, so they replace it, and the new one still feels restricted. In many cases, debris moved during the install and lodged in the aerator. Unscrew it, rinse it, and test again. If flow improves with the aerator removed, you've found the issue.
If not, check whether one shutoff valve is still partly closed or whether debris has entered the cartridge or supply line during the swap. A brand-new faucet can still perform poorly if the line feeding it is the problem itself.
DIY vs Calling a Pro: When to Trust Encano Plumbing
DIY faucet replacement makes sense when the shutoff valves work, the mounting hardware comes apart without a fight, and you're installing a straightforward replacement on a standard sink. If you're reasonably handy and patient, it's a fair project.
When DIY still makes sense
A good DIY candidate usually looks like this:
- The faucet is accessible: There's enough room under the sink to work with both hands and tools.
- The valves shut off properly: You can isolate the fixture without guessing.
- The replacement is like-for-like: Same hole pattern, similar size, standard connections.
- There's no sign of hidden damage: No cabinet rot, no mystery moisture, no crumbling fittings.
In those cases, the job is often simpler than people expect. The key is not rushing the diagnosis and not over-tightening the final connections.
When the job stops being simple
Call for backup when the shutoff valves are seized, the supply tubes are badly corroded, the faucet is installed on a thick stone counter with awkward access, or the leak may involve more than the faucet itself. Multi-unit buildings add another layer. A small mistake under one sink can affect the unit below if a fitting lets go.
That matters even more for rentals, strata properties, and commercial spaces. In British Columbia, a faucet swap can involve tenant notices, fixture choices for heavier use, and coordination around water shutdowns. Those are part of the hidden risk side of the job, especially in Metro Vancouver's tight housing market, as discussed in this overview of faucet repair and property considerations.
If you need a licensed plumber for a home, rental turnover, or multi-unit repair in Richmond or nearby communities, Encano Plumbing & Drainage Ltd. is one local option for scheduled work and urgent plumbing issues. That's the right move when the job touches old valves, shared shutoffs, compliance concerns, or anything you don't want to test by trial and error.
If your faucet is dripping, loose, corroded, or simply not worth repairing anymore, Encano Plumbing & Drainage Ltd. can help with faucet replacement, leak diagnosis, and related plumbing repairs across Vancouver, Richmond, Burnaby, New Westminster, Delta, Surrey, and nearby communities. The team handles residential, commercial, and multi-unit work, including urgent calls, so if your “simple faucet swap” starts looking less simple, you can book a proper fix before it turns into cabinet damage or a bigger water problem.