
You're probably standing at the sink with the cabinet open, looking at a shutoff valve, a drain trap, a garbage bin, and a filter box that suddenly seems bigger than it did in the store. That's how most under sink water filter installation projects start. The good news is that many of them are very manageable for a careful homeowner.
The part most guides miss is that a clean installation isn't the same as a good installation. A good one fits, doesn't leak, and still lets you change the cartridge later without emptying half the cabinet or fighting around the trap arm. In Vancouver-area homes and condos, that last part matters more than people expect.
Table of Contents
- Planning Your Under Sink Filter Project
- Gathering Your Tools and Materials
- The Core Installation Process Step by Step
- Avoiding Common Pitfalls and Troubleshooting Leaks
- Filter Maintenance and Long Term Care
- When to Call a Professional Plumber
Planning Your Under Sink Filter Project
Saturday morning is when many under sink filter jobs go sideways. The new box is on the counter, the cabinet is already half emptied, and only then does the homeowner notice the drain trap, disposal body, and shutoff valve leave far less room than expected. In Vancouver kitchens, especially condos and older homes, the planning work decides whether this is a clean one-time install or a cabinet problem you fight at every filter change.
Start with the water problem, then check the cabinet. Both matter. Metro Vancouver's drinking water is generally good, so many homeowners are trying to improve taste, reduce chlorine, or add confidence at one tap, not solve a whole-house water quality failure. That usually points to a simpler point-of-use setup, but the right choice depends on what you want the filter to do.
Choose the filter for the water problem
A compact carbon system is often the better fit for Vancouver homes on municipal water. It improves taste and odour, takes less cabinet space, and is easier to live with long term. For many kitchens, that is the practical answer.
Reverse osmosis deserves a harder look before you buy. It can be the right system for specific water concerns, but it also brings more parts, more tubing, a drain connection, a faucet change, and often a storage tank competing for the same cabinet space as your cleaning supplies and disposal. If you are not sure what you need removed, start with water quality testing guidance from Encano before you choose a system.
I tell homeowners to match the filter to the problem, not to the marketing on the box.
A Vancouver condo owner with chlorinated taste and no other known issues will often be happier with a small carbon unit than with a full RO system. The install is cleaner, the cabinet stays more usable, and future cartridge changes do not turn into a wrestling match under the sink.
Measure for serviceability, not just for fit
This is the part many guides skip, and it is the part that causes callbacks. A unit can fit inside the cabinet and still be a bad installation if you cannot reach the shutoff, remove the cartridge, or route tubing without kinks.
Manufacturer instructions usually call for clearance below and in front of the unit so the filter can be changed without removing half the cabinet contents. Follow the requirements for the exact model you bought, not a generic rule from another system. If the cabinet is tight, hold the filter housing in place and physically simulate the service step before you drill anything. Your hand has to fit there later. So does the replacement cartridge.

Check these points before you install:
- Vertical clearance: Confirm there is enough room to drop the cartridge or sump straight down.
- Front access: Leave working space for both hands, the tubing bends, and any twist-off or clip-release motion.
- Valve access: Do not block the cold-water shutoff behind the filter body or tubing.
- Obstructions: Account for the trap arm, disposal, pull-out garbage bins, cleaning caddies, and cabinet braces.
- Future maintenance: Make sure you can replace the filter without uninstalling the unit.
Older Vancouver cabinets are often a significant challenge. Between offset plumbing, shallow bases, and retrofitted disposals, a filter that looks fine on paper can become awkward fast. Plan for the day you service it, not just the day you mount it. That is what keeps a DIY install from turning into a leak-prone headache six months later.
Gathering Your Tools and Materials
A tidy install starts before the water is shut off. If you stop halfway to look for a cutter or a second wrench, that's when fittings get rushed and cabinets get wet.
Mission prep checklist
Two adjustable wrenches are better than one because one holds the stationary fitting while the other turns the nut. That prevents you from twisting the stop valve or supply tube. A proper tube cutter matters for plastic tubing because push-fit connections seal best when the cut is square and clean.
Keep a shallow bucket and old towels under the work area even after the valve is closed. Residual water stays in the line, and that small spill is enough to soak the cabinet floor if you aren't ready.
| Item | Purpose |
|---|---|
| Adjustable wrench x2 | Hold one fitting while turning the other so pipes and valves don't twist |
| Tube cutter | Makes a clean, square cut for push-to-connect fittings |
| Plumber's tape | Helps seal threaded fittings where the manufacturer calls for it |
| Screwdriver or drill/driver | Mounts the filter bracket securely to the cabinet wall |
| Shallow bucket | Catches residual water when the cold line is opened |
| Old towels or rags | Protects cabinet surfaces and helps spot fresh drips |
| Flashlight or headlamp | Lets you inspect fittings at the back of the cabinet |
| Pencil | Marks bracket holes and tubing routes |
| Tape measure | Confirms mounting position and future service clearance |
| Locking clips | Secures push-fit connections where supplied by the manufacturer |
A few material checks matter just as much as the tools:
- Read the box contents: Make sure the adapter or T-fitting matches the connection style under your sink.
- Inspect the tubing: Don't use kinked tubing straight from the package. Lay it out and plan the route first.
- Confirm flow direction: Many systems mark inlet and outlet on the head or manifold. Find those labels before mounting.
- Keep the instructions nearby: Even experienced installers check manufacturer-specific details when fittings or cartridges vary.
One practical example. If you try to cut tubing with a dull utility knife instead of a proper cutter, the end often goes slightly oval or ragged. That may look acceptable at a glance, but it's exactly the sort of detail that leads to a slow drip later.
The Core Installation Process Step by Step
Saturday morning is usually when this job happens. The sink cabinet is already crowded with a disposal, cleaning supplies, and maybe a pull-out bin. The filter still has to fit, the tubing still has to route cleanly, and you still need enough hand room to change the cartridge six months from now. That service clearance matters as much as the first install, especially in Vancouver homes where under-sink cabinets are often tighter than they look.
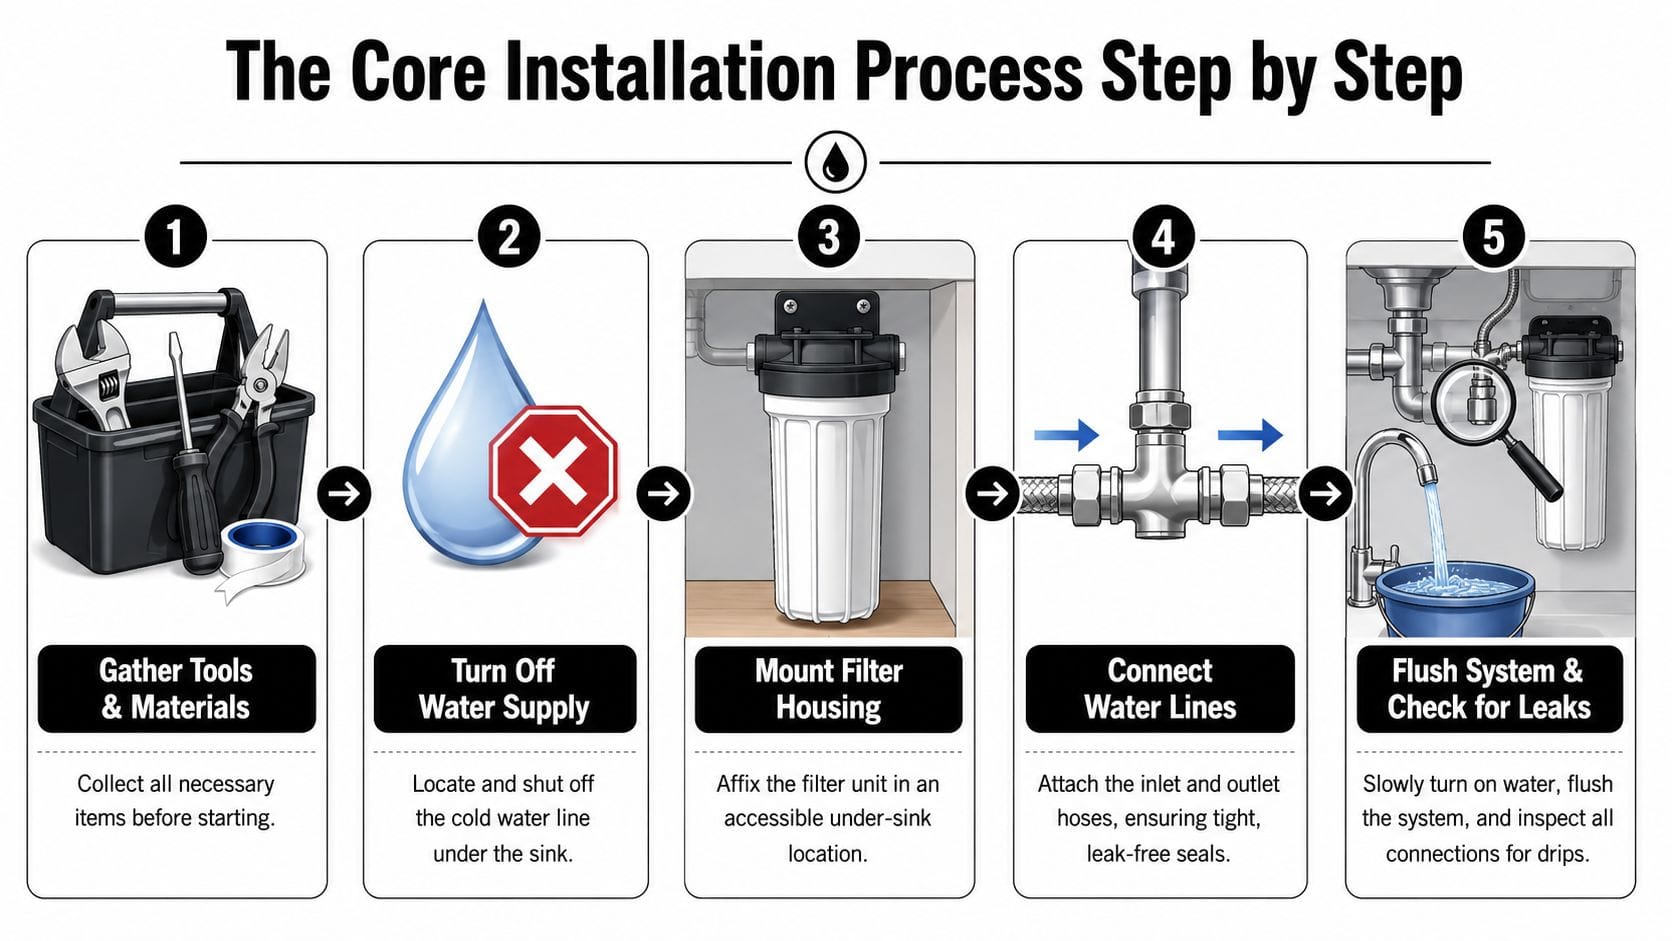
Shut down and de-pressurise properly
Close the cold-water stop valve under the sink, then open the kitchen faucet to drain off pressure. Let it sputter until the flow stops or slows to a drip. Set a bucket under the connection you plan to open, and keep a towel behind the valve if the cabinet back is finished wood or particleboard.
Go slowly here.
If the stop valve is stiff, badly corroded, or looks like it has not been touched in years, do not muscle it. I treat that as a warning sign. A cracked handle or a valve stem that starts leaking can turn a simple filter project into an urgent plumbing repair.
Install the feed adapter and choose the mounting spot
Most systems tie into the cold line at the shutoff valve with a supplied adapter or T-fitting. Disconnect the faucet supply line where the manufacturer specifies, support the valve body with one wrench, and turn the nut with the other. That keeps twisting force off the pipe coming out of the wall.
Before you screw the bracket to the cabinet, hold the filter in place and simulate the next cartridge change. Can the housing drop out? Can the cartridge swing free? Will the tubing rub against the disposal, drain, or sharp screw tips? If the answer is no, the location is wrong even if the unit technically fits.
Three placement checks prevent a lot of regret later:
- Leave valve access clear: You should still be able to reach the shutoff without removing the filter.
- Protect service space: Give yourself room below or in front of the unit for cartridge removal.
- Route tubing with wide bends: Tight loops and hidden kinks are common in cramped cabinets.
If you are still comparing layouts, this guide to under-sink water filter systems and installations shows the kinds of cabinet arrangements that work well in real homes.
A filter that fits on install day but blocks future service is not a good install.
Make the tubing connections carefully
This is where careful work pays off. Most call-backs on these systems come from one of three things. A tube was cut out of square, it was not pushed in all the way, or the installer rushed a hard-to-reach connection at the back of the cabinet.
For push-fit fittings, cut the tube cleanly and square, check that the outside surface is smooth, and push it in until it bottoms out. Then do a light pull test. If it grabs, that connection is usually seated correctly. If the manufacturer includes locking clips, install them.
For threaded fittings, tighten them the way the instructions call for. More force does not mean a better seal. On plastic threads, too much force can deform the fitting. On compression-style connections, over-tightening can damage the ferrule or distort the seat.
A common real-world problem is the short piece of tubing behind the garbage disposal. It looks connected, but your hand angle is poor and the tube stops just shy of full depth. The system may stay dry for a minute, then start weeping once pressure holds. That is why I like to trace each tube by hand, from inlet to outlet, before turning the water back on.
Flush and test under real flow
Open the stop valve slowly. Watch the adapter, supply connection, filter head, and every tubing joint as pressure comes back. If one fitting is going to show a problem, it often does it in the first minute.
After the system is pressurised, flush the filter exactly as the manufacturer directs. New cartridges often release carbon fines at startup, which can make the water look cloudy for a short time. Run both the filtered line and the regular cold tap if your setup affects both.
Use a simple check routine:
- Pressurise slowly: Look and feel for moisture right away.
- Run the filtered water: Keep it flowing long enough to expose slow drips.
- Dry every joint: A dry paper towel or clean finger finds leaks better than a quick glance.
- Check again later: Come back after the cabinet has sat under pressure and inspect every connection once more.
If the cabinet stays dry through that full cycle, the installation is in good shape. If anything feels forced, unclear, or beyond your comfort level, stop and get a plumber involved before a small drip turns into cabinet damage.
Avoiding Common Pitfalls and Troubleshooting Leaks
A filter can look perfectly installed and still give you trouble in the first hour. Under a Vancouver sink, the problem is often not the filter body itself. It is the cabinet layout, the old shutoff hardware, or a line that had to bend tighter than it should.
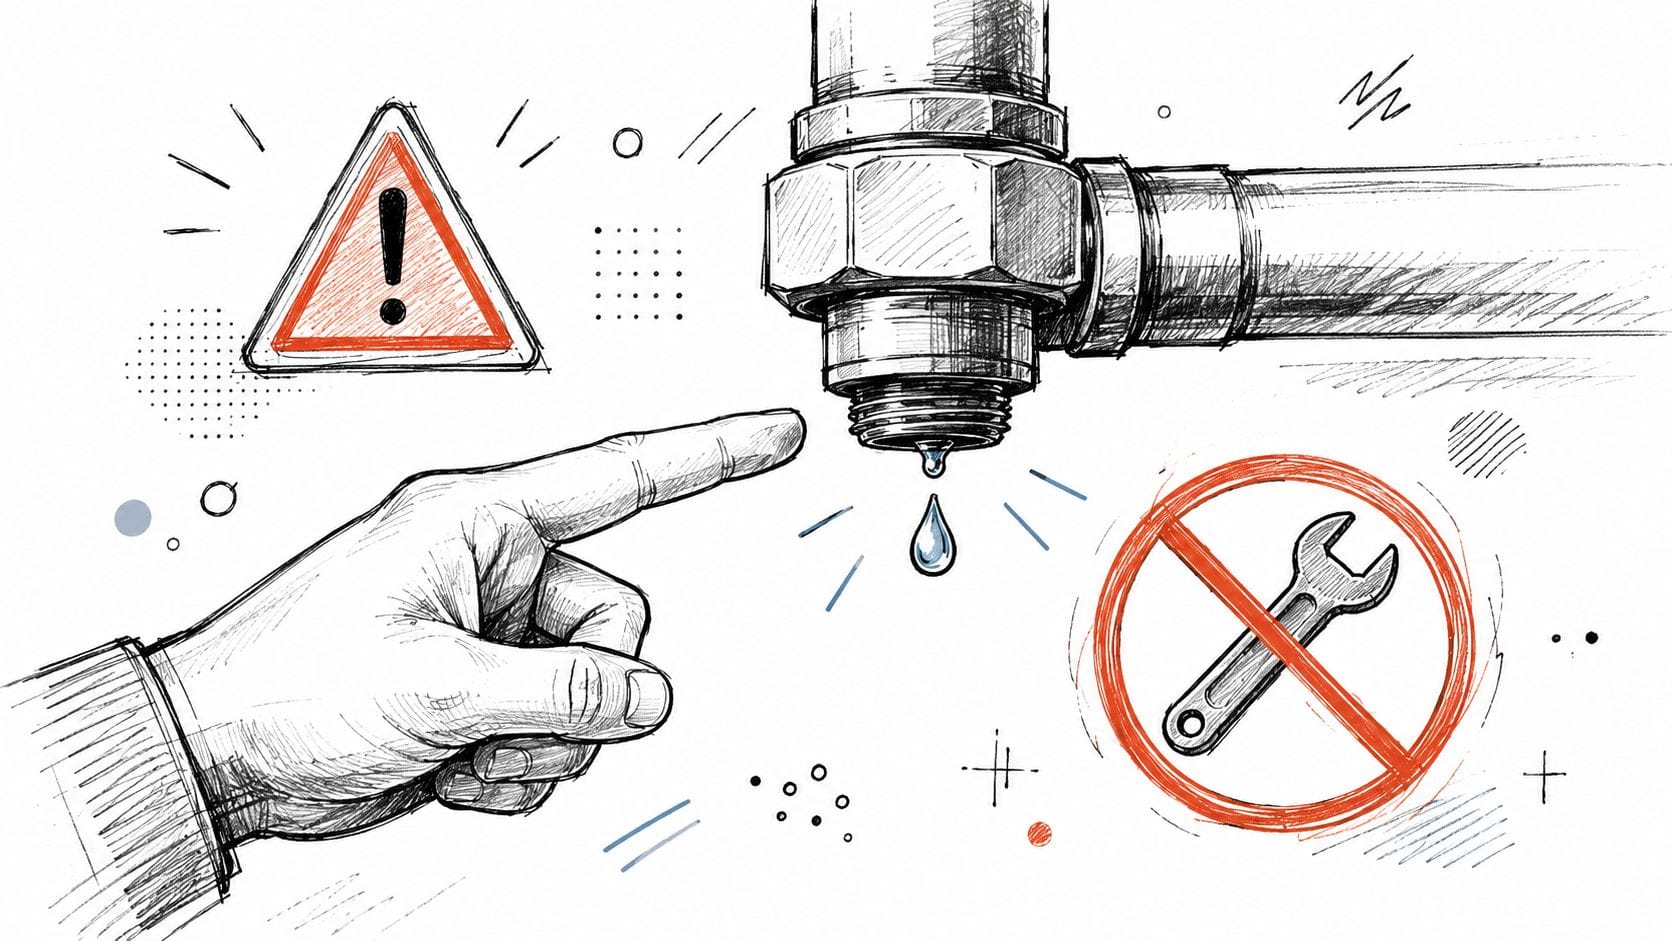
You finished and found a tiny drip
One bead of water under a fitting usually points to an assembly issue, not a defective filter.
Identify the connection before touching anything. If it is a push-fit joint, shut the water off, relieve pressure, remove the tube if the fitting design allows it, and inspect the end closely. A tube that is cut slightly out of square, scratched, or not pushed in to full depth will often seep. Cut it cleanly and reinsert it straight.
Threaded joints need a different approach. Take them apart and confirm the sealing method matches the manufacturer's instructions. Some connections seal on a washer or cone seat, not on the threads themselves, so extra tape and extra force do not help.
Trace the water path with your hand and a dry paper towel. The drip point is not always the source point.
Isolate one suspect connection at a time. Tightening everything in reach is how small leaks turn into cracked housings, distorted washers, and a longer repair.
For broader warning signs after any under-sink work, review this guide on how to spot hidden plumbing leaks in your home.
The water flow is weak or missing
Restricted flow usually comes from a partially closed valve, a kinked tube, a blocked cartridge, or reversed inlet and outlet connections.
Cabinet fit matters here more than many guides admit. I see compact filters installed in tight condo kitchens where the unit technically fits, but only if the tubing is forced behind a disposal, pull-out bin, or trap arm. The faucet works at first, then flow drops because one line is pinched every time the cabinet contents shift. A wider tubing sweep and a different mounting location often fix it.
Check the simple causes in order. Make sure the stop valve is fully open. Confirm the tubing is not flattened where it passes the cabinet wall or filter bracket. Verify the inlet and outlet ports are not swapped. If the unit uses a new cartridge with a protective cap or seal, confirm that it was removed before startup.
Air can also cause sputtering and weak flow right after installation. That often clears during the initial flush. If it does not, go back through the plumbing path one connection at a time and compare it to the manufacturer's layout.
[EMBED YOUTUBE VIDEO: https://www.youtube.com/embed/qLzlwEipeBw]
The shutoff valve becomes the primary problem
Older homes around Vancouver add another layer to this job. A homeowner plans for the filter, but the existing stop valve has been sitting untouched for years. The moment it gets turned, it starts dripping at the stem, refuses to close fully, or feels like it may twist apart.
That catches people off guard because the filter install may be straightforward while the original plumbing is not. In practice, this is one of the main reasons to inspect the cabinet carefully before buying the unit. There needs to be room not only for the filter, but also for your hands, the tubing bends, and future service. If the valve is buried behind the body of the filter after installation, even a minor leak becomes harder to control.
If the stop valve seeps at the packing nut, a careful snugging may stop it. If it is badly corroded, will not shut off, or starts leaking from the body, stop there and call a plumber. That is the point where a confident DIY install turns into valve replacement, and forcing it can leave you without a reliable shutoff under the sink.
Filter Maintenance and Long Term Care
A filter that was easy to install can still become annoying to own if maintenance wasn't considered. For this reason, good planning pays off. If the unit is mounted with proper access, routine care is quick and clean.
A simple ownership routine
Most homeowners do well with a simple habit-based schedule:
- After installation: Write the install date on the cartridge or inside the cabinet door.
- At regular intervals: Check the cabinet floor and fittings by hand for any sign of moisture.
- At cartridge change time: Empty the area around the filter before you start, even if it was designed as a tool-free replacement.
- After every filter swap: Flush the new cartridge as the manufacturer instructs and repeat a leak check.
A practical example. If your filter is mounted beside the trap with enough hand space, a cartridge change is a short task. If it's wedged behind cleaning supplies and a disposal elbow, that same job gets delayed because no one wants to deal with it. Delayed maintenance is how water quality complaints start.
Signs it needs attention
You usually don't need fancy diagnostics to know something has changed. Watch for:
- Reduced flow at the filtered tap: This often means the cartridge is loading up or a line is restricted.
- Taste or odour returning: If the original problem comes back, the media may be spent.
- Noise or sputtering that doesn't clear: Check for trapped air, line routing problems, or a connection issue after a recent service.
- Visible strain during servicing: If every cartridge change feels like cabinet disassembly, the placement was wrong and may need to be revised.
The best maintenance plan is the one you'll actually follow. Easy access beats good intentions every time.
If you manage a rental, strata unit, or family home with more than one person using the sink, leave a simple note inside the cabinet showing shutoff location, filter direction, and cartridge type. That small step saves confusion later.
When to Call a Professional Plumber
A lot of homeowners can handle a straightforward filter install. If the shutoff valve works, the cabinet has room, and the connection kit matches the plumbing, it can be a satisfying project.
The moment the job moves beyond straightforward, the smart choice changes. Plumbing work under a sink sits directly over cabinet materials, flooring edges, and in many condos, shared building risk. A minor mistake can stay hidden until the cabinet base swells or the neighbour below notices staining.
Red flags that change the job
Call a professional if any of these show up:
- The stop valve is seized, corroded, or leaking
- The plumbing is non-standard or heavily modified
- You need to drill stone, porcelain, or another fragile finished surface for a dedicated faucet
- The cabinet is so tight that proper service clearance isn't possible without reworking the layout
- You live in a strata building with rules around plumbing alterations or liability

A practical example. Replacing a compact inline unit under a detached-home sink is one thing. Installing an RO system in a condo cabinet with a disposal, metal trap, and limited access is another. That second job often involves layout decisions, drain work, and space management that need a trained eye.
Why risk management matters
Professional installation isn't just about speed. It's about recognising when the existing plumbing itself is the issue, protecting finished surfaces, and making sure the filter remains maintainable after the first week.
That matters even more in multi-unit buildings. A leak from a loose fitting is frustrating in a house. In a strata property, it can become a building issue.
If you've started the job and lost confidence, that's not failure. That's good judgement.
If you want a clean, leak-free under sink water filter installation in Vancouver, Richmond, Burnaby, or nearby communities, Encano Plumbing & Drainage Ltd. can help. Their team handles under-sink filters, water quality upgrades, tricky shutoff valves, and tight cabinet layouts with the kind of planning that prevents callbacks later.