
You notice it on a wet Vancouver morning. The basement floor drain starts to gurgle when the washing machine empties. Or there's a soft patch in the lawn you can't explain, even though it hasn't rained enough to justify it. In a lot of Greater Vancouver homes, that's the moment drain trouble stops being an annoyance and starts becoming a property problem.
Repairing drain pipes isn't one job. It can mean tightening a loose P-trap under a bathroom sink, replacing a cracked exposed ABS section in a basement ceiling, or deciding whether a buried line under a patio should be spot repaired, relined, or replaced. The right move depends on where the problem is, what the pipe is made of, and how much damage is already there.
Local conditions matter more than most homeowners realise. Vancouver Specials with basement suites, older character homes, strata buildings with shared stacks, and properties with mature landscaping all create different repair limits. A simple clog in one fixture is one thing. A recurring backup in lower fixtures across the home is something else entirely.
There's also a bigger context behind local drain issues. Metro Vancouver's regional wastewater system includes over 1,300 km of sewer pipes, and major long-term capital plans show a regional push to rehabilitate aging infrastructure, which is one reason a homeowner's drain issue can sit inside a much larger interconnected system (regional wastewater system and Clean Water Plan context).
Table of Contents
- Your Guide to Drain Pipe Repair in Greater Vancouver
- First Signs of Trouble Diagnosing Your Drain Pipes
- DIY Drain Pipe Repairs You Can Actually Tackle
- Permanent Solutions Trenchless Repair and Replacement
- When to Call a Professional Plumber in Vancouver
- After the Fix Proactive Drain Maintenance Tips
Your Guide to Drain Pipe Repair in Greater Vancouver
A drain problem in Burnaby, Richmond, or East Vancouver rarely announces itself clearly. The first clue is often indirect. Water drains a little slower. A toilet bubbles when the tub empties. A basement suite tenant mentions an odour near the laundry area. By the time you see water where it shouldn't be, the issue has usually been building for a while.
That's why the first job isn't grabbing a snake or pouring cleaner down a drain. The first job is sorting the problem into the right category. Is this a local fixture issue, an exposed branch drain problem, a vertical stack issue in a strata building, or a buried line failure outside the home?
What makes Vancouver-area drain repairs different
Greater Vancouver properties bring a few recurring complications:
- Older buried lines: Older homes often have drainage routed beneath driveways, lawns, basement slabs, or later additions.
- Finished lower levels: Basement suites make access harder because opening ceilings or walls disrupts occupied space.
- Tight lots and mature landscaping: A repair under a patio in North Vancouver or near established hedges in Richmond needs a different approach than an open lawn excavation.
- Shared drainage in multi-unit buildings: One complaint may be a unit issue. Several complaints in the same stack usually point to something larger.
A homeowner can handle some small repairs safely. A strata council or property manager can often catch patterns early if they listen to reports from occupants instead of treating every backup as an isolated clog.
Practical rule: If one fixture is acting up, start local. If several lower fixtures are involved, think system, not sink.
What a sensible repair process looks like
Good drain work usually follows this order:
- Confirm the symptom: Which fixtures are affected, and when?
- Find the access point: Under-sink trap, cleanout, ceiling opening, crawlspace, or exterior line.
- Match the repair to the location: Tightening a slip joint is not the same job as dealing with a broken pipe under a slab.
- Choose the least disruptive lasting fix: Sometimes that's a simple replacement. Sometimes it's trenchless. Sometimes excavation is unavoidable.
A practical example. A Vancouver Special with a basement suite has a laundry standpipe that overflows only when the upstairs kitchen sink and dishwasher are used heavily. That pattern points away from the laundry itself and toward a shared drain line restriction downstream. In that situation, replacing the standpipe or trap won't solve the underlying issue.
First Signs of Trouble Diagnosing Your Drain Pipes
Most homeowners wait too long because they treat drain symptoms one by one. They clear a tub, then ignore a toilet gurgle, then blame a smell on the weather. Diagnosis gets easier when you group symptoms by what you see, hear, and smell.
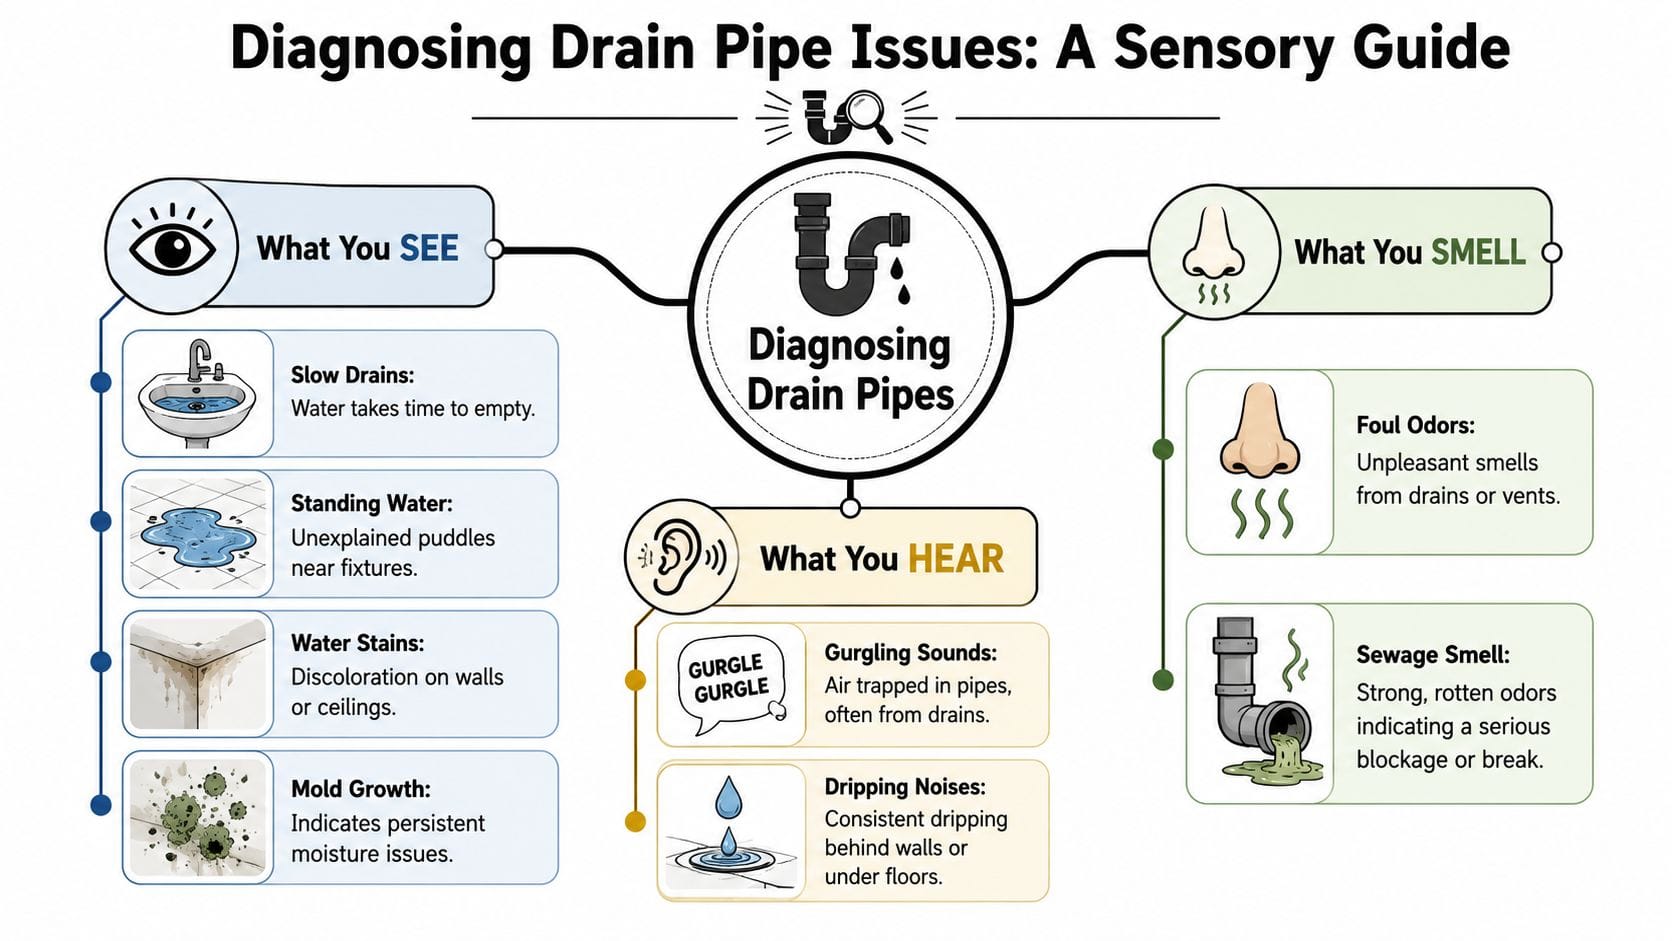
What you see first
Visual signs usually show up before homeowners connect them to a drain line.
- Slow drains in more than one fixture: One slow sink is often local. Several slow fixtures on the same level usually mean a larger restriction.
- Standing water near a floor drain or fixture: That suggests drainage can't move away fast enough.
- Water stains on walls or ceilings: In houses with bathrooms stacked one above another, a leak in a drain line can show up well below the actual problem.
- Persistent damp ground or an unusually green strip outside: That can point to a buried drain or sewer issue.
In older Vancouver homes, I'd also pay attention to finished basement ceilings. Staining around a boxed-in drain run often means a slow leak has been there longer than anyone thinks.
What the pipes are telling you
Noise matters. Healthy drains are boring.
Gurgling usually means air is being pulled through water seals because flow is restricted or venting isn't right. Dripping behind a wall or under a floor means you may already be past the clog stage and into active leakage.
If the toilet gurgles when a sink, shower, or washing machine drains, don't treat that like a toilet-only issue. It often means the system is struggling to move air and wastewater together.
A camera inspection is often the fastest way to stop guessing, especially when symptoms don't match one obvious fixture. A proper drain camera inspection service helps confirm whether you're dealing with buildup, a cracked section, root intrusion, poor slope, or a damaged joint.
A drain that acts up in isolation is inconvenient. A drain system that talks across fixtures is warning you about the line.
A practical example from a multi-unit building
A West Side strata manager once had what looked like unrelated complaints. One unit had a foul smell under the kitchen sink. Another had slow drainage in a bathtub. A lower unit reported occasional gurgling in the toilet after evening peak use.
Taken separately, each tenant might have called it minor. Taken together, the pattern pointed to a shared stack or branch issue. The right next step wasn't sending someone with a bottle of cleaner to each suite. It was correlating the reports, checking which units lined up vertically, and arranging a camera inspection of the common section.
That's a useful lesson for any property owner. Drain diagnosis gets sharper when you stop asking, “Which fixture is annoying me?” and start asking, “What do these symptoms have in common?”
DIY Drain Pipe Repairs You Can Actually Tackle
Some drain repairs are absolutely reasonable for a careful homeowner. The trick is picking jobs where the risk is low, the pipe is visible, and a mistake won't flood a wall, slab, or suite below.
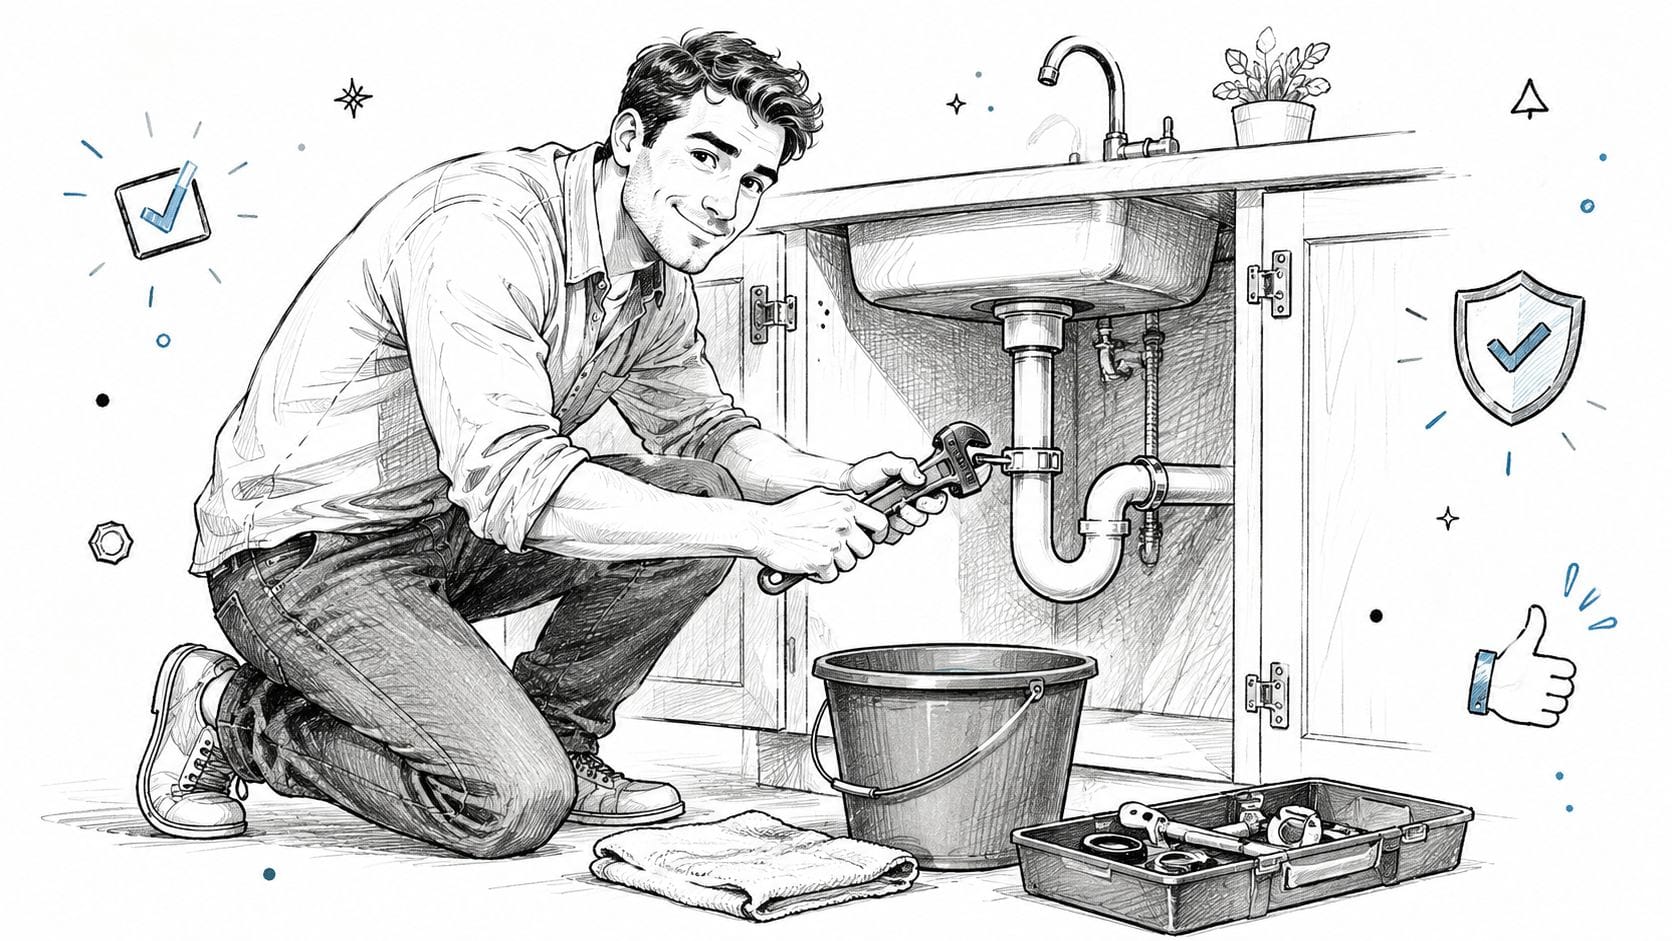
Safe jobs for a careful homeowner
These are the DIY drain jobs that usually make sense:
- Replacing a leaky P-trap under a sink: Common, visible, and low-risk if you test properly.
- Swapping an exposed cracked ABS section: Practical in an unfinished basement or accessible utility room if the damaged section is short and easy to isolate.
- Using a repair clamp or epoxy putty as a temporary measure: Useful to slow a small leak until a proper repair can be done.
Basic tools and materials are easy to find at local hardware stores:
- For trap work: Channel-lock pliers, a small bucket, slip-joint pliers, replacement trap kit, new washers, and rags.
- For ABS repair: Tape measure, ABS pipe, fittings, saw, deburring tool or utility knife, ABS cement, and gloves.
- For temporary patching: Epoxy putty or a pipe repair clamp, plus sandpaper and a dry cloth.
If your issue is a clog at the fixture and not a broken pipe, start with a simple mechanical approach. This guide on how to fix a clogged sink covers the safer first steps before you start taking fittings apart.
A practical example replacing a bathroom P-trap
A bathroom sink in a Vancouver condo drips only when the basin drains. The cabinet base is damp, but the supply lines are dry. That usually points to the trap or one of its slip-joint connections.
Here's the right sequence:
- Put a bucket under the trap. There will always be water in it.
- Loosen the slip nuts by hand first. Use pliers only if needed.
- Remove the old trap and inspect the washers. Many leaks come from warped or misaligned washers, not the pipe itself.
- Dry fit the new trap. Make sure the trap arm lines up without being forced sideways.
- Install the washers in the correct direction. Many DIY repairs go wrong at this step.
- Tighten snugly, not aggressively. Plastic nuts crack or distort if over-tightened.
- Run water slowly, then fully. Watch every joint with a dry tissue or paper towel.
The most common mistake is forcing misaligned parts together. If the tailpiece and trap arm don't naturally meet, don't wrench them into place. Reconfigure the sections so the assembly sits square.
Here's a useful visual if you want to see under-sink drain work in action:
Where DIY should stop
DIY work stops being smart when any of these are true:
- The pipe is hidden: Behind finished walls, under slabs, or inside ceilings with active occupancy below.
- The problem affects multiple fixtures: That usually means the issue is beyond the trap or branch you can see.
- There's sewage or black water involved: That's not a trial-and-error repair.
- The pipe is part of a shared building system: In strata properties, a bad repair can affect several units.
- You're guessing on slope or alignment: Drain pipes need proper fall. “Close enough” creates repeat problems.
Homeowner check: If you can't explain exactly where the leak starts, you're not ready to repair it yet.
A temporary patch has value, but only if you treat it like a temporary patch. Epoxy on a cracked exposed drain can buy you time. It won't fix a buried line, a separated joint, or a pipe that has failed in more than one spot.
Permanent Solutions Trenchless Repair and Replacement
When a drain line is buried under a slab, patio, driveway, or mature landscaping, the main question isn't just how to fix it. The real question is how to fix it without creating a second expensive problem above ground.
That's where trenchless methods earn their place. They're not magic, and they're not right for every pipe, but they can solve the right problem with far less disruption than open excavation.
How trenchless repair actually works
The standard trenchless workflow is straightforward. The process starts with a camera inspection, then cleaning with mechanical tools or hydro-jetting, followed by installation of a resin-saturated liner or sleeve, inflation to press it against the host pipe, curing to form a new pipe inside the old one, and a final CCTV verification (standard trenchless sleeving workflow).
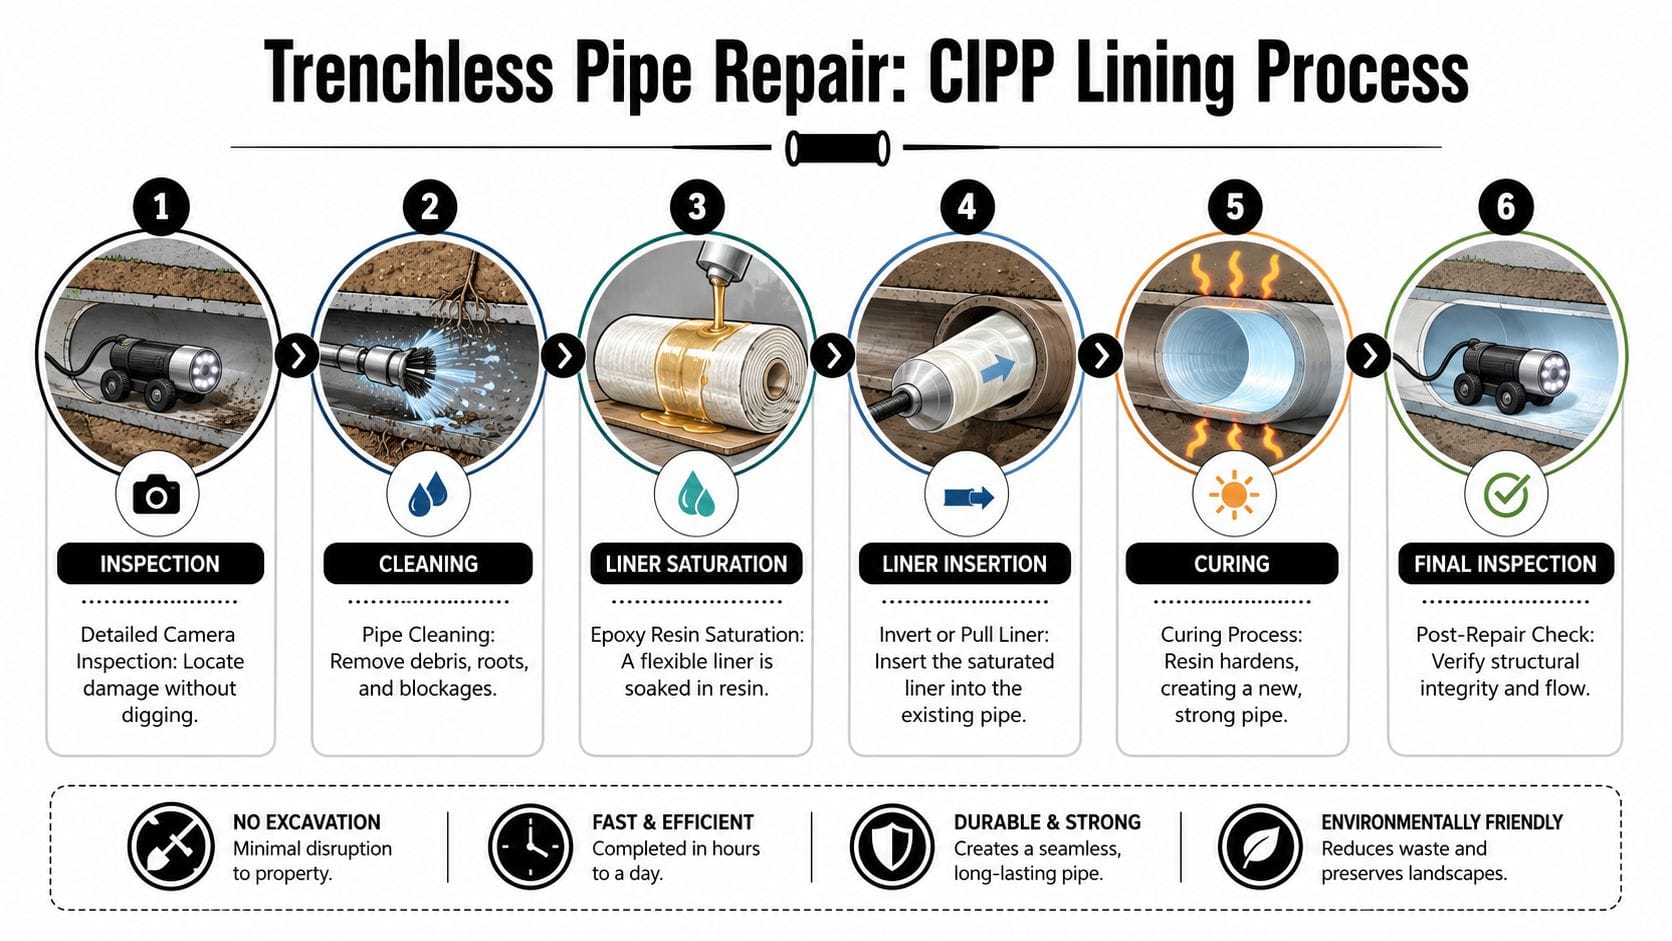
In plain terms, the damaged pipe is cleaned well enough for the new liner to bond properly. The liner is inserted into the existing pipe, pressed into shape, cured, and then checked again with a camera so no one is guessing about the result.
A lot of homeowners are surprised by the timeline. CIPP or similar relining systems can often be completed in roughly a day end-to-end, and the resin cure itself may finish within several hours to about 2 hours in accelerated hot-water curing setups (step-by-step CIPP timing and curing notes).
Spot repair or full-line relining
This is the decision that matters most under a slab or patio.
A spot repair makes sense when damage is clearly isolated and the remaining pipe is still structurally sound. A full-line reline makes more sense when the pipe is older, has more than one trouble area, or sits in a location where repeated access would be painful.
Use this logic:
- Choose spot repair when the camera shows one failed joint, one crack, or one local defect with good pipe around it.
- Lean toward full-line relining when the pipe has recurring backups, multiple defect points, internal wear, or runs under surfaces you don't want disturbed twice.
- Skip both and consider replacement when the line is too collapsed, too misshapen, or too far gone to accept a liner properly.
A practical example. A North Vancouver homeowner has a leaking drain under a finished patio. If the camera shows one clean break near a joint and the rest of the line looks stable, a localised repair may hold. If the line shows several weak sections in old material, patching one spot usually just moves the emergency to the next weak point.
For trenchless sewer work, one local option property owners look at is trenchless sewer line repair information from Encano, especially when excavation would affect landscaping or hardscape.
What usually causes trenchless repairs to fail
Trenchless work has limits, and the failure points are predictable.
- Poor pre-cleaning: If roots, scale, or debris are left behind, the liner won't sit or bond properly.
- Bad liner sizing or positioning: A liner that doesn't match the pipe can wrinkle, bridge defects poorly, or leave weak points.
- No final camera check: If nobody verifies the result, defects can be missed before the line goes back into service.
That last step matters more than homeowners think. A repaired drain should be confirmed, not assumed.
When to Call a Professional Plumber in Vancouver
Some drain issues are manageable. Others get expensive because people spend too long trying the wrong fix. The fastest way to save money is often deciding early that a problem is beyond DIY.
In Vancouver, that threshold comes sooner than many owners expect. The City of Vancouver alone manages about 1,000 km of sewer and combined-sewer pipes, which is one reason drain repairs can intersect with aging infrastructure, access limits, and system compatibility concerns rather than staying isolated to one fixture (City of Vancouver sewer network context).
DIY vs professional drain repair decision guide
| Symptom | Potential Problem | DIY Approach | When to Call a Pro Immediately |
|---|---|---|---|
| Single slow bathroom sink | Local hair or soap buildup | Clean stopper, clear trap, hand auger if accessible | If the pipe leaks, fittings are damaged, or blockage returns quickly |
| Drip under kitchen or bathroom sink | Loose slip joint or worn washer | Tighten carefully, replace trap or washers | If cabinet damage is present or the leak source isn't visible |
| One exposed cracked ABS section in unfinished area | Localised pipe damage | Replace accessible section if alignment is simple | If multiple sections are brittle, poorly supported, or tied into hidden runs |
| Multiple ground-floor drains backing up | Main line obstruction | Limit water use only | Call immediately |
| Sewer smell indoors or near yard | Dry trap, vent issue, cracked drain, or buried line problem | Refill infrequently used traps only if that's clearly the cause | If odour persists or appears with slow drains and gurgling |
| Water staining on lower ceiling from upstairs drain use | Drain leak in concealed piping | None beyond stopping use | Call immediately |
| Repeated backups after DIY clearing | Deeper blockage or pipe defect | Stop repeating chemical or mechanical attempts | Call immediately |
Red flags that need a pro now
Call a professional without delay if you see any of these:
- Sewage backup: Stop using water fixtures and contain the area.
- Multiple fixtures affected at once: That points to shared drainage, not a single trap.
- Leaks inside walls, ceilings, or slabs: Hidden drainage leaks can spread damage fast.
- Recurring symptoms after your fix: Repetition means the first diagnosis was incomplete.
- Foundation-adjacent moisture or outdoor sink areas: Buried drainage failures need proper locating and inspection.
If you're in a strata or mixed-use building, don't wait for multiple complaints to pile up. Shared systems punish delay.
If the problem can affect another suite, another tenant, or the building structure, it isn't a DIY decision anymore.
Permits access and shared systems
Significant pipe replacement may involve permits and inspections, especially when work extends into buried building drainage or exterior sections near municipal connections. That matters in places like Surrey, Delta, and Vancouver where ownership, access, and inspection requirements aren't always obvious to the property owner.
In practical terms, a professional helps with three things a homeowner usually can't do alone:
- Accurate diagnosis with equipment
- Safe access planning
- Code and permit compliance where the repair requires it
That becomes even more important in older homes, lane-access properties, and multi-unit buildings where the wrong cut, wrong fitting, or wrong assumption can affect more than one drain line.
After the Fix Proactive Drain Maintenance Tips
A successful repair doesn't give a drain system a free pass. A lot of repeat calls happen because the pipe was fixed, but the habits that caused or worsened the problem never changed.
Post-repair habits are critical for preventing repeat failures. Guidance on trenchless repair aftercare stresses avoiding grease, wipes, and food scraps, while scheduling regular cleanings for high-use systems such as busy homes, strata buildings, and commercial kitchens (post-repair drain care guidance).
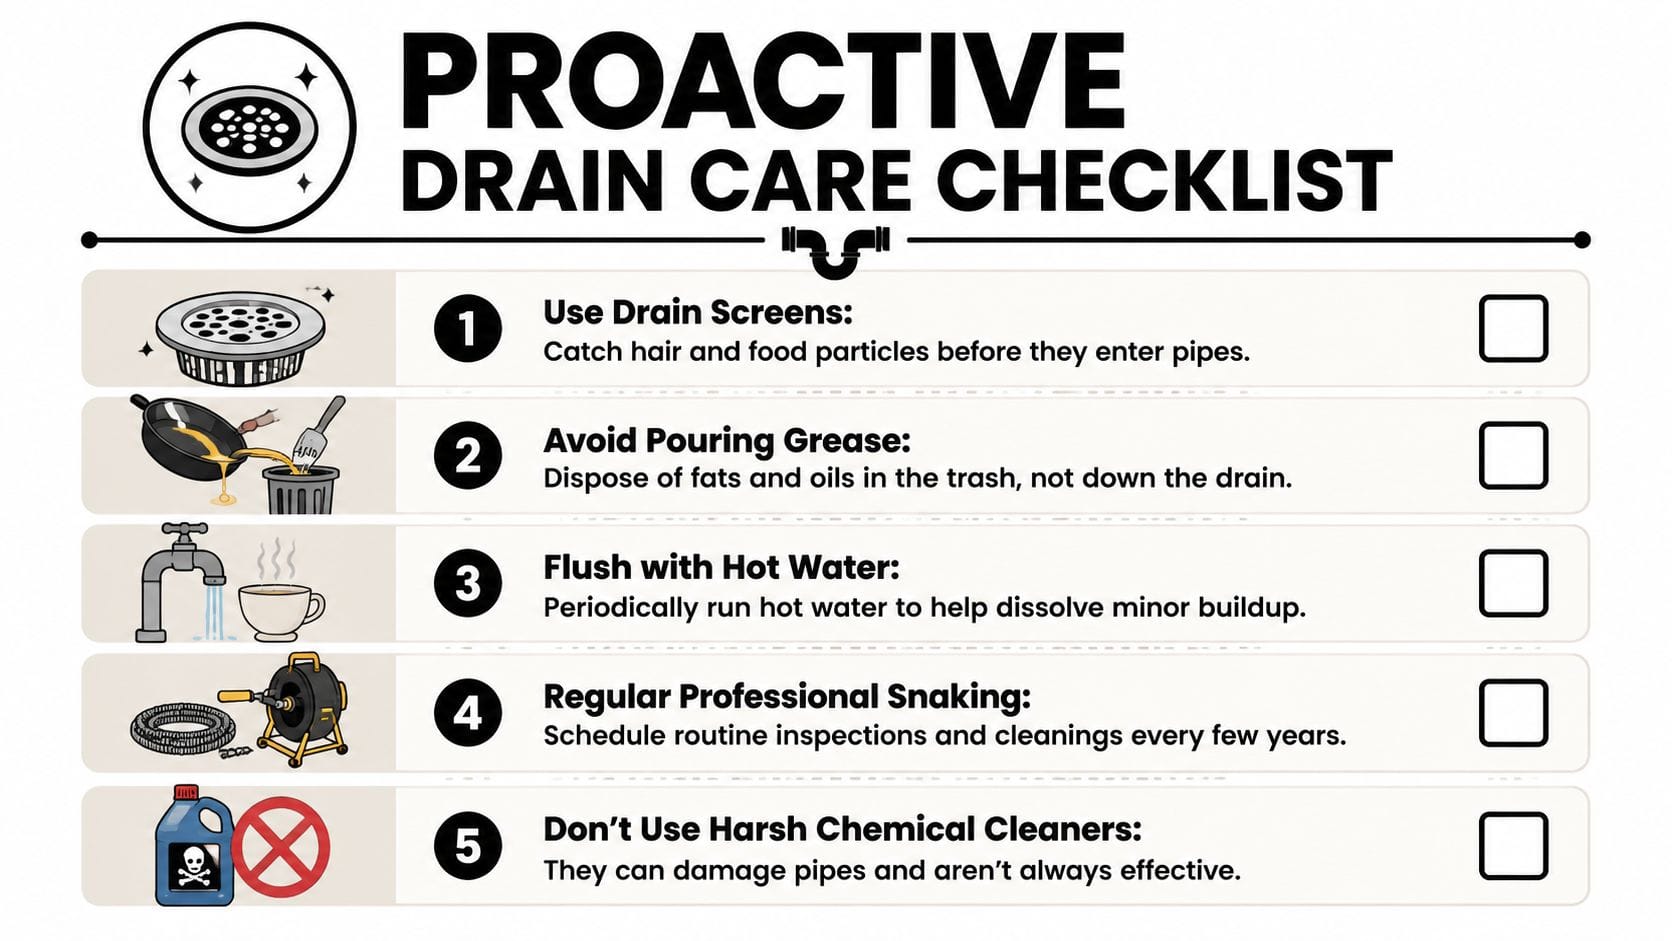
Simple habits that protect the repair
Use this checklist after repairing drain pipes:
- Catch solids early: Put strainers in showers, tubs, and kitchen sinks so hair and food scraps don't enter the line.
- Keep grease out of the system: Let fats cool and put them in the rubbish, not down the drain.
- Be strict about wipes and hygiene products: “Flushable” labelling doesn't change what these items do inside drain lines.
- Skip harsh chemical drain cleaners: They often fail to remove the blockage and can make future repair work messier.
- Plan cleaning for heavy-use systems: Shared building drains and commercial kitchen lines need more attention than a lightly used ensuite sink.
A practical example. If you've just repaired a kitchen branch drain in a rental house with a basement suite, the repair lasts longer when both suites know the ground rules. One household pouring grease and food scraps into the sink can undo a good repair faster than most owners expect.
Repair the pipe, then protect the repair. That's how you avoid paying twice for the same problem.
If you're dealing with a slow drain, a hidden leak, or a buried line that may need more than a quick patch, Encano Plumbing & Drainage Ltd. handles drain inspections, repairs, trenchless options, and emergency plumbing across Greater Vancouver. The practical next step is getting the problem properly diagnosed before you choose between a small repair, a larger rehabilitation, or a full replacement.