
You hear a drip behind a wall. Or you spot a brown ring spreading across the ceiling under an upstairs bathroom. In Vancouver homes, that usually means two problems at once. There's the leak from a pipe itself, and then there's the damage that keeps spreading while you decide what to do.
The first job is to slow things down. Don't start cutting drywall because of a stain alone, and don't assume a small drip can wait until next week. A calm response saves flooring, cabinets, insulation, and a lot of avoidable mess. In older Vancouver houses and aging strata buildings, leaks often travel before they show themselves, so what you see isn't always where the pipe failed.
This guide is the practical version of what I'd tell a worried homeowner on a service call. Stop the water safely, narrow down the source, decide whether a temporary fix makes sense, and choose a repair that won't put you back in the same spot a month later.
Table of Contents
- What To Do When You Find a Leak From a Pipe
- Common Causes and How to Find Your Leak
- Your Emergency Water Leak Action Plan
- Temporary Fixes and When to Call an Expert
- What to Expect From a Professional Pipe Repair
- Proactive Tips for Pipe Leak Prevention
What To Do When You Find a Leak From a Pipe
If you've just found water where it shouldn't be, start with one question. Is water actively moving right now? If the answer is yes, treat it as urgent even if the drip looks small. Water doesn't need much time to soak drywall, swell laminate, or run along framing into another room.
Your next move is simple. Find the nearest shutoff if the leak is under a sink, behind a toilet, or at a visible fixture supply line. If you can't isolate it quickly, go straight to the main water shutoff for the home. That step matters because every minute of pressure on a damaged line increases the chance that a hairline leak turns into a split.
First priorities inside the home
- Protect people first: Keep everyone away from wet light fixtures, power bars, and anything electrical near the leak.
- Stop the water source: Use the fixture valve if it's obvious and accessible. Use the main shutoff if it isn't.
- Move vulnerable items: Pull rugs, electronics, paper storage, and furniture legs away from the wet area.
- Contain what you can: Place a bucket, shallow bin, or towels under the drip to limit spread while you sort out the next step.
Practical rule: The fastest safe shutoff is the right shutoff. Don't spend ten minutes hunting for the perfect valve while water keeps running.
A common mistake is focusing only on the wet spot. The stain is the symptom. The issue is pressure, pipe condition, and where the water is travelling. In Vancouver condos and townhomes, that also means thinking about neighbours below or shared building plumbing if the leak appears in a ceiling, riser wall, or mechanical area.
The good news is that most homeowners can improve the situation quickly if they act in the right order. Shut off. Make the area safe. Contain the water. Then start narrowing down what type of leak you're dealing with.
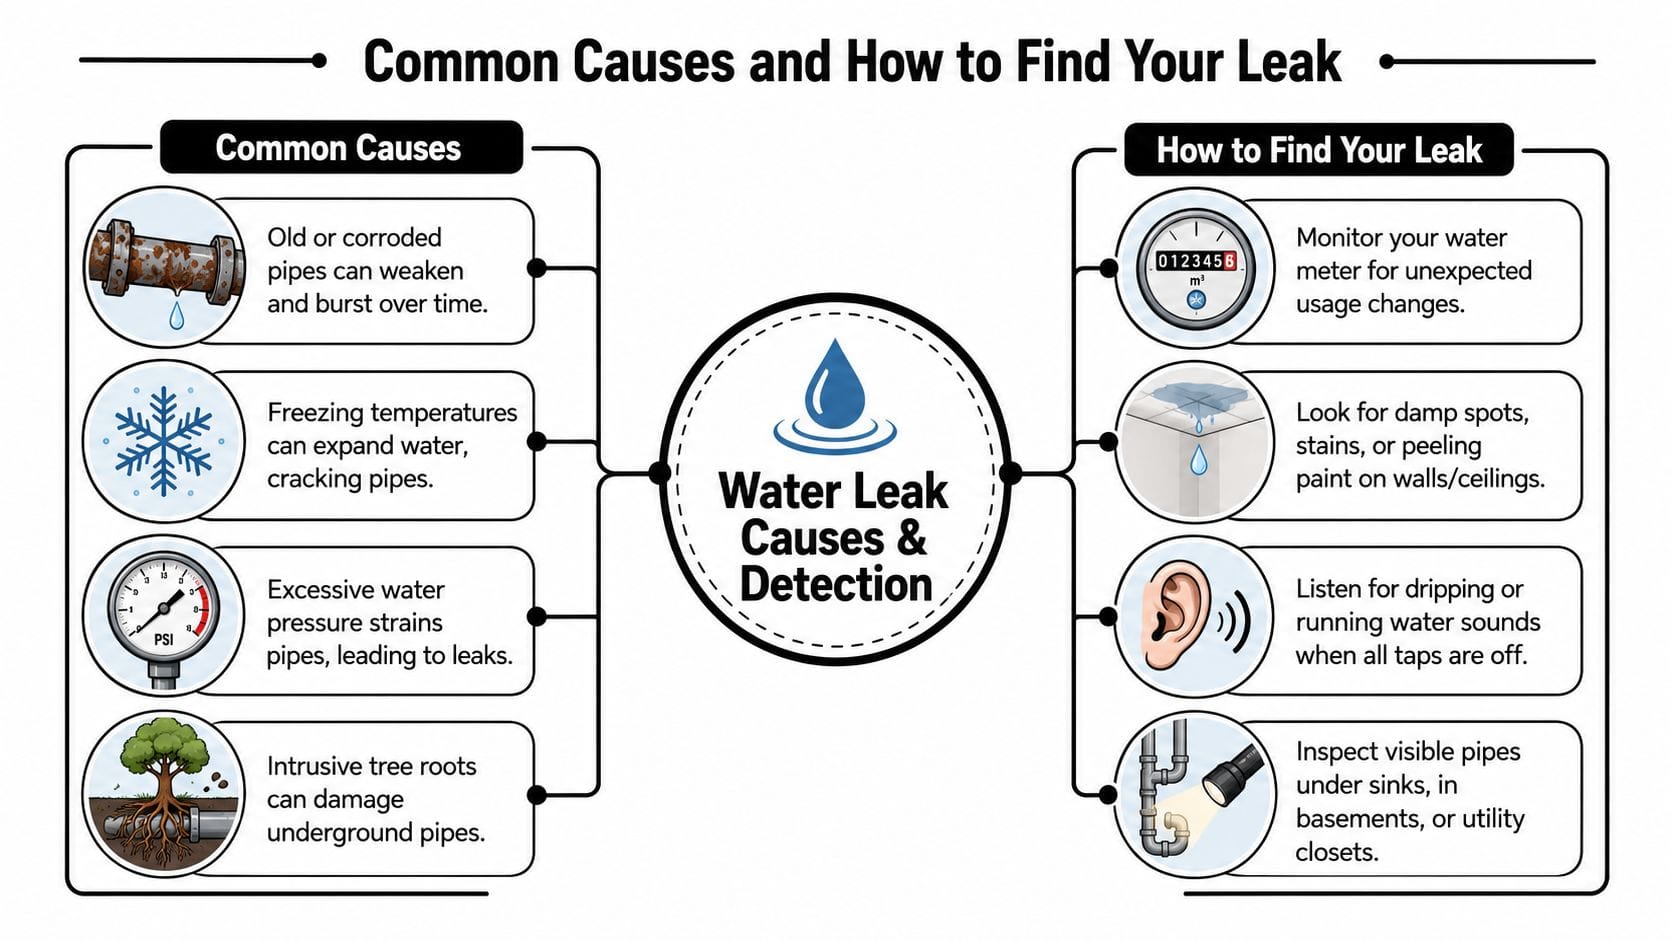
Common Causes and How to Find Your Leak
A pipe leak in Greater Vancouver usually starts with stress that built up over time. In older Vancouver houses, that often means aging copper, mixed materials from past renovations, or fittings that have been disturbed more than once. In strata buildings, the challenge is different. Water rarely stays where the failure starts, so the wet ceiling or wall you see may be several feet from the actual leak.
In buried or incoming water lines, municipalities commonly point to corrosion, ground movement, and repeated expansion and contraction as leading causes of leaks, as noted in municipal guidance on what causes a leak. That lines up with what shows up locally. Freeze-thaw cycles are milder here than in the Prairies, but they still put stress on vulnerable sections, especially in crawl spaces, exterior walls, garages, and poorly insulated service entries.
Why Vancouver homes develop leaks
Corrosion is high on the list. A pipe can look fine from the outside and still be thinning from the inside, especially on older domestic water lines. That is one reason pinhole leaks catch homeowners off guard.
Movement causes a lot of trouble too. Soil settlement, nearby construction vibration, and normal building movement put stress on joints, transitions, and service lines. In condos and townhomes, that movement can show up around risers, mechanical walls, and places where piping passes through concrete or framing with little room to move.
Pressure is another factor. High water pressure may not create the first weak point, but it tends to expose one faster. I see this often in older homes where one section has been upgraded and the rest of the system is still original. The new parts hold. The older section nearby starts to seep.
Other common causes include:
- Loose connections: Supply stops, compression fittings, braided hoses, and valve connections often seep before they fail outright.
- Worn seals or cartridges: Tub, shower, and fixture leaks can send water into floors, vanity backs, and ceilings below.
- Poor support: Pipes that shift when a tap closes or an appliance cycles develop stress at fittings.
- Old repairs: Patchwork work from different eras can leave mixed pipe materials and weak transition points.
How to narrow the location without opening walls
Start by reading the pattern of the damage. A fresh drip under a sink points you one way. A ceiling stain that grows after someone showers points you another. Timing matters. If the moisture appears only when a fixture runs, focus on that branch. If it continues with no water use, look harder at pressurized supply piping.
Then check the clues you can confirm without cutting anything open:
- Surface changes: Yellowing, peeling paint, swollen trim, cupped flooring, and damp cabinet backs often show the path water is taking.
- Smell: A musty odour in one room usually means the leak has been slow enough to stay hidden for a while.
- Sound: In a quiet home, faint hissing or running water with all fixtures off can point to an active supply leak.
- Visible plumbing: Check under sinks, behind toilets, around water heaters, in utility closets, and at exterior hose bibs.
A water meter test is also useful, especially in detached homes. Turn off all taps, appliances, and irrigation, then watch the meter. If it keeps moving, water is escaping somewhere in the system. It does not tell you where, but it helps separate a real plumbing leak from condensation, roof water, or a one-time spill.
In strata buildings, the search takes more discipline. Water can travel along joists, concrete surfaces, pipe chases, and framing before it shows itself. A stain in your dining room ceiling may come from a bathroom supply line in the suite above, not from the nearest fixture in your own unit. That is why the visible damage and the leak source often do not match.
For homeowner-level warning signs, use this checklist on how to spot hidden plumbing leaks in your home.
One practical rule helps avoid expensive guesswork. If the stain is growing but the exposed pipe looks dry, assume the water is travelling until you prove otherwise.
That matters in Vancouver because opening the wrong wall gets expensive fast. In older strata buildings, one bad exploratory cut can add drywall, painting, access coordination, and sometimes asbestos protocols to a repair that was already urgent. The better approach is to match the symptom pattern to the likely pipe group first, then open only where the evidence points.
Your Emergency Water Leak Action Plan
Once you've confirmed there's an active leak from a pipe, stop diagnosing and start controlling damage. The first five minutes matter most.
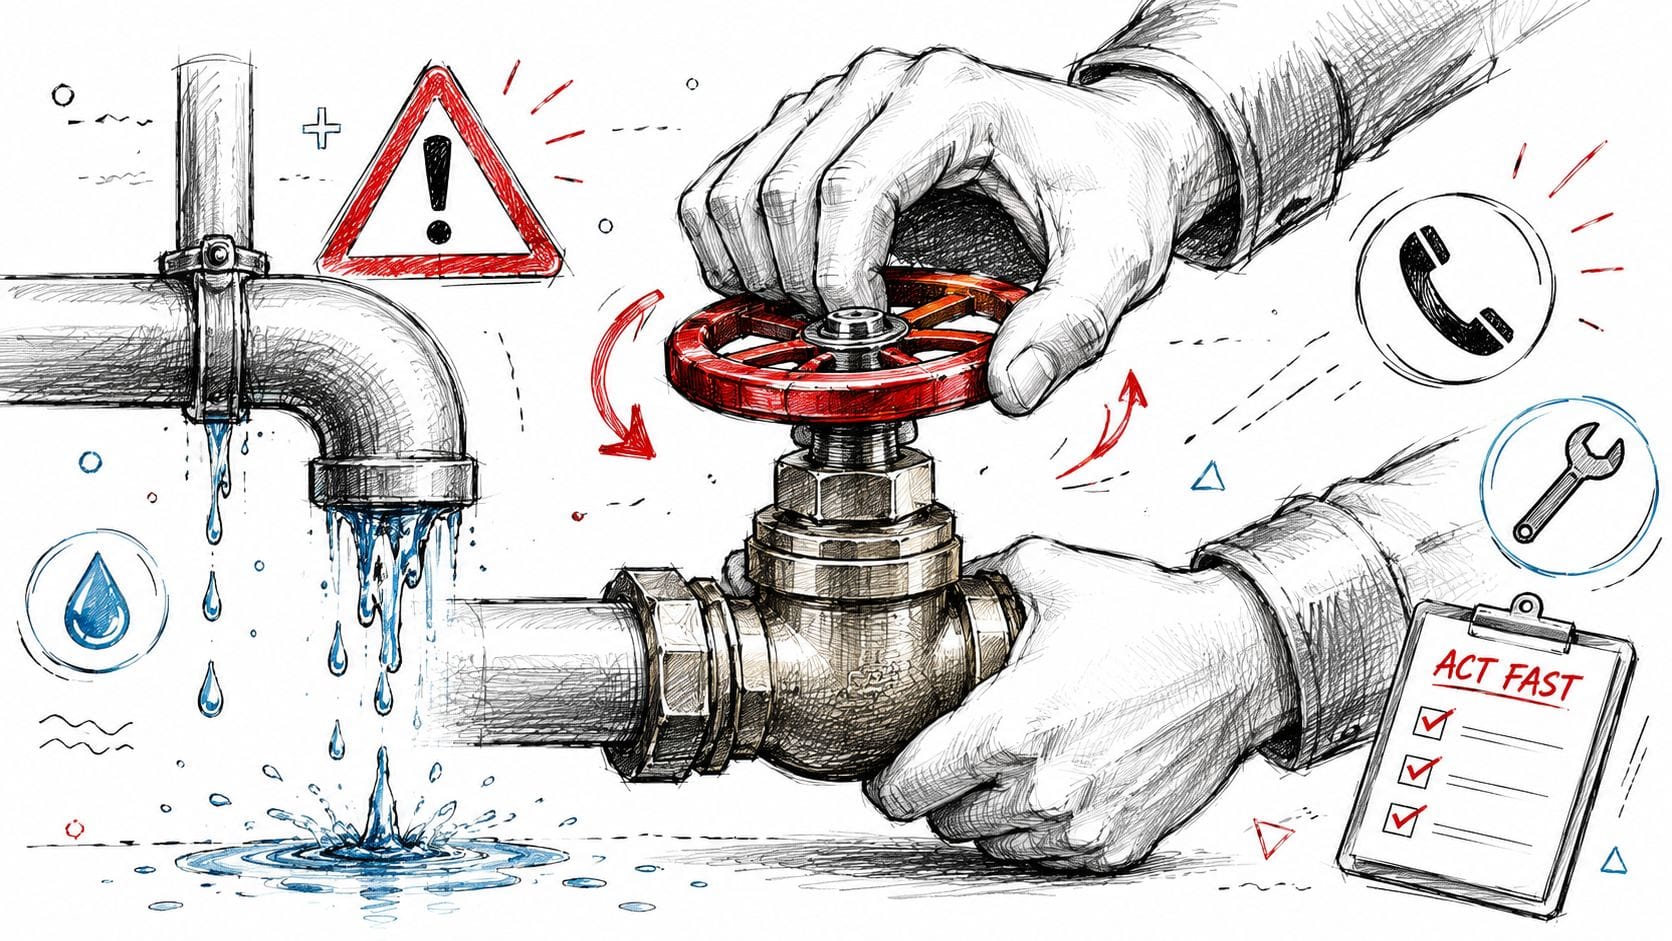
Five steps to take right away
Shut off the main water supply
If the leak is on a branch you can isolate safely, use that fixture valve. If not, shut off the house main. In many Vancouver homes it's near where the water line enters the building, often in a basement, crawl space, utility room, or mechanical closet.Turn off power to the water heater
If you have an electric water heater, switch off power at the breaker after the water is shut off. If it's gas, follow the unit's safe shutdown guidance if needed. This protects the equipment from operating in poor conditions.Drain the system
Open a cold tap at the lowest practical point in the home and another tap higher up. That relieves pressure and lets remaining water in the lines drain out, which often slows or stops the leak.Contain the water
Use buckets, towels, and plastic bins. If water is bulging a ceiling badly, don't start poking into it near lights or fixtures. Safety comes first.Document the damage
Take clear photos of the wet area, damaged finishes, and any belongings affected. That helps with insurance and also gives the plumber a cleaner before-and-after picture of what changed.
If you're unsure whether the situation has moved beyond a homeowner fix, this page on when to call an emergency plumber lays out the practical tipping points.
A short visual walkthrough can help if you're under stress and need to see the sequence.
What not to do in the first few minutes
Don't wrap an actively spraying pipe with random tape and call it solved. Don't leave the water on “just for now” because the leak seems manageable. And don't start demolition until you've made the area safe and reduced pressure in the line.
A leak that looks minor at dinner can become a soaked ceiling by bedtime if pressure stays on the pipe.
Temporary Fixes and When to Call an Expert
Temporary repairs have their place. They can buy time. They can reduce active dripping. They can keep things stable until a proper repair happens. What they can't do is reverse corrosion, stop movement stress, or make a compromised pipe reliable again.
That distinction matters because many homeowners delay too long after the first patch. In Metro Vancouver, even a 1-drop-per-second drip wastes significant water, and hidden leaks in walls or slabs are often detected late, which can lead to larger secondary damage and calls for professional diagnostic tools, as noted in this discussion of hidden leak costs and delays.
What a temporary repair can and cannot do
A pipe clamp can work on a small accessible crack on a straight section of pipe. Epoxy putty can sometimes slow seepage on a clean, dry surface long enough to schedule service. Self-fusing silicone tape has limited use where pressure is low and access is easy.
Those methods fail when the pipe is wet, corroded, split along a seam, moving under stress, or leaking at a fitting rather than on a straight run. They're also poor choices inside walls, above finished ceilings, and in strata buildings where one bad assumption can damage multiple units.
DIY Patch vs. Professional Repair
| Factor | DIY Temporary Fix (e.g., Pipe Clamp) | Professional Permanent Repair |
|---|---|---|
| Purpose | Slows leakage for the short term | Removes the failed section or corrects the failed connection |
| Best use case | Visible, accessible, low-risk seep until service is arranged | Hidden leaks, recurring leaks, ceiling leaks, slab or wall leaks, shared systems |
| Reliability | Depends heavily on surface condition and exact leak type | Based on diagnosis, proper materials, and system testing |
| Risk of hidden damage | High if the leak path isn't fully understood | Lower because the source is verified before repair is closed up |
| Fit for strata properties | Usually poor | Usually necessary |
| Long-term value | Limited | Better because it addresses cause, not just symptom |
When a professional is the only sensible option
Call for expert help if any of these apply:
- The leak is inside a wall, ceiling, or slab: You need proper localization before opening finishes.
- The pipe serves more than one unit or area: Shared plumbing changes the stakes.
- The leak returns after a patch: That usually means the original problem wasn't solved.
- You see staining far from the suspected source: Water is migrating, and guesswork gets expensive.
- The pipe is heavily corroded or the fitting is damaged: A patch won't restore pipe integrity.
- You're not confident shutting down and isolating the system: Uncertainty is a good reason to stop and call.
For homeowners weighing next steps, this guide on how to fix water pipe leakage helps frame what's reasonable to do yourself and what isn't.
A practical example. A homeowner in Burnaby finds a slow drip under the kitchen sink and tightens the connection. Fair enough. A week later the cabinet base is wet again. This time the issue turns out to be a pinhole in the pipe just behind the escutcheon where corrosion had been working for a while. The first fix wasn't wrong. It just addressed the wrong part.
What to Expect From a Professional Pipe Repair
A proper repair visit starts with diagnosis. In Vancouver homes and strata buildings, that matters because water rarely stays where the pipe failed. It can travel along joists, slab edges, and shared walls, then show up in a unit below or on the opposite side of a room. If the source is guessed wrong, you pay for opening, drying, and patching the wrong area.

How the leak is confirmed before anything is opened
For concealed leaks, plumbers usually start with non-invasive testing. The goal is simple. Confirm the source first, then open only what needs to be opened. That approach is especially important in older Vancouver houses with finished basements, and in strata properties where one bad guess can affect restoration costs, access approvals, and neighbors.
In practice, a technician may:
- Map moisture spread: This helps separate where water travelled from where it started.
- Use thermal imaging carefully: Temperature differences can help trace moisture paths, but the camera does not replace pressure testing or a physical inspection.
- Pressure test isolated lines: This helps confirm whether the failure is on a hot line, cold line, heating loop, or fixture branch.
- Check the easiest access points first: Cabinets, vanities, mechanical rooms, and service panels often provide enough evidence without cutting drywall.
In freeze-thaw season, I also want to know whether the leak came from a one-time freeze event or from a pipe that was already thinning and finally gave way. The repair choice changes if the system has broader age-related wear.
Encano Plumbing & Drainage Ltd. is one local option that uses modern leak detection tools for this kind of diagnostic work in Greater Vancouver.
Open the wall after the testing points to that wall. Otherwise the plumbing repair may be small, but the restoration bill will not be.
How permanent repairs are chosen
Once the leak is confirmed, the primary decision is scope. Homeowners often hope for the smallest repair possible. Sometimes that is the right call. Sometimes it just buys a few months before the next weak spot opens.
A short, accessible section with isolated damage can often be cut out and replaced with matching or upgraded material. A failed fitting may need more than a new joint if the pipe is unsupported, misaligned, or under constant movement. In older systems, especially in East Vancouver houses and aging strata buildings, one visible failure can be a sign that the run has reached the point where spot repairs stop making financial sense.
The usual options look like this:
- Local section repair: Best when the surrounding pipe is still in good condition and access is straightforward.
- Partial re-pipe of one run: Often the better value when there have been repeated leaks on the same branch or visible corrosion nearby.
- Low-access or trenchless strategy: Sometimes the smartest choice for underground lines or hard-to-reach sections where demolition would cost more than the pipe work.
- Material upgrade: Worth discussing if the existing material has a known history of trouble in that home or building.
Regional costs matter here too. In Greater Vancouver, the pipe repair itself is only part of the bill. Access, asbestos testing in older buildings, strata coordination, drying, and finish restoration can easily drive the decision toward a longer-lasting repair instead of the cheapest patch.
A common example is a basement ceiling leak in an older East Vancouver home. Testing finds a failed hot water branch, then inspection shows aging copper at several nearby points. Replacing only the wet section costs less today. Replacing that weak run usually costs less over the next few years because it avoids another opening, another dry-out, and another repair visit.
Proactive Tips for Pipe Leak Prevention
Most leaks don't feel preventable when you're standing in a wet hallway. But many are. Prevention isn't glamorous plumbing work. It's usually basic maintenance, better awareness of your piping, and dealing with stress points before they become failures.
That matters beyond one house. Across North America, real water loss is treated as a major conservation issue because even a small percentage of leakage can waste very large volumes of water, which is why proactive leak reduction is part of modern water management, as described in this article on water lost to broken pipes and leaks.
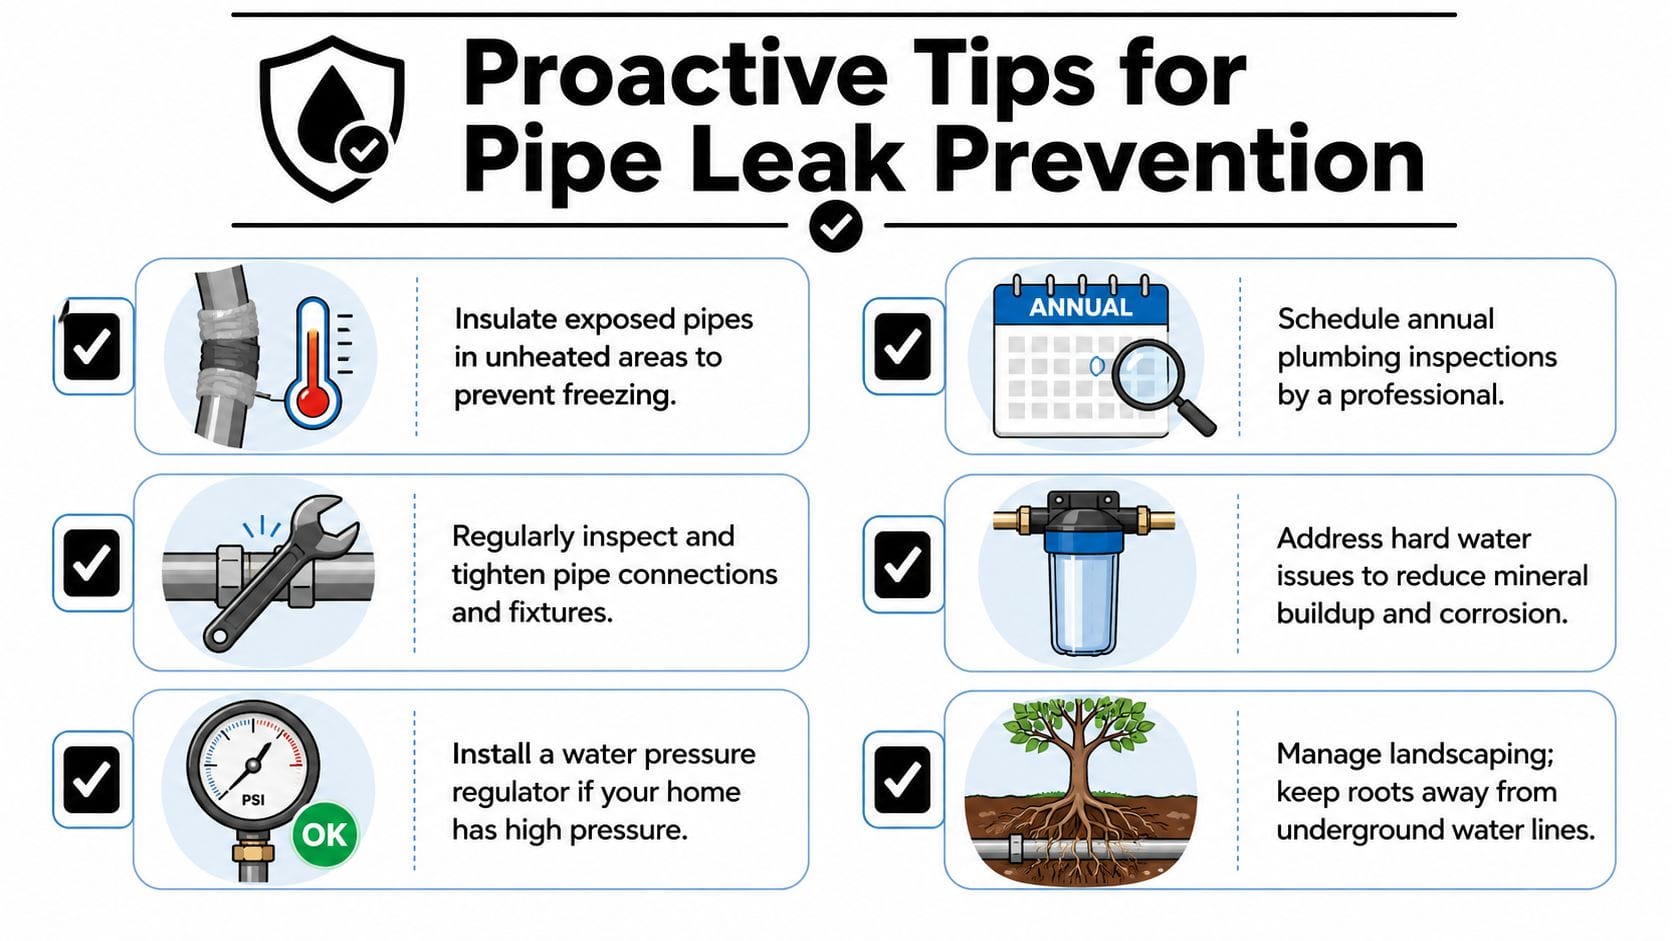
The prevention habits that actually matter
- Insulate exposed pipes: Pipes in crawl spaces, garages, and exterior-adjacent walls are more vulnerable during cold snaps.
- Pay attention to pipe age and material: If your home has older plumbing or a history of spot repairs, don't treat each leak as unrelated.
- Watch for repeat movement points: Pipes rubbing at framing penetrations or pulling at fittings need support, not just patching.
- Check visible shutoffs and supply lines: Slow seepage under sinks and behind toilets often gives warning before a bigger failure.
- Arrange periodic inspections in older homes or strata units: Especially if there have been prior leaks, renovations, or unexplained stains.
- Take hidden moisture seriously: Musty odours, cupped flooring, and recurring paint issues deserve investigation.
A practical Vancouver example
Take a townhouse in Richmond with a cold garage wall and a pipe run feeding a laundry area. The owner notices nothing dramatic, just a faint smell and slight swelling at the baseboard. A quick check catches a small leak early. If that same area is ignored through another cold period, expansion, contraction, and trapped moisture can turn a minor repair into drywall removal, insulation replacement, and flooring work.
The smart investment isn't doing everything. It's doing the few things that reduce risk the most. Know where your main shutoff is. Learn the weak points in your own system. Treat the first sign of moisture as information, not as an annoyance you'll get to later.
If you're dealing with a leak from a pipe in Vancouver, Richmond, Burnaby, or nearby communities, Encano Plumbing & Drainage Ltd. can help you isolate the problem, locate hidden leaks with the right diagnostic tools, and carry out a repair that fits the condition of the pipe and the building.