

You notice it first at ground level. One corner of the yard stays soggy for days, mulch keeps washing out of the same bed, and the concrete beside the house darkens every time Vancouver gets another stretch of rain. Then you look up and see the underlying cause. Water is pouring over a gutter end, the downspout is too short, or the bottom elbow has pulled loose and is dumping everything beside the foundation.
That's how a lot of drainage problems start here. Not with a dramatic pipe burst, but with ordinary rain hitting an ordinary house that isn't moving water far enough, fast enough, or in a controlled direction. In Metro Vancouver, that small mistake gets repeated storm after storm until you're dealing with wet crawlspaces, stained siding, soft ground along the footing, or even interior moisture concerns that can contribute to mould. If that sounds familiar, it's worth reading this guide on mould concerns in the home.
A proper downspout installation is less about hanging pipe on a wall and more about finishing the roof drainage system correctly. The details matter. Placement matters. Discharge matters even more.
Table of Contents
- Why Proper Downspout Installation Matters in Vancouver
- Planning Your Project Measuring and Material Selection
- Gathering Your Tools and Materials
- The Core Downspout Installation Process
- Effective Drainage and Discharge Solutions
- Budgeting Local Codes and When to Call Encano
Why Proper Downspout Installation Matters in Vancouver
Vancouver rain tests every weak point in a drainage system. A gutter can look fine from the street and still fail where it counts, because the downspout is undersized, poorly placed, loose at the seams, or discharging right beside the house. When that happens, the water doesn't disappear. It soaks the soil around the foundation, splashes against siding, and finds the easiest path into the building envelope or basement perimeter.
A lot of homeowners focus on the gutter trough because that's what they can see. The downspout is what finishes the job. If it can't carry the flow or direct it away properly, the gutter system is only doing half its work.
What usually goes wrong
The most common failures are simple, but they cause expensive messes:
- Short discharge at the base puts water where you don't want it, right against the footing.
- Loose lower sections get kicked, shifted, or separated during storms and yard work.
- Poor outlet placement lets water collect in long gutter runs before it can drain.
- Improvised routing around soffits, trim, and decks often leaves joints under strain.
A downspout should look boring when it's done right. Straight run, tight joints, solid straps, controlled discharge.
In Vancouver's wet climate, small installation errors don't stay small. The house gets hit by repeated rainfall over long stretches, so a weak connection that leaks a little in summer can become a steady problem by autumn.
Why the end of the run matters most
The top half of the system gets attention because it's hard to reach. The bottom half causes more property damage because that's where water meets soil, paving, retaining walls, and basement walls. A downspout that dumps beside the foundation is doing exactly the wrong thing efficiently.
That's why proper downspout installation is part exterior work and part site drainage work. On some homes, a splash block is enough. On others, especially where grade falls toward the house or the lot is tight, the right fix goes below ground.
Planning Your Project Measuring and Material Selection
A lot of downspout problems start before the first cut. The outlet gets placed where it looks convenient from the ladder, then the bottom lands at a walkway, a basement window well, or a strip of soil that already stays wet all winter. In Vancouver, that mistake shows up fast.
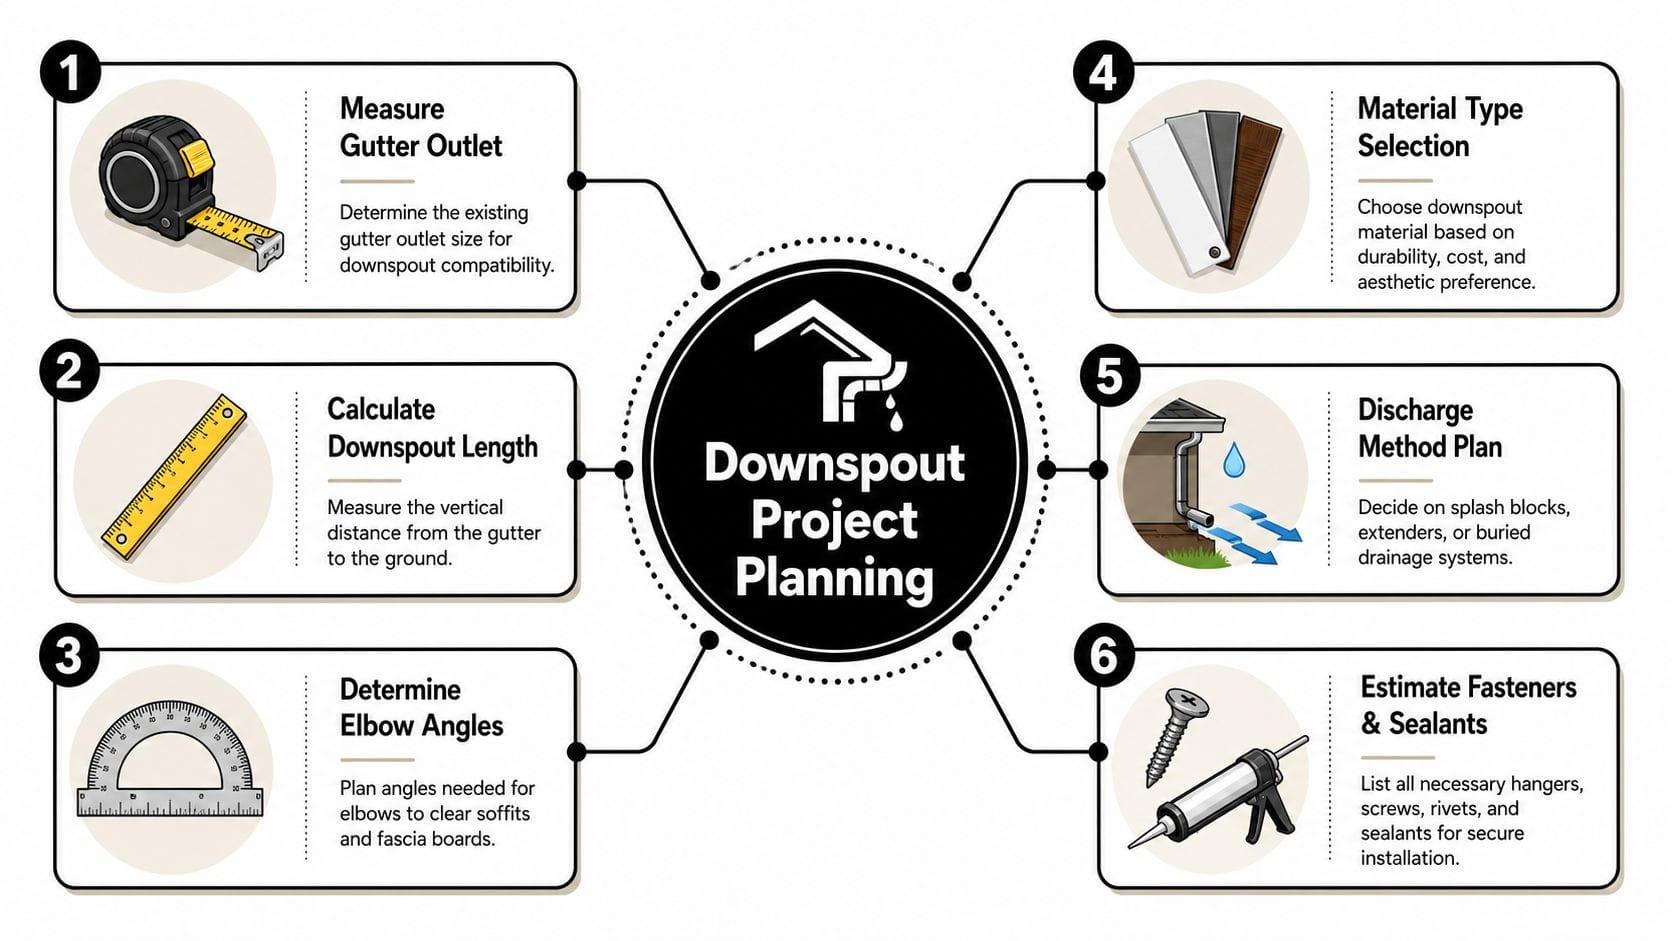
Start with the roof and gutter layout
For layout and sizing, the Building America Solution Center guidance for gutters and downspouts recommends spacing downspouts every 20 to 50 feet along the gutter, allowing roughly 1 square inch of downspout cross-section for every 100 square feet of roof area, and extending discharge at least 5 feet from the foundation or to an underground catchment system at least 10 feet away.
Use those numbers as a check, not a shortcut. A house in Vancouver often needs more careful placement than a simple end-of-run layout because rainfall is sustained, not just heavy for ten minutes. Long gutter runs, inside corners, upper roofs draining onto lower sections, and tight side yards all change how the system should be set up.
Measure each run on its own. Note where the outlet can go, how far the water has to travel inside the gutter, and what sits below on the wall and at grade. If a lower elbow will have to dodge trim, a deck ledger, conduit, or a gas meter, sort that out now.
A few planning questions catch most problems early:
- What roof area feeds this gutter run? Count upper sections that dump into lower gutters.
- Where is the best outlet location for flow? The shortest clean path is usually better than forcing water to travel the full run.
- What happens at the bottom? Splash block, extension, catch basin, or buried drain line all need different space and slope.
- What are you fastening into? Stucco, old wood siding, masonry, and fiber cement all need different anchors and a lighter touch.
Choose materials for coastal conditions
Material choice affects how the installation goes and how long it stays tight.
Aluminum is the standard pick on many Vancouver homes for good reason. It cuts cleanly, it is light enough to handle on a ladder, and it suits most siding types without looking bulky. It does dent, and it needs proper support on taller walls or exposed corners where it can get knocked.
Steel holds its shape better and feels sturdier on open elevations, duplexes, and spots near driveways or lanes. The trade-off is weight, harder cutting, and more risk if the coating gets scratched during installation. Once bare steel starts rusting in a wet climate, the problem rarely stays local.
Vinyl has its place on simple, short runs, but I would not use it where the wall is uneven, the drop is tall, or the bottom section may get bumped. The joints can work loose over time, and cold weather makes cheap fittings more brittle.
Match the fasteners and accessories to the downspout material as closely as possible. Mixed metals are a common DIY miss, especially at straps and screws, and that is where corrosion stains often start.
Plan the discharge before you buy pipe
This is the part homeowners skip. The vertical run is easy to picture. The discharge path is what decides whether the job protects the house.
On some lots, a splash block or surface extension is enough. On many Vancouver properties, it is not. Narrow side yards, paved walkways, rear laneways, and grading that falls back toward the house often call for a catch basin or underground tie-in. That has to be planned before you choose outlet locations, because the cleanest-looking downspout position is not always the one that gives you a workable drain connection.
A practical example. A long front gutter may look fine with one downspout at each end, but if one end dumps near the front steps and the other lands beside the foundation bed, neither location is doing you any favours. Adding a center outlet or shifting one downspout several feet during planning usually gives a shorter gutter drainage path and a safer discharge point.
That is also where local code and site conditions start to matter. If the best fix involves tying into underground drainage, crossing a walkway, or working near foundation waterproofing, the layout should be checked before installation day. A neat downspout on the wall does not mean much if the water still ends up in the wrong place.
Gathering Your Tools and Materials
A clean installation day starts on the ground. If you're stopping halfway through to buy another elbow, a rivet gun, or longer straps, the project usually gets sloppier as it goes.
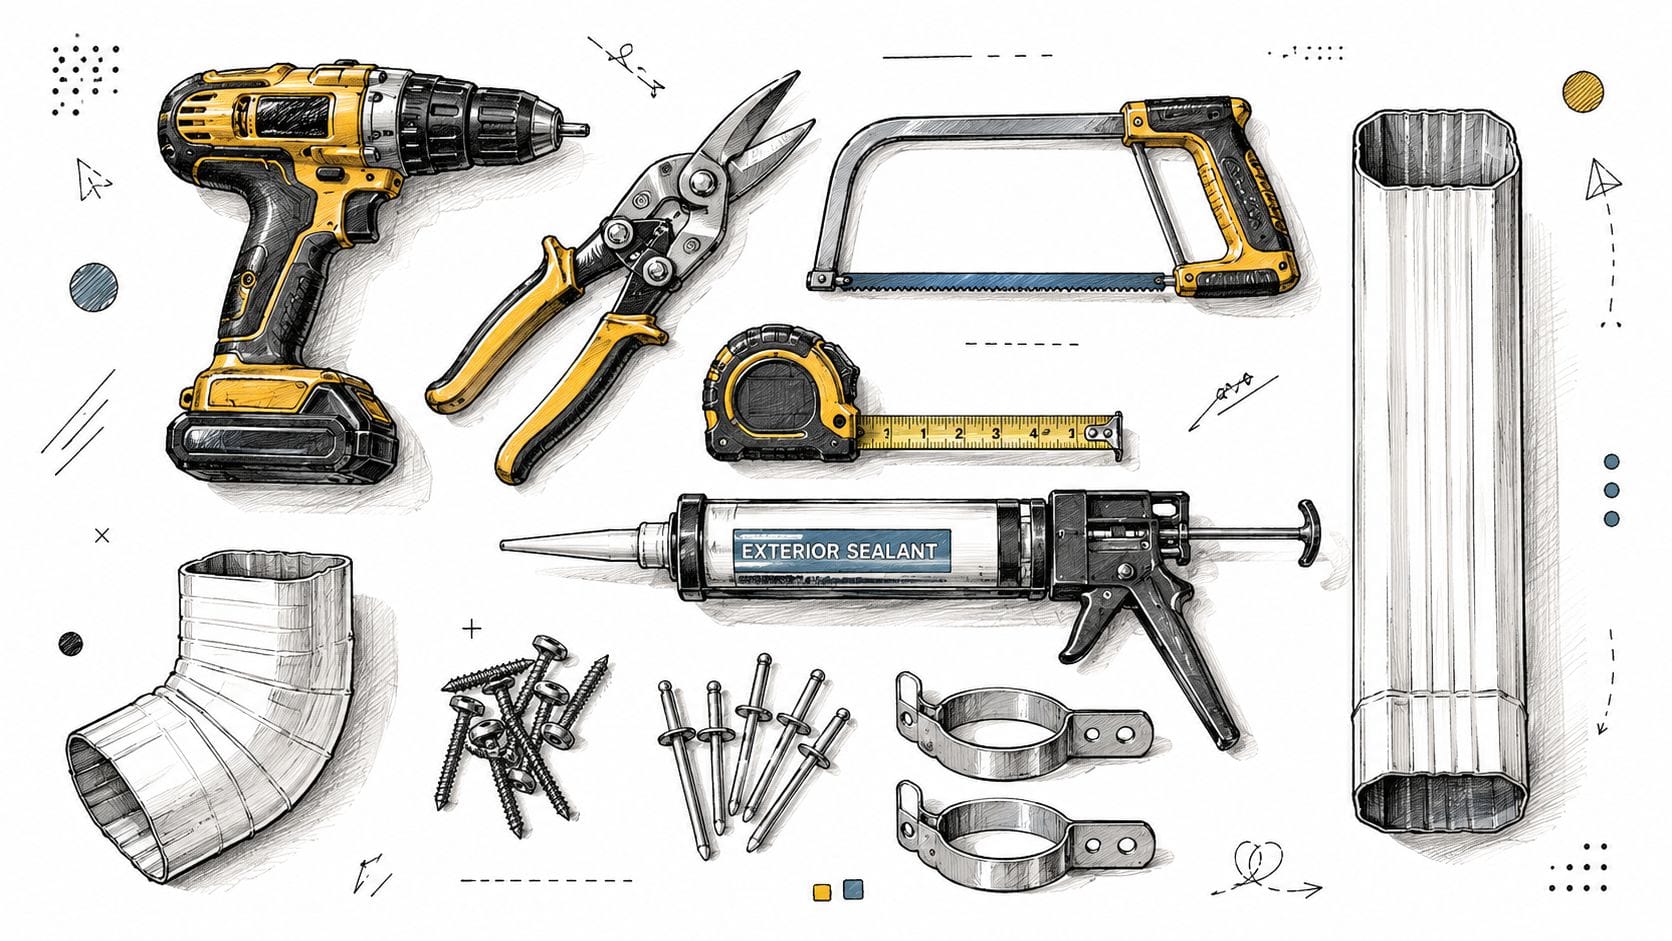
Tools worth having before you climb the ladder
Some tools are obvious. Some are the difference between a tight system and a rattly one.
- Extension ladder and stabiliser keeps you off the gutter edge and gives you better working angles.
- Tape measure and marker help you lay out elbow offsets and vertical cuts accurately.
- Drill/driver handles straps, screws, and pilot holes.
- Pop rivet gun gives you secure, tidy connections at joints and outlets.
- Aviation snips cut aluminum and light steel cleanly.
- Downspout crimper is worth buying or borrowing. It shrinks the end of one piece so the next section slides over tightly.
- Level helps keep the run plumb so the finished work looks right and fits the wall properly.
- Work gloves and eye protection matter when you're cutting sharp metal.
If you're working on an older house, keep a stud finder, masonry bit, or alternate anchors nearby. Exterior walls in Vancouver vary. Some are forgiving. Some have stucco, older wood siding, or tricky trim details that change your fastening plan.
Materials that hold up better
Buy the system as a set where possible. Outlet, elbows, straight lengths, straps, screws, and extension components should all suit the same profile.
A solid material list includes:
- Drop outlet
- Elbows
- Straight downspout sections
- Wall straps or brackets
- Pop rivets or screws
- Exterior-grade sealant
- Bottom extension, splash block, or underground adapter
- Touch-up paint if you cut coated metal
Don't cheap out on fasteners. Poor-quality screws are how you end up with rust streaks on siding and loose straps after one wet season.
A practical shopping example
For a two-storey home with one full replacement run on the side wall, a capable homeowner would usually shop for one outlet, a pair of upper elbows, several straight sections, enough straps for a secure vertical run, fasteners, sealant, and one discharge piece at the bottom. Add one extra elbow and one extra strap. Those are the parts people most often need after dry-fitting on site.
Keep power lines in mind before you even set the ladder. If the work area is tight, the ground is soft, or the wall height forces you to overreach, stop there. Ladder safety is part of the job, not an afterthought.
The Core Downspout Installation Process
At this juncture, neat planning either pays off or falls apart. Dry-fit first. Fasten second. Seal only after you know the alignment works.
A good visual walkthrough helps before you start cutting.
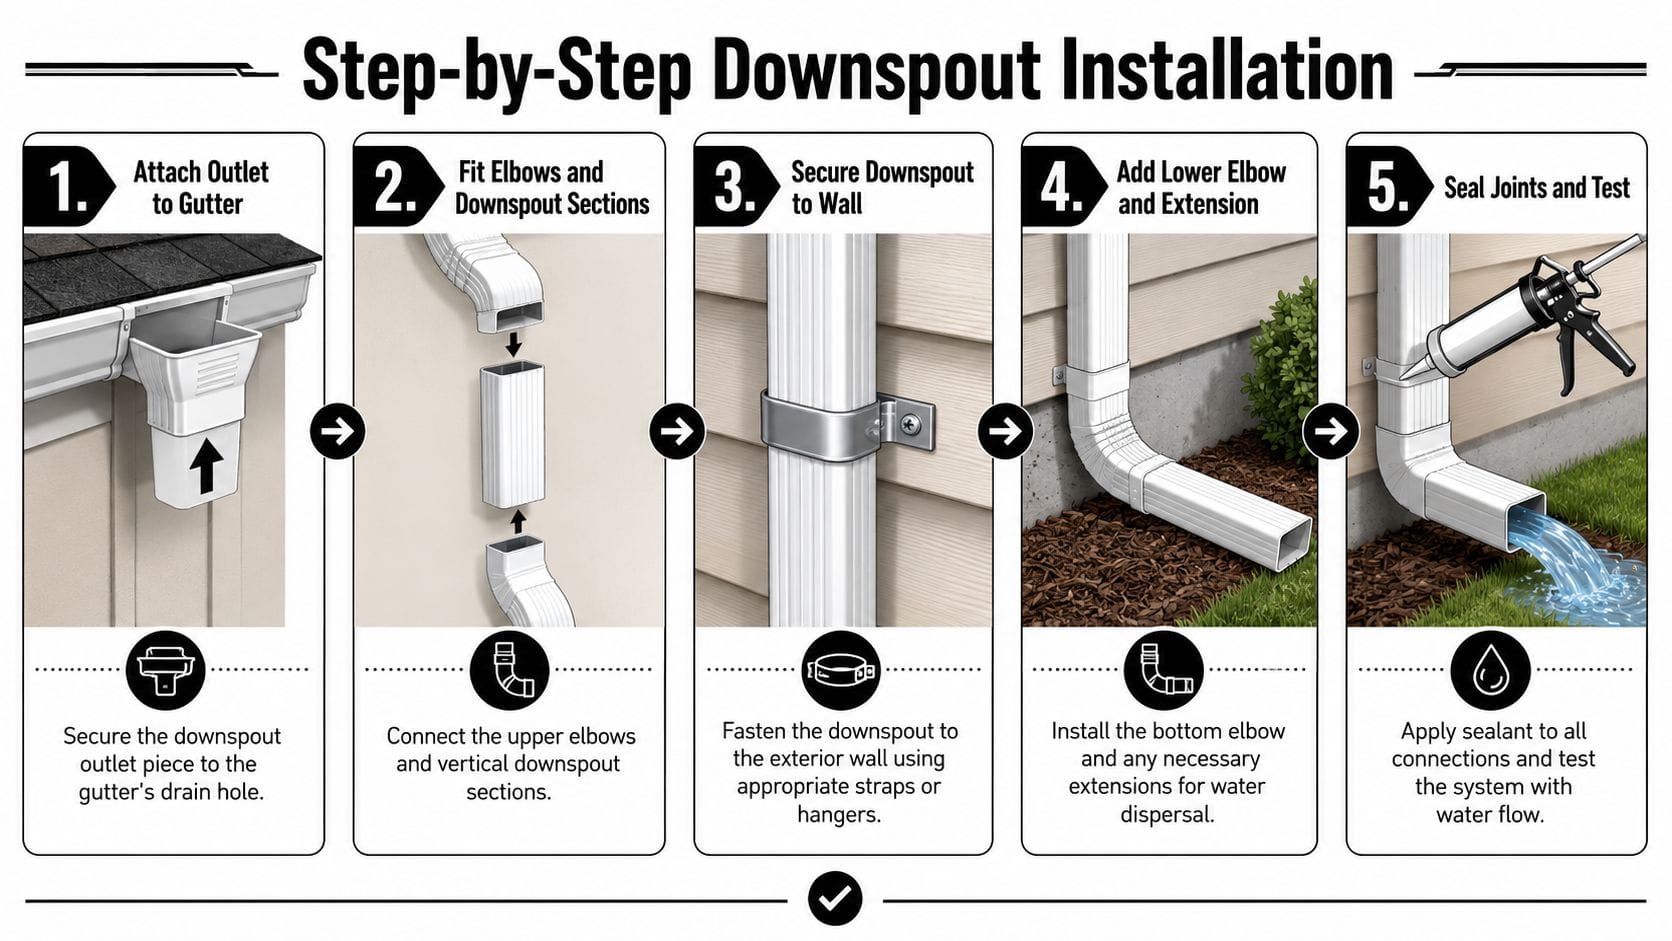
Set the outlet and build the upper offset
A useful installation benchmark from This Old House's guide to installing rain gutters is to use at least one downspout for every 20 to 30 feet of gutter, secure the outlet connection with four pop rivets or screws, and use elbows to route the downspout around the wall line. The same guidance reflects common field practice: installers usually crimp the elbow end slightly so the next section slides in tightly, then fasten joints with rivets or screws and add wall straps to resist wind and vibration.
Start at the gutter outlet. If you're installing a new drop outlet, seat it cleanly at the opening and fasten it securely. Don't leave the connection depending on sealant alone. The fasteners carry the load. The sealant only helps weather the joint.
From there, use elbows to bridge the overhang and bring the line back to the wall. This upper offset decides whether the rest of the run sits straight.
Key points during the upper assembly:
- Dry-fit the elbows first so you can see the offset before cutting a connector piece.
- Crimp the correct end so the next section nests properly and sheds water inside the pipe.
- Keep the assembly tight to the wall line without forcing it into the soffit or trim.
After you've got the upper section sorted, this short video is useful for seeing the sequence in motion.
Run the vertical sections and secure them properly
Build downward, checking plumb as you go. A downspout can technically function while looking crooked, but crooked runs place stress on elbows and straps. Over time, that's where joints open up.
The most common DIY mistake here is under-supporting the pipe. If the vertical run isn't strapped well, the lower section starts moving every time water surges through it, the wind hits it, or someone brushes past it with bins or a ladder. Once the bottom starts kicking out, the upper joints follow.
Use wall straps that suit the wall assembly. Fastening into solid backing is better than relying on brittle trim or thin cladding alone. If the wall surface is uneven, shim carefully or use adjustable strap types so you don't twist the pipe to force it flat.
A lot of drainage repair calls begin with a simple issue that should've been fixed on installation day: a separated seam, a loose base elbow, or a cracked connection where the run meets an underground line. If you're already seeing those signs, it's smart to understand the broader issue of repairing damaged drain pipes.
The bottom connection deserves extra attention. It takes the most abuse from impact, vibration, and repeated water load.
A practical example around a bay window
Bay windows create one of the more awkward offsets on older Vancouver houses. You can't just drop the downspout straight down if the projection sits directly below the outlet. The clean way is to use elbows to move the run around the bay, then return to the wall once you've cleared the projection.
What doesn't work is improvising with too many short pieces. Every extra joint is another possible leak point. Keep the route simple. Use the fewest directional changes that still give you a straight vertical descent after the obstacle.
When the path becomes too contorted, or when the downspout has to pass across trim, stairs, or a narrow side yard, that's usually where a professional touch starts paying for itself.
Effective Drainage and Discharge Solutions
A downspout that ends in the wrong place is still a bad drainage system. The final discharge matters as much as the pipe on the wall because that's what protects the foundation, retaining walls, paving, and lower-level rooms.
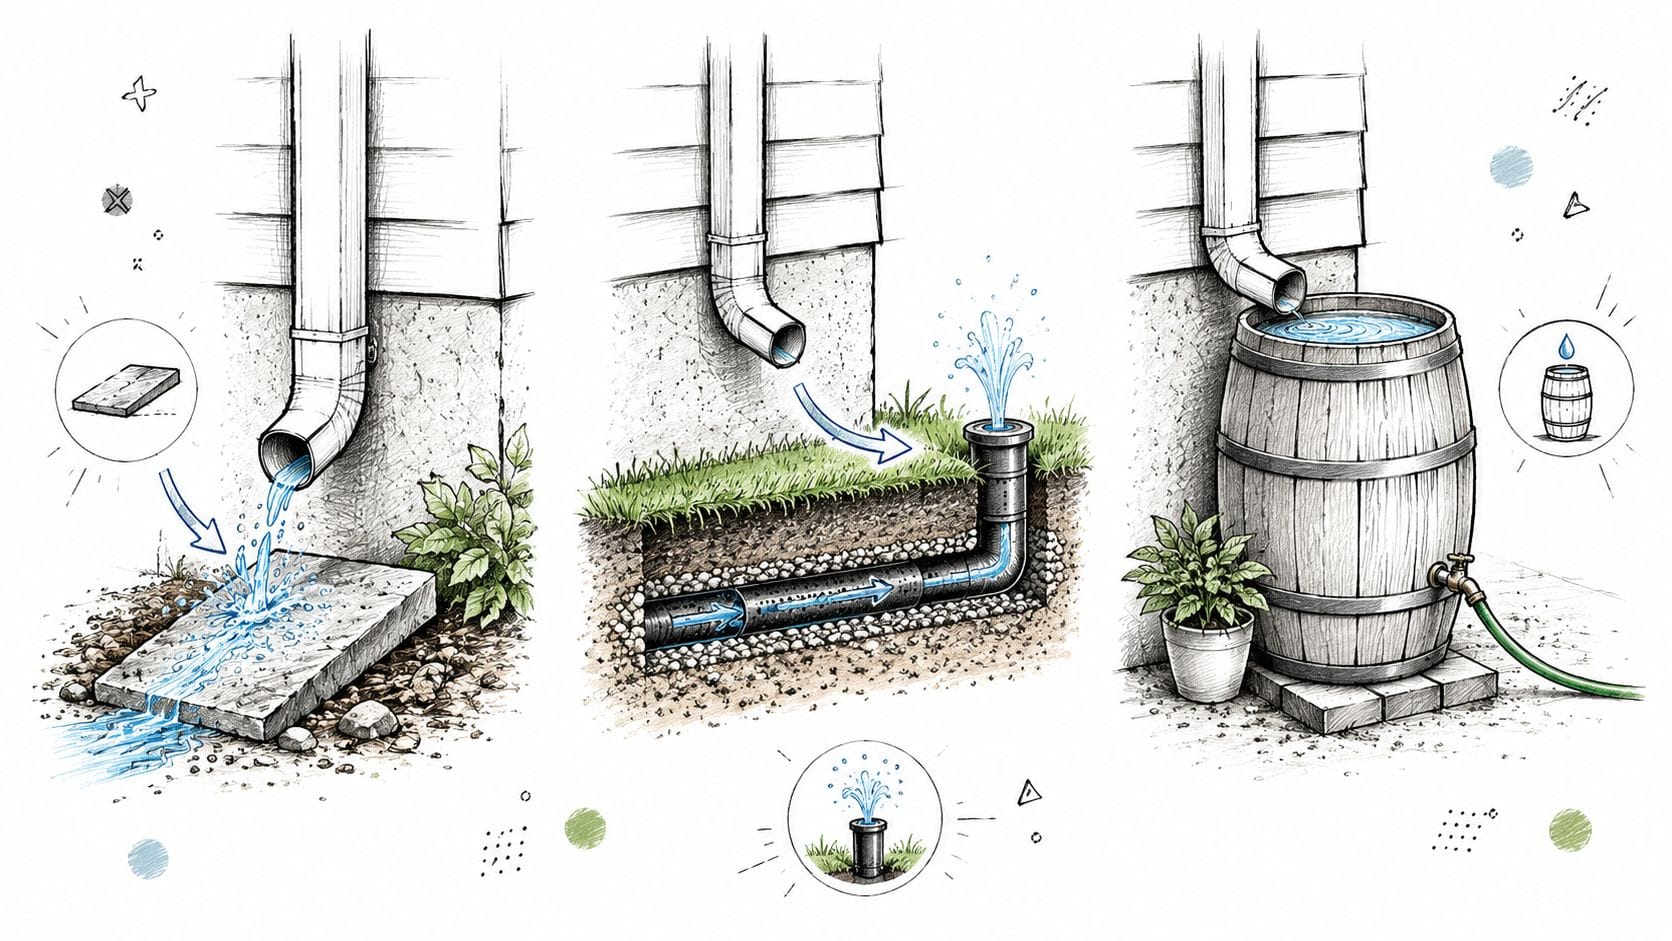
Simple above-ground options
For some homes, the straightforward solution is enough.
- Splash blocks work where the ground already falls away from the house and the soil drains reasonably well.
- Flexible or rigid extensions help move water farther across a lawn or bed.
- Surface channels can help where paving limits soil absorption but you still have a safe path away from the structure.
These are practical on smaller homes, detached garages, and yards with good slope away from the foundation. They're also easy to inspect. If something shifts, you can see it right away.
What doesn't work well in Vancouver is assuming a splash block solves everything. On flat lots, narrow side yards, or homes where runoff collects beside basement walls, surface discharge often isn't enough. Water keeps cycling through the same wet area, and eventually the ground stops coping with it.
When underground drainage is the better answer
Underground tie-ins are usually the cleaner solution when surface routing is awkward or the site is vulnerable. That can mean a buried line to a proper discharge point, a catchment arrangement away from the house, or integration with an existing drainage plan.
This is also where local conditions matter. Some municipalities have specific requirements on where roof water can go, and some existing systems aren't in good enough shape to accept more flow. If the home has a history of wet basement walls, perimeter drainage issues, or recurring backups, surface fixes can hide the problem without solving it. If that sounds familiar, it's worth understanding the warning signs around basement drain backup issues.
A buried tie-in should be deliberate, not guessed. If you don't know where the line goes or what condition it's in, verify that before connecting anything to it.
A practical example on flat ground versus a sloped lot
On a flat property with room to discharge over lawn, a properly placed extension can work well if it keeps water moving away and doesn't create an icy or muddy walkway. It's visible, easy to maintain, and often enough for straightforward roof runoff.
On a sloped lot, especially one that sheds water toward the house or into a side passage, above-ground discharge can make things worse. Water accelerates, erodes soil, and concentrates where the grade pinches against the foundation. That's where an underground route usually gives better long-term control and a tidier finish.
The right answer depends less on the downspout itself and more on what the site does with water after it leaves the pipe.
Budgeting Local Codes and When to Call Encano
A downspout job can start as a simple replacement and turn into drainage work fast. I see that a lot in Vancouver. The pipe itself is often the easy part. The cost usually rises when access is poor, the wall needs careful fastening, or the water has nowhere reliable to go after it leaves the elbow.
What drives the budget
For budgeting, start with the scope instead of a generic online price range. A straight swap on a reachable wall is usually predictable. A reroute with custom offsets, new straps, cutting around trim, or work on a taller home takes more time and more care. Add buried drainage, and the job changes again because now you are dealing with slope, pipe condition, cleanouts, and where that line discharges.
A practical budget check comes down to three questions:
- Are you replacing an existing downspout or changing the route?
- Can the work be done safely with proper ladder access?
- Is there already a proven discharge point, or does the site need drainage work too?
That last point is where homeowners often underestimate the job. A neat-looking downspout does not help much if it dumps water beside the footing, across a walkway, or into a buried line that is already failing.
Why local code and discharge rules matter
Vancouver-area homes deal with long wet periods, not just one big storm. That changes the standard for what counts as "good enough." Water that only puddles for a few hours in summer can become a recurring problem from fall through spring.
Municipal requirements can also differ on stormwater discharge, site drainage, and where roof water is allowed to go. Older houses add another layer because past drainage work is often undocumented. I have opened up more than one line that looked usable from the surface and found a partial blockage, a broken connection, or a tie-in that should never have been used in the first place.
Check local requirements before connecting anything if the project involves:
- An underground line you did not install
- Discharge near a sidewalk, lane, or property line
- Work close to foundation drainage
- A strata, duplex, or other shared drainage arrangement
The physical install can be clean and still fail inspection, or worse, send water to the wrong place.
When to call Encano
A capable homeowner can handle some downspout replacements. The line is usually crossed when the job stops being a simple exterior pipe install and becomes a drainage diagnosis.
Call Encano when:
- The downspout is on a second storey or higher and safe setup is limited
- The exterior is stucco, masonry, older wood trim, or detailed cladding that can be damaged by bad fastening
- The route has to work around decks, bay windows, meters, stairs, or tight side yards
- The discharge needs an underground tie-in
- The home already shows signs of water trouble, including seepage, persistent pooling, or backups
One rule helps sort out DIY from pro work. If you cannot say exactly where the roof water will end up, and whether that path can handle a Vancouver rain cycle, the job is not ready to build.
If your home needs more than a simple replacement, Encano Plumbing & Drainage Ltd. can help with the drainage side that most gutter guides skip. Their team handles practical water-management work across Greater Vancouver, including the kind of underground tie-ins, drain troubleshooting, and site-specific fixes that keep roof runoff from turning into foundation or basement problems.