
Rain is hammering the windows in Burnaby, the street drains look slow, and you find yourself thinking about the one plumbing part you almost never see. If your home has a basement, that concern is reasonable. A backwater valve sits between your house and a sewer backup, and when it's neglected, you usually don't get a warning before trouble starts.
In Greater Vancouver, that matters more than many homeowners realise. Older neighbourhoods, low-lying lots, shared drainage patterns, strata responsibilities, and insurance conditions all make backwater valve maintenance something you need to treat like seasonal home protection, not an optional plumbing chore. The good news is that the basic care is straightforward if you know what's safe to handle yourself and where the line is for professional service.
Table of Contents
- Why Backwater Valve Maintenance is Non-Negotiable
- Understanding Your Home's First Line of Defence
- Your Biannual DIY Inspection Checklist
- Safely Cleaning Your Backwater Valve
- Troubleshooting and When to Call a Professional
- Vancouver-Specific Rules and Maintenance Planning
Why Backwater Valve Maintenance is Non-Negotiable
A lot of sewer backup calls in Burnaby start before any water shows up. Rain has been pounding for hours, the basement still looks dry, and you are standing near the floor drain wondering whether the valve under that cover will close if the city side surges.
That concern is reasonable in Greater Vancouver. We deal with older sewer infrastructure, intense rainfall, low-lying streets, and, in many strata buildings, strict limits on what an owner can open or service without approval. Insurance carriers are also paying closer attention to sewer backup protection and maintenance records. A backwater valve only helps if it is clean, intact, and able to move freely when reverse flow hits the line.
In practical terms, this is a small maintenance job protecting you from a very expensive cleanup. Sewage on a basement floor is not just a water problem. It can damage flooring, drywall, stored contents, and mechanical rooms, and it often leads to sanitation work that homeowners cannot safely handle on their own.
I also see a common mistake. Homeowners assume that no past backup means the valve is fine. That is not a safe assumption. Backwater valves usually fail unnoticed because grease, grit, paper residue, or a damaged flap keeps the gate from sealing fully.
For detached homes, basic visual checks are often a reasonable DIY task. For strata units, valves tied into shared building drainage may fall under building rules, and unauthorized opening can create liability if something is reassembled incorrectly. That line between homeowner care and professional service matters here more than generic online guides admit.
If you want the broader plan, not just the valve itself, review these home sewer backup prevention steps. The valve is one protective layer. It should never be the only one.
Understanding Your Home's First Line of Defence
A sewer backup usually hits at the worst time. Heavy rain, a surcharged city main, and then the lowest drain in the home becomes the place where wastewater tries to come back in. Your backwater valve is the part standing in the way.
A backwater valve is a one-way device installed on the building sewer. Wastewater from sinks, toilets, and floor drains leaves the house normally. If flow reverses from the municipal side, the internal flap or gate swings shut to block sewage from entering the home.
That job is specific. The valve does not clear a blockage, speed up a slow drain, or correct a sagging sewer line. It is there to stop reverse flow during a backup event.

What you're usually looking for
In detached homes around Burnaby and Greater Vancouver, the access point is often in the basement slab or a utility area near where the sewer exits the foundation. You may see a round or rectangular lid. Some covers are clear, which helps with quick visual checks during storm season.
Inside, the parts are usually straightforward:
- The valve body sits in line with the sewer pipe.
- The flap or gate opens with normal discharge and closes under reverse pressure.
- The cover and O-ring seal the access opening.
- The service opening gives access for inspection and cleaning without cutting pipe.
Location and ownership get less straightforward in strata buildings. A valve may serve one unit, several units, or a shared branch. That matters because many strata bylaws limit what an owner can open, and insurers may ask who was responsible for maintenance if there is a claim.
Why the mechanics matter
A backwater valve fails in ordinary ways. Debris can keep the flap from closing flat. The hinge can bind. The cover seal can dry out or crack. Any one of those issues can leave you with a valve that looks fine from above but does not seal when the line is under pressure.
This is also where generic DIY advice gets people into trouble in Greater Vancouver. If the valve is tied to a shared system, if sewage has already been in the chamber, or if the flap does not move freely with light hand pressure, stop there and call for service. A drain camera inspection of the sewer line is often the right next step when we need to confirm whether the problem is only at the valve or farther down the line.
For a homeowner, understanding the parts helps you make the right call. You can usually handle a visual check in an accessible detached-home installation. You should not force a stuck gate, modify seals, or disassemble components if you are not certain the valve serves only your home and can be safely isolated.
That line matters. A backwater valve is simple equipment, but it needs to open and close freely, and in many homes the safest maintenance decision is knowing when to leave the internal work to a licensed plumber.
Your Biannual DIY Inspection Checklist
The safest homeowner routine is inspection first, cleaning second. You're not trying to overhaul the device. You're checking whether it looks clean, intact, and ready to close when it needs to.
A strong habit is to inspect after major rain and on a set schedule through the year. A maintenance checklist used for backwater valves recommends a thorough visual inspection and mechanical function test after every heavy rainfall event and quarterly regardless of precipitation, including removing the access cover, using a flashlight to inspect for debris, damage, or wear, and confirming that the flap moves freely, as described in this backwater valve basement inspection checklist.
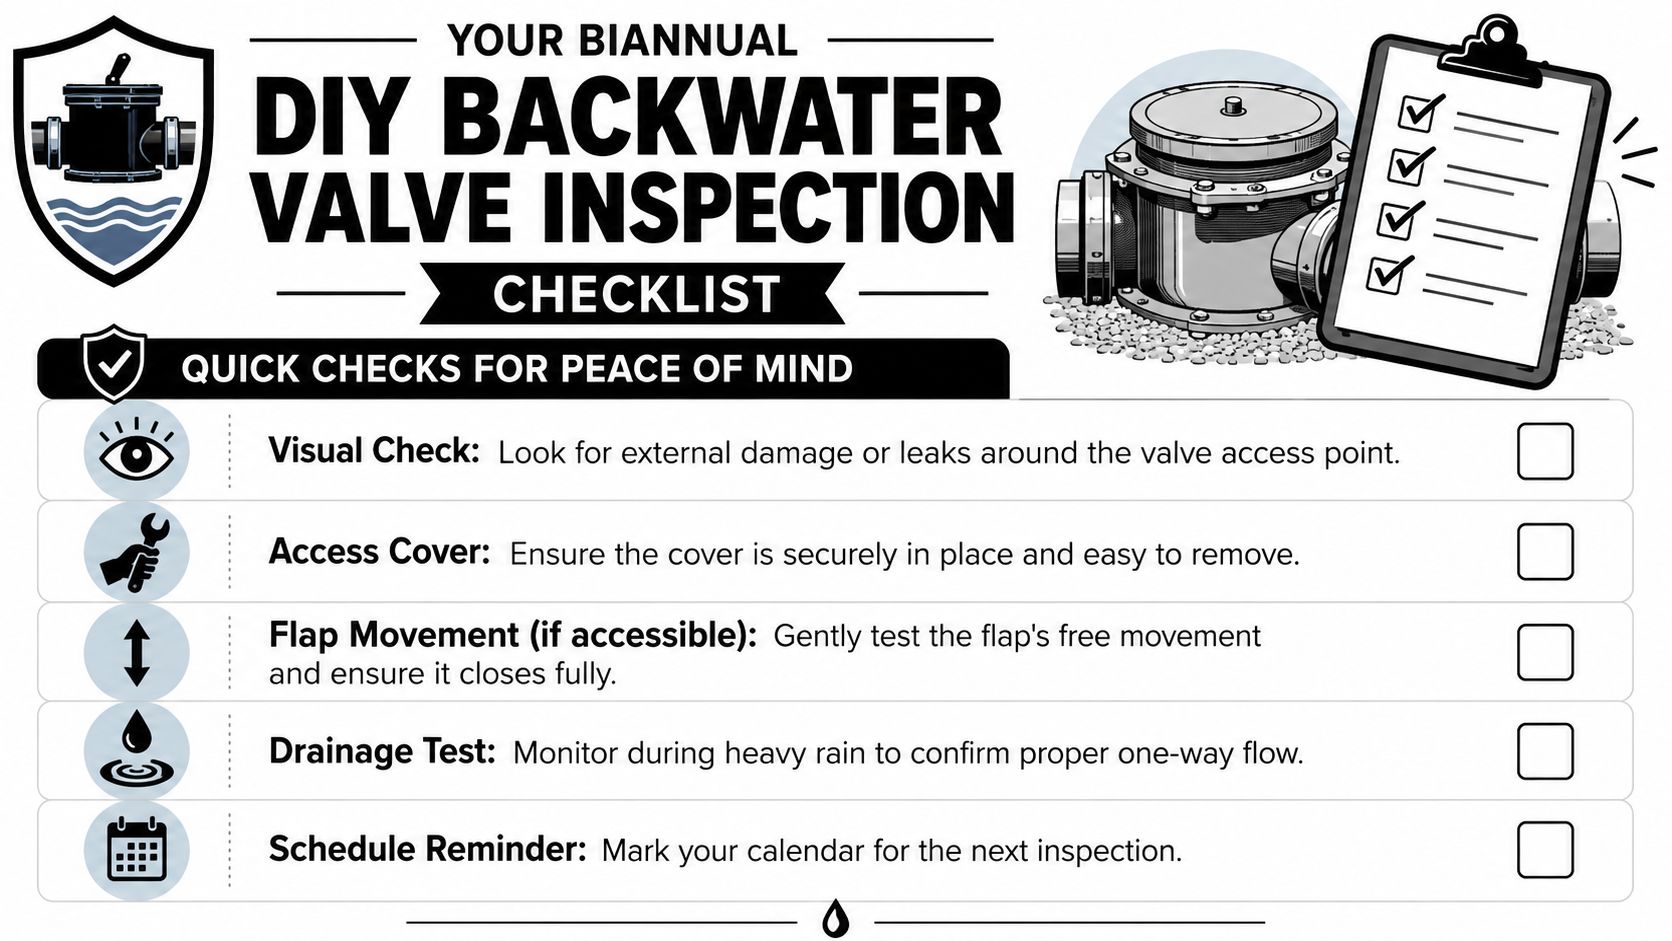
What to check in a routine inspection
Use gloves, eye protection, a flashlight, and a rag. If the lid is screwed down, use the correct driver or wrench so you don't strip fasteners.
- Start outside the chamber. Look for moisture around the lid, staining on the floor, cracked plastic, corrosion, or an access cover that sits unevenly.
- Open carefully. Remove the access cover without prying so hard that you damage the lid or seal.
- Check the interior with a flashlight. You're looking for grease buildup, paper debris, sediment, or anything caught near the flap.
- Test movement gently. If the design allows it, move the flap gently and make sure it returns to position without binding.
- Look at the seal surfaces. Dirt on the seating area can stop a proper closure even when the flap still moves.
- Confirm the lid condition. The cover should go back on securely and sit flush.
A practical Burnaby example
Say you've had a hard spring rain overnight and the lane behind your house is still holding water in the morning. That's a good time to do a quick inspection. Open the cover, shine a flashlight inside, and see whether bits of debris or grease film have collected around the flap.
If you find minor buildup, note it and plan a proper cleaning. If you see anything that looks broken, misaligned, or difficult to move, stop there. That's not the moment to start experimenting.
For homes with a clear cover, keep an eye on it during storm periods. If you want a better look at the line condition upstream or downstream from the valve, a drain camera inspection service gives a much clearer answer than guesswork.
What not to treat as a DIY inspection issue
A routine inspection is not the same as repair work. Don't disassemble internal parts beyond basic access if you're unsure of the model. Don't force a stuck flap. Don't use sharp metal tools to scrape the seat clean.
If the flap hesitates, catches, or won't return smoothly, the inspection has already done its job. It has shown you that the valve needs a professional set of hands.
Safely Cleaning Your Backwater Valve
Cleaning is where homeowners often mean well and damage the valve. The safe version is controlled, gentle, and limited to debris removal, washing residue away, and confirming that the mechanism still moves as designed.
Start with protective gloves, safety glasses, a flashlight, rags, a bucket, a soft brush, and mild soapy water. Keep the work area clear so you don't drop dirt back into the chamber.
The safe cleaning sequence
For routine backwater valve maintenance, work in this order:
Remove the lid carefully
Lift or unscrew the access cover without twisting the seal out of shape. Set the lid on a clean towel.Inspect before touching anything
Use a flashlight first. It's easier to understand what's happening before debris gets stirred up.Remove loose debris by hand
Use a gloved hand or rag for leaves, paper residue, or sludge sitting in the chamber. Go slowly.Wash away grease and grime
Flush with water and use mild soapy water if you're dealing with greasy buildup. A practical example is a homeowner in Richmond opening the chamber during spring rains, removing the cap, flushing the valve with hot soapy water to dissolve hardened grease, and checking that the flap moves freely before resealing, as described in this Government of Canada guidance on backwater valves.Brush gently if needed
A long-handled soft brush can help remove residue from reachable surfaces. Don't gouge the seat or flap edge.Test the mechanism lightly
If the model allows, move the flap gently and let it return on its own.Check the O-ring and lid
Wipe the sealing surfaces clean before reinstalling the cover.
The mistake that ruins valves
The most damaging shortcut is using the wrong cleaning tool.
Never run a sewer snake through an installed backwater valve. Expert guidance warns that inserting cleaning cables directly through the valve can permanently damage the flapper and cause failure. Best practice is to install cleanout tees on both sides of the valve for safe maintenance access, according to this homeowner guide to backwater valves.
That warning matters in older Greater Vancouver homes where drain cleaning is common. If a line needs cabling, the plumber should access it properly, not through the valve body.
A short visual walkthrough can help you understand the parts before you open yours:
What works and what doesn't
Here's the practical difference.
| Method | Works well | Doesn't work well |
|---|---|---|
| Warm or hot soapy water | Grease film and light residue | Broken parts or root intrusion |
| Soft brush and rag | Surface cleaning and seat cleanup | Hard scale removal with force |
| Gentle manual flap test | Confirming free movement | Diagnosing alignment problems |
| Aggressive scraping tools | Rarely appropriate | Damages seals and seating surfaces |
| Sewer snake through valve | Never appropriate | Can permanently harm the flap |
If you smell sewage after cleaning, can't get the lid to reseal properly, or the flap still feels rough, stop. Cleaning is finished at that point, and inspection by a plumber is the next step.
Troubleshooting and When to Call a Professional
A common Burnaby call goes like this. The homeowner opens the access lid, sees the flap sitting a little crooked, and figures it just needs a firmer push or a better cleaning. That is the point where a simple maintenance check can turn into a damaged valve, a bad seal, or a backup risk the next time the municipal line is under pressure.
Homeowners can handle surface-level checks. Once the issue involves the valve not closing properly, damaged parts, repeat drainage problems, or any doubt about the sewer line beyond the chamber, bring in a licensed plumber.
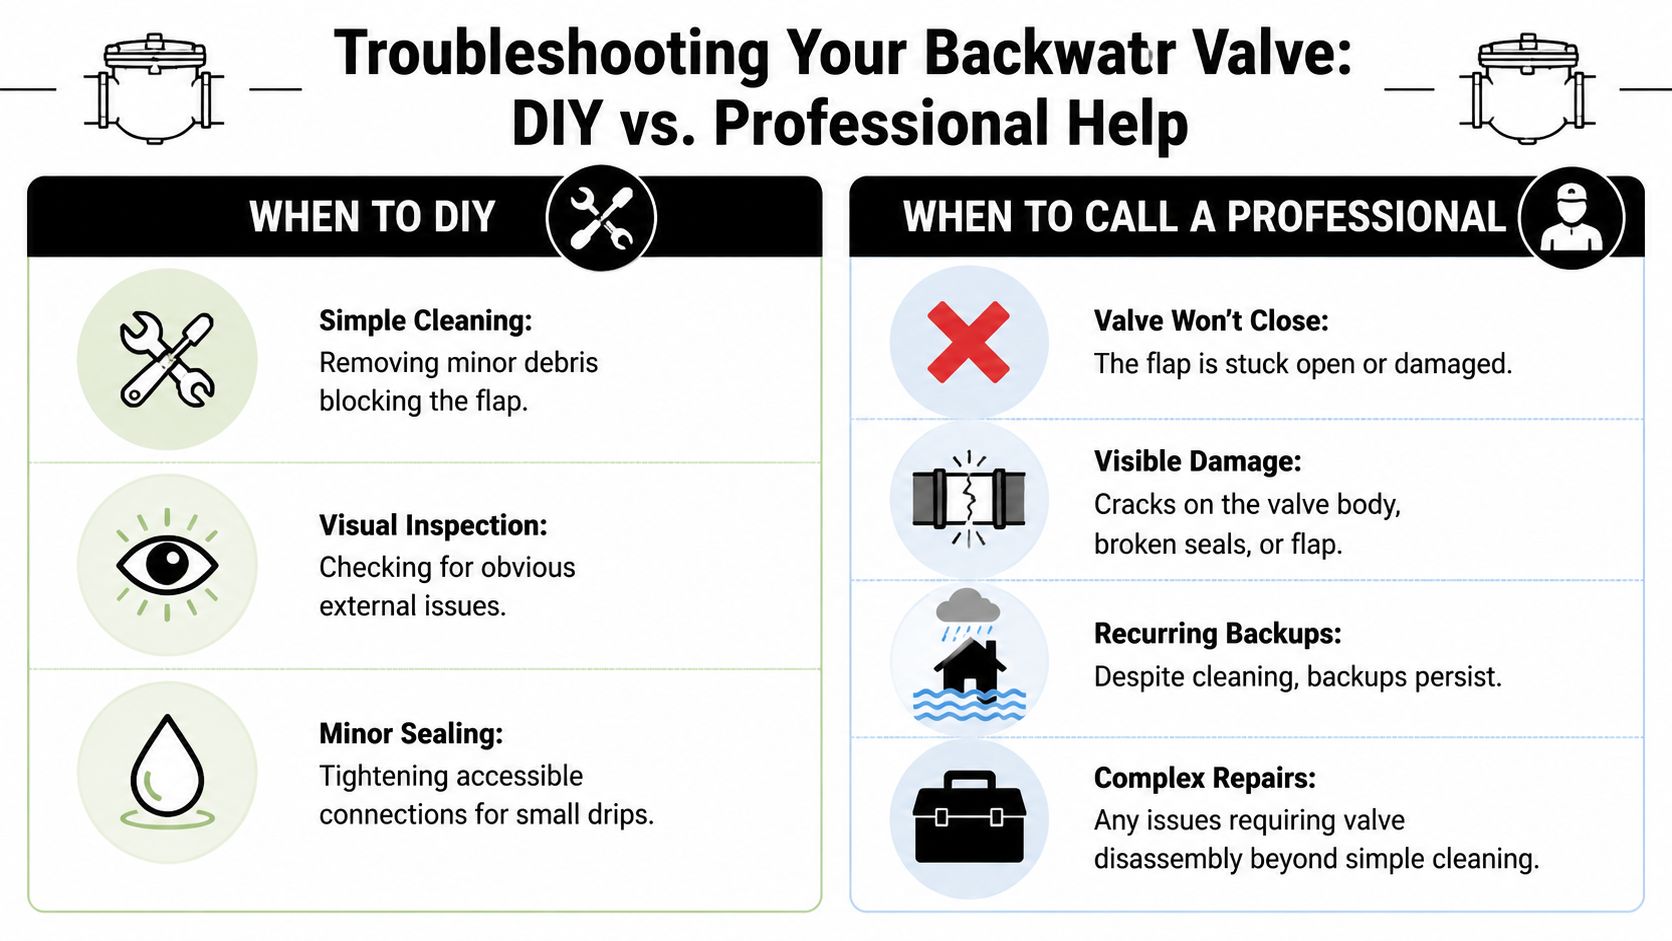
Signs you should stop and call
Use this as your clear cutoff point:
- The flap will not close fully. Debris may be trapped deeper in the seat, the hinge may be worn, or the body may be slightly out of position.
- You see cracks, warping, or damaged seals. Once the body or sealing surfaces are compromised, cleaning will not fix it.
- The chamber still smells foul after cleaning. That can point to standing waste, a sealing problem, or trouble farther down the line.
- You keep getting slow drains or backup symptoms. The valve may be doing its job, but the branch or main sewer line may need camera inspection.
- The internal assembly looks shifted or loose. Incorrect reassembly is a real problem, especially in homes where access is tight and parts are older.
If a valve looks mechanically wrong, do not force it. The whole point is dependable closure during a backup event.
Why professional service matters here
In Greater Vancouver, the trade-off is simple. A service call for proper diagnosis costs far less than replacing a valve body, opening finished flooring, or dealing with sewage damage after a preventable failure. Older Burnaby homes often have aging drainage lines, limited access, and previous renovations that make the original installation harder to inspect than generic online guides suggest.
There is also the paperwork side. Strata bylaws may limit who can work on drainage components. Insurance carriers may ask for proof that the valve was maintained correctly if there is ever a sewer backup claim. If a homeowner has taken the assembly apart, damaged the flap, or used a cable through the valve body, that conversation gets harder.
We see this often after heavy rain. The valve itself gets blamed, but the underlying issue turns out to be scale, roots, settlement, or a partially collapsed line farther downstream.
A simple DIY versus pro breakdown
| Situation | DIY-safe | Pro-only |
|---|---|---|
| Visual inspection through access lid | Yes | No |
| Removing loose debris you can reach easily | Yes | No |
| Gentle rinse with warm soapy water | Yes | No |
| Flap does not return smoothly after cleaning | No | Yes |
| Cracked lid, damaged seal, or warped parts | No | Yes |
| Any drain cleaning with cables or powered equipment | No | Yes |
| Repeat backups, gurgling, or line diagnosis | No | Yes |
If the problem extends beyond the valve, the repair method depends on what the inspection shows. In some cases, trenchless sewer line repair is the better option when the line itself is damaged or access under the slab is limited. Guessing is what gets homeowners into trouble. A camera inspection and a proper diagnosis tell you whether the valve needs service, the line needs repair, or both.
Vancouver-Specific Rules and Maintenance Planning
Generic online advice often misses the local realities here. In BC municipalities, backwater valves are now code-required for new construction or major renovations, and a key maintenance threshold is the annual visual inspection to verify that the flapper is seated correctly and free of debris, which can also be documented for insurance compliance, according to this BC backwater valve installation and maintenance reference.
For Greater Vancouver homeowners, there are three local pressures to keep in mind.
What makes local planning different
- Aging infrastructure means older neighbourhoods can put more stress on private drainage systems during storms.
- Strata rules may require documented checks for shared or unit-level plumbing assets.
- Insurance conditions often depend on proving the valve has been maintained, especially if sewer backup coverage is involved.
That last point gets missed all the time. Some guidance states that annual professional inspection is required by many BC insurers to maintain sewer backup coverage and that documented maintenance records matter. Even when a homeowner handles basic checks personally, keeping a dated log, photos, and service receipts is smart.
A practical schedule that works
For most homes in Burnaby and the surrounding area, a sensible maintenance rhythm looks like this:
- Quarterly visual checks through the access point
- Extra inspection after heavy rain
- Full cleaning twice per year, usually before the wettest part of the year and again after debris-heavy seasons
- One professional inspection each year
- Recordkeeping after every check or service visit
A practical example is a strata manager in Vancouver inspecting basement units quarterly, operating the manual override where present, and documenting the short test for insurance and building records. That kind of consistency matters in multi-unit properties because no one wants responsibility questioned after a backup.
The goal isn't to obsess over the valve. It's to make sure the one device designed to stop sewage from coming back into the home is clean, documented, and ready when the city system is under pressure.
If you want help with annual inspection, safe maintenance, drainage diagnostics, or sewer line issues in Burnaby, Vancouver, Richmond, or nearby communities, Encano Plumbing & Drainage Ltd. can assess your setup, document the condition of the valve, and handle the work that shouldn't be left to DIY. That gives you a clear answer on compliance, condition, and next steps before the next major storm hits.