

Your sink is full of cloudy water. You flip the wall switch, and instead of that familiar grind, you get silence, a hard hum, or a nasty metallic rattle. In Greater Vancouver, that problem isn't always as simple as a stuck spoon. Our coastal air, older plumbing in many buildings, and changing city rules all affect whether it makes sense to repair a garbage disposal or stop before you sink money into the wrong fix.
Most generic guides miss the local part. A disposal in Richmond or Delta doesn't age the same way as one in a dry inland climate, and a repair decision in Vancouver now has a by-law angle too. If you want to repair a garbage disposal safely, start with the simple checks, know what a fixable jam sounds like, and recognise the signs that tell you to put the tools down.
Table of Contents
- Safety First Essentials and Required Tools
- How to Diagnose Your Garbage Disposal Problem
- Step-by-Step DIY Garbage Disposal Repairs
- When to Stop and Avoid Costly Mistakes
- Proactive Maintenance to Extend Unit Lifespan
- When to Call a Professional Vancouver Plumber
Safety First Essentials and Required Tools
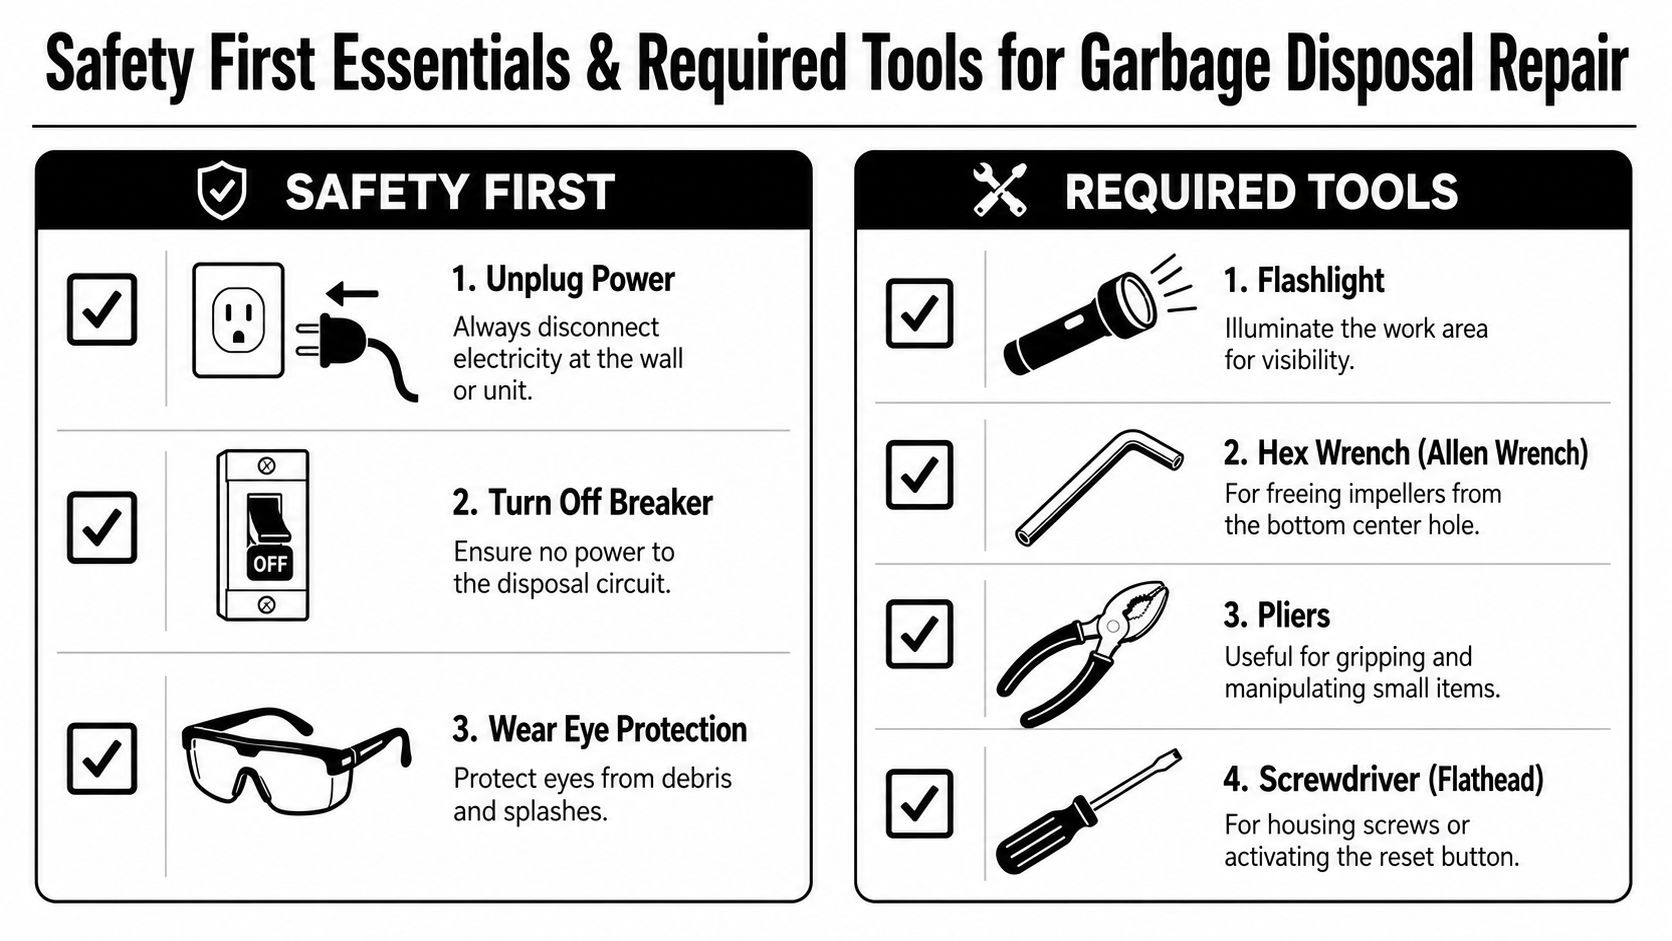
Safety isn't optional when you repair a garbage disposal. This is a powered appliance sitting under a metal sink, often in a cramped cabinet with water nearby. The fastest way to turn a small repair into an injury is to assume the switch is enough.
Cut power the right way
Start at the sink, but finish at the electrical source. If the unit plugs into an outlet under the sink, unplug it. If it's hardwired, turn off the breaker that controls the disposal circuit. Then go back to the switch and try to turn the unit on. You want confirmation that nothing happens.
If you're working in a tight cabinet with any shutoff valves in rough shape, it's also smart to know how to shut off your water main safely before you start loosening anything below the sink.
Practical rule: Never put your hand into the grind chamber, even when you're sure the power is off. Use pliers, tongs, or the proper bottom hex fitting.
Wear eye protection. Old food debris, rusty water, and bits of metal or glass can drop when you disturb a jam or disconnect a trap. Keep the cabinet floor as dry as you can so you're not kneeling in water while handling tools.
Tools that actually matter
You don't need a van full of gear for the first round of troubleshooting. You do need the right few items.
- Flashlight: You need to see into the chamber and around the mounting ring. Phone lights work in a pinch, but a proper flashlight keeps one hand free.
- 1/4-inch Allen wrench: This is the key tool for many jams. On many units, it fits the bottom centre socket used to rotate the flywheel manually.
- Pliers or tongs: Use them to remove visible debris like bottle caps, fruit pits, screws, or a dropped spoon.
- Flathead screwdriver: Handy for hose clamps, cover plates, or helping with awkward fasteners.
- Bucket and rags: If you loosen drain fittings, assume trapped water and sludge are coming out.
- Work gloves: Good for handling dirty plumbing parts. They are not a licence to reach into the disposal.
A simple setup beats improvising. If you're stopping every two minutes to hunt for a rag, balancing a phone light in your mouth, or using the wrong wrench, you're more likely to strip a fitting or miss the underlying problem.
How to Diagnose Your Garbage Disposal Problem
It is 8 p.m., the sink is full, and the disposal suddenly changes its tune. That sound, or lack of it, is the first clue. Around Greater Vancouver, I also tell homeowners to factor in age and environment. Hard water buildup, damp cabinets, and salt air in coastal areas like Richmond, Delta, and North Vancouver can turn a simple diagnosis into a repair-or-replace decision faster than generic guides suggest.
Match the symptom to the failure
Start with what the unit is doing right now.
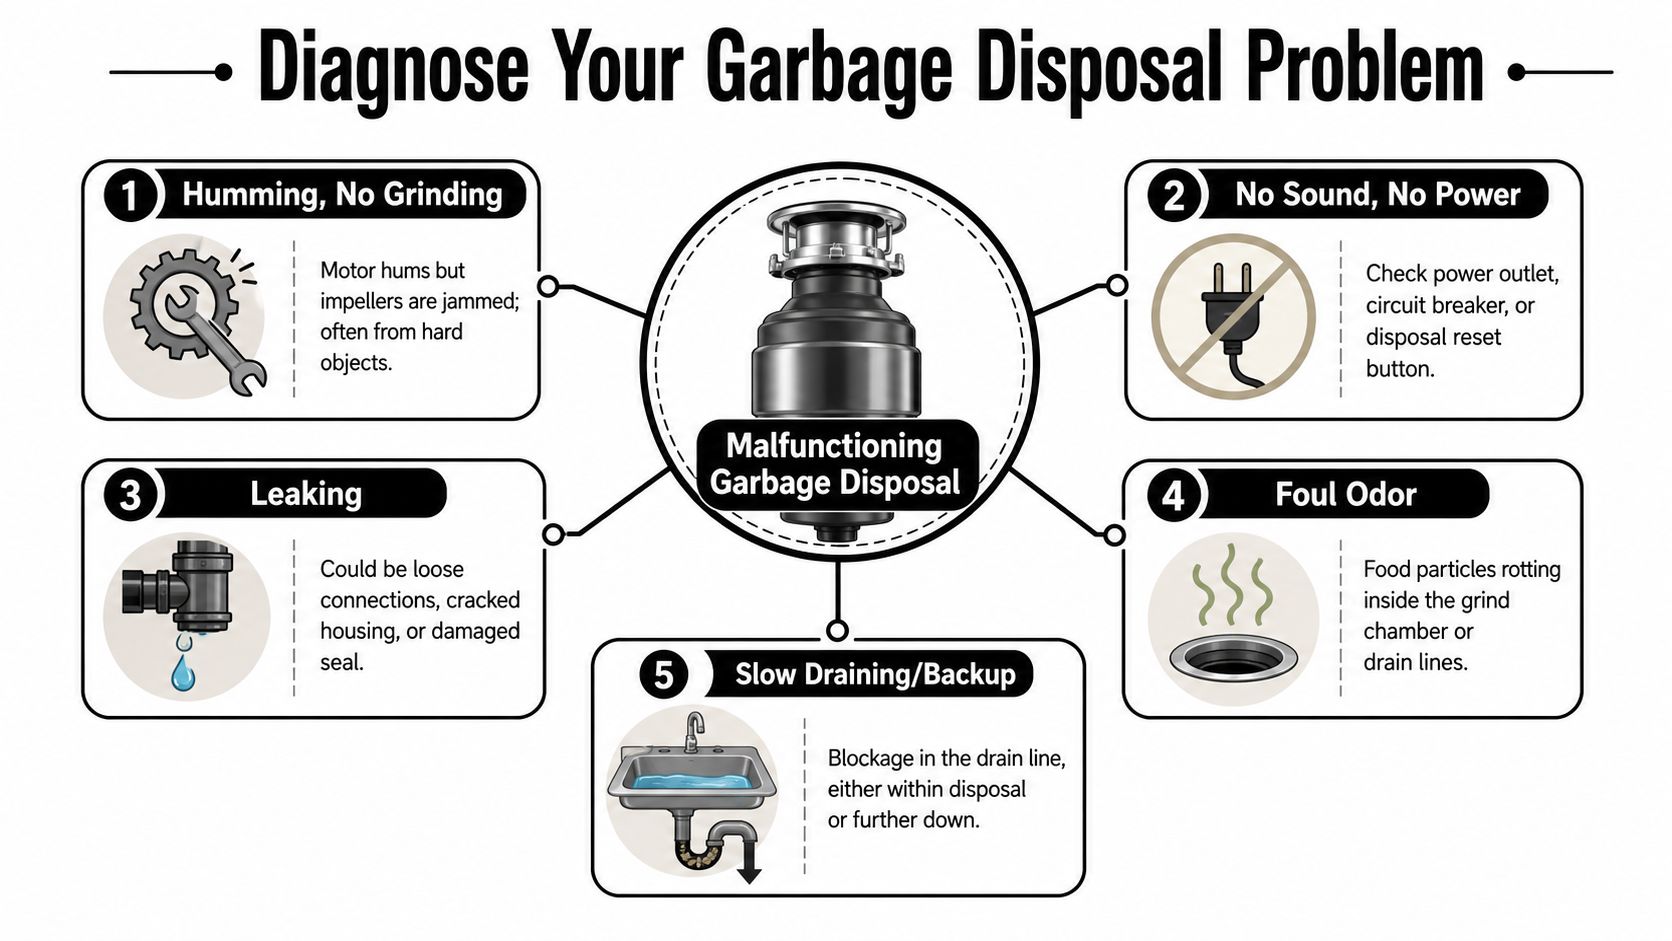
If the disposal is completely silent, check for power first. Look at the plug, the wall switch, and the breaker. Then press the red reset button on the bottom of the unit. That simple step fixes a lot of overload trips after a jam or overheating event, especially on older units that have been working harder than they should.
If the disposal hums but does not spin, the motor is getting power but the turntable is stuck. In my experience, that usually means a jam from a hard object or heavy food waste packed around the impeller area. Shut it off quickly. Letting it hum under load can overheat the motor.
If you hear sharp metal-on-metal grinding, assume something solid is inside. Small bones, fruit pits, screws, and dropped cutlery are common. In Vancouver homes with older sink setups, I also see rust flakes or corrosion scale break loose and get caught in the chamber.
If there is water under the sink, find the highest wet point before you touch a fitting. A leak from the sink flange tells a different story than a leak from the side dishwasher inlet or the disposal body itself. A cracked housing usually means replacement is the honest answer, not sealant.
Use this as a quick field guide:
| Symptom | Most likely cause | First move |
|---|---|---|
| No sound | No power or tripped overload | Check plug, breaker, and reset button |
| Humming only | Jammed flywheel or impeller area | Cut power and test the bottom hex socket |
| Metallic grinding | Foreign object inside | Remove visible object with pliers |
| Drip under sink | Loose fitting, failed flange seal, or cracked housing | Dry everything and trace the leak source |
| Slow drain | Food blockage in the disposal or drain line | Check for buildup and inspect the trap or branch drain |
Slow drainage needs a little judgment. If the disposal runs but the sink backs up, the problem may be downstream rather than in the unit itself. A disposal cannot push through a grease-heavy clog in the trap arm. If that sounds like your setup, start with this guide on how to fix a clogged sink before assuming the disposal has failed.
A local example that changes the call
A Richmond homeowner drops a spoon into the sink while rinsing dishes. The disposal hums but will not turn. That usually points to a mechanical jam, not a bad switch or dead motor.
A different call in Tsawwassen can look similar at first, but the unit is 10 years old and the lower housing is already corroded from salty coastal air. In that case, forcing a stuck mechanism loose may get it spinning for a week or two, then the seals let go and the cabinet starts leaking. That is the trade-off homeowners need to hear clearly.
Diagnosis is also getting more important because of the 2025 city by-law changes being discussed around food waste handling and fixture updates. If your unit is old, leaking, and inefficient, putting money into a marginal repair may not make sense when replacement could better match upcoming local requirements. A good diagnosis does not just answer, “Can this be fixed?” It answers, “Is this still worth fixing in Greater Vancouver?”
Step-by-Step DIY Garbage Disposal Repairs
A lot of disposal trouble is still fixable at home, but only if the unit is in decent shape to begin with. Around Greater Vancouver, that matters more than many guides admit. Hard water scale in some buildings, salty air in places like Tsawwassen and Richmond, and older condo plumbing can turn a simple repair into a short-lived patch.
Reset a dead unit before doing anything else
If the disposal is completely silent, start with the overload reset.
- Turn the wall switch off.
- Check that the unit still has power at the plug or breaker.
- Press the red reset button on the bottom of the disposal.
- Wait a few seconds and test it.
This can solve a shutdown caused by overheating or a brief jam. If the reset clicks and the unit comes back, use it briefly with cold water and listen for rough noise. A reset that trips again soon usually points to a bigger problem, not a one-time overload.
Free a humming disposal that will not spin
A humming disposal usually means the motor has power but the turntable cannot move. Shut it off right away. Letting it hum under load can overheat the motor.
Then work through it in this order:
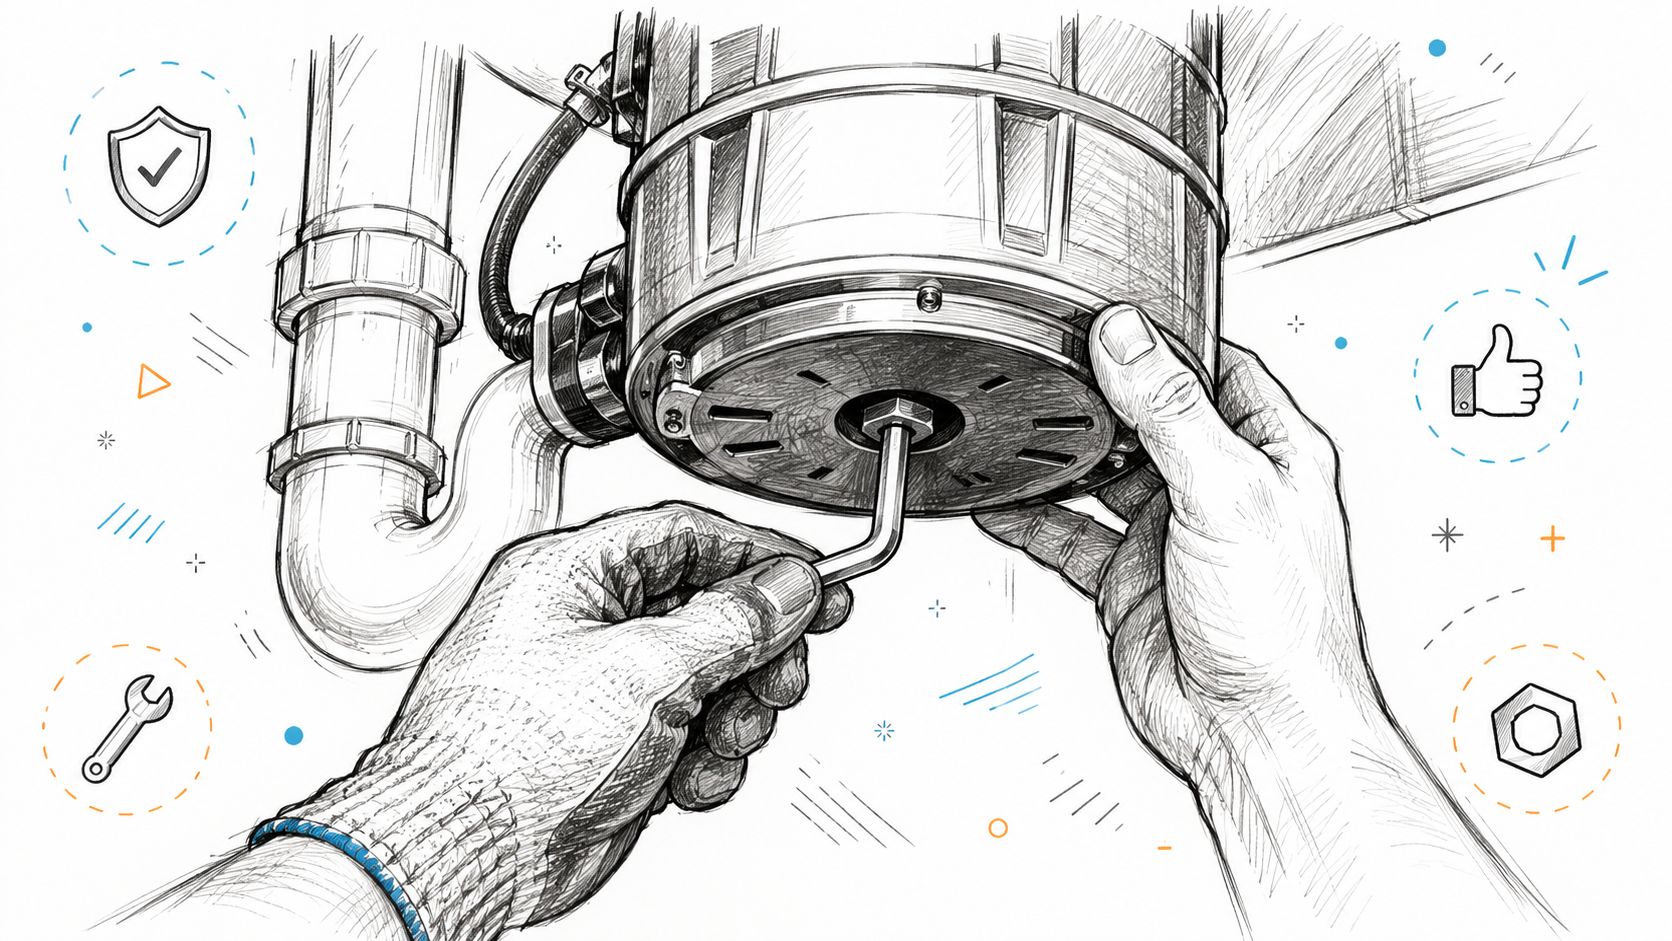
- Disconnect power fully.
- Use a flashlight to check inside the chamber.
- Pull out visible objects with pliers or tongs. Never reach in by hand.
- Insert a 1/4-inch Allen wrench into the bottom centre socket.
- Work the mechanism back and forth until it turns freely.
That fix works well for a fresh jam, like a utensil, fruit pit, or piece of glass. It is less promising on an older coastal unit with corrosion around the lower bearing. I tell Vancouver-area homeowners to pay attention to the feel here. If the wrench frees the unit smoothly, good. If it binds hard, grinds, or only moves a few degrees, do not force it.
A Richmond homeowner who drops a spoon into the chamber can often clear the jam and get years more out of the unit. A ten-year-old disposal near the water in Delta may free up, then start leaking a week later because the seals and housing were already near the end. That repair versus replace call is part of the job here, especially with 2025 by-law changes likely to push more homeowners to update aging kitchen fixtures instead of nursing them along.
If the sink backs up while the disposal runs, the clog may be below the unit instead of inside it. In that case, follow a proper how to fix a clogged sink step-by-step guide before assuming the disposal itself has failed.
For a visual walkthrough, this short clip shows the basic motion and body position under the sink:
Track down and fix the common leak points
Leaks waste a lot of DIY time because the drip often shows up lower than the actual failure. Dry everything first. Then run a small amount of water and watch with a flashlight.
Check these spots carefully:
- Sink flange: Water starts near the top mounting assembly under the sink.
- Dishwasher inlet: The small side nipple drips when the dishwasher drains.
- Discharge pipe: Water appears around the outlet connection or slip nut.
- Disposal body: The housing itself is cracked or corroded.
A common and costly mistake, especially in multi-unit buildings, is poor flange sealing during installation or reinstallation. If the leak starts at the sink opening, remove the old putty fully and apply a fresh 1/4-inch bead before setting the flange again. In condos, a slow flange leak can run down the mount, stain the cabinet, and start corrosion that makes later removal much harder.
Here's the trap I see often in Burnaby and New Westminster. A homeowner notices a few drops under the disposal after each use and keeps tightening the discharge pipe. The leak originates at the flange above, so the water tracks down the assembly and makes the lower connection look guilty. Tightening the wrong fitting does nothing except risk cracking an older plastic drain arm.
If the leak is coming through the disposal body, stop there. Patch products rarely last on a rusted or corroded housing, and in Vancouver's damp under-sink conditions they usually fail sooner than people expect.
When to Stop and Avoid Costly Mistakes
You clear a jam, hit reset, try the switch again, and the same hum comes right back. That is usually the point where I tell Vancouver homeowners to stop pushing their luck.
A disposal that will not change its behaviour after the basic checks often has a deeper problem. In practice, the expensive mistakes start when someone keeps forcing a stuck unit, keeps resetting a tripping motor, or starts taking apart corroded hardware under a wet sink cabinet.
Signs the problem is no longer a DIY repair
Some calls are straightforward. This part is not.
Stop and reassess if you notice any of these:
- The reset button keeps tripping: Repeated trips usually mean overheating, an electrical fault, or a motor that is nearing failure.
- The unit still hums after the mechanism turns freely: The jam may be gone, but the motor may already be damaged.
- You smell burning or see darkened wiring: Shut power off at the breaker and leave it alone until it is checked properly.
- Water is coming through the disposal body: A cracked or corroded housing is usually a replacement job.
- Mounting parts or fasteners are badly rusted or seized: Forcing them can twist the sink flange, crack the drain connection, or turn a simple swap into cabinet and drain work.
One mistake I see often is assuming every humming disposal is still just mechanically stuck. In coastal BC communities, a significant number of seemingly unfixable disposals turn out to have failing or burned-out motors related to corrosion, not a simple jam. That matters in Greater Vancouver, where damp air, hard water buildup, and salt exposure can age metal parts faster than generic repair guides suggest.
A corroded unit can fool you. It may free up briefly with an Allen key, run once or twice, then seize again because the underlying problem is inside the motor or bearing assembly.
That is not a good candidate for repeated DIY attempts.
Why local conditions change the repair decision
Greater Vancouver has its own disposal problems. Near the coast, salt air works on exposed metal. In older homes and some multi-unit buildings, hard water scale adds drag to moving parts and shortens seal life. Under-sink spaces here also stay damp for long stretches, especially through fall and winter, which speeds up corrosion around mounts, screws, and lower housings.
That combination changes the repair versus replace call. A five-minute jam fix makes sense on a fairly clean unit with no electrical smell, no corrosion, and no body leak. It makes far less sense on an older disposal that hums inconsistently, shows rust at the mount, and has already needed more than one reset.
There is also a timing issue now. With 2025 city by-law changes looming, some Vancouver-area homeowners will be better off replacing an aging disposal with a compliant setup instead of putting money into a unit that is already near the end of its life. Generic articles rarely mention that, but it matters if you are deciding whether to buy parts, spend an afternoon under the sink, and still face replacement soon after.
One more stop sign. Do not pour chemical drain cleaner into a disposal that is jammed, leaking, or overheating. It will not fix a bad motor or corroded housing, and it makes the next repair more hazardous for whoever has to handle the unit.
Proactive Maintenance to Extend Unit Lifespan
A disposal usually gives you a long warning before it fails. In Vancouver homes, that warning often shows up as slower grinding, a lingering sour smell, or light rust around screws and clamps under the sink. Our damp winters, coastal air, and hard water in some buildings shorten the margin for sloppy habits.
Daily use matters more than occasional cleaning. A unit that sees small loads, plenty of cold water, and the right food waste will usually outlast one that gets packed with rice, peels, grease, and coffee grounds, even if both are the same age.
Habits that help
Keep the routine simple and consistent.
- Run cold water before, during, and after use: That helps carry ground waste through the trap and drain line instead of leaving soft grease behind.
- Feed waste gradually: Small amounts reduce strain on the motor and lower the chance of a jam.
- Keep stringy and hard scraps out: Celery, onion skins, corn husks, pits, bones, shells, and fruit stickers cause a lot of the calls I hear about.
- Rinse and wipe the splash guard: The rubber baffle holds residue and starts to smell long before the grinding chamber does.
- Pay attention to sound changes: A rougher grind or new rattle often means wear, loose metal, or buildup, not just “normal aging.”
One house rule helps a lot. Scrape plates into the compost first, then use the disposal for the small bits left behind. That matters even more with the 2025 by-law changes coming, because homeowners deciding whether to repair or switch to a garbage disposal replacement with installation should avoid adding extra wear to a unit that may already be near the end.
What not to pour down the drain
Chemical drain cleaner causes more trouble than it solves. If the sink is slow, the disposal is humming, or the chamber smells hot, chemicals will not repair the underlying fault. In strata buildings, using them can also lead to serious liability problems if corrosion or leaks spread into shared drainage lines.
Grease is another common mistake. It may go down warm, then cool in the line and trap food particles. In older Vancouver homes with tired kitchen drains, that buildup shows up fast.
Keep these maintenance rules in plain view:
| Do | Avoid |
|---|---|
| Cold water during operation | Chemical drain cleaners |
| Small batches of food waste | Grease and oil |
| Compost peels, rice, and fibrous scraps | Packing the chamber full |
| Stop and inspect if the sound changes | Repeated switch flipping |
| Clean the splash guard regularly | Reaching inside by hand |
If odour keeps coming back, clean the baffle and check for residue under the lip. If draining stays slow after that, the problem is usually in the branch drain, not the disposal itself. That is a plumbing issue, and forcing the unit to “grind through it” only shortens its life.
When to Call a Professional Vancouver Plumber
It usually goes like this in Vancouver. The sink backs up during dinner cleanup, the disposal hums, and there is water showing up in the cabinet. At that point, a quick DIY attempt can turn a simple service call into a burned-out motor, a stained cabinet base, or a leak into the suite below.
Call a plumber if the unit trips the breaker, leaks from the body of the disposal, smells like hot wiring, or stays jammed after you have safely tried the reset and manual turn. Those symptoms point past a routine clog. They often mean electrical trouble, a failed seal, internal corrosion, or a drain issue farther down the line.
Greater Vancouver homes have a few local wrinkles that generic guides miss. In coastal areas, salt air speeds up rust on older fasteners and mounting hardware. Hard water leaves scale on moving parts and around seals, especially in aging kitchens with older shutoffs and trap connections. I also tell callers in strata buildings to stop earlier than they would in a detached house, because a small kitchen leak can become a building problem fast.
Repair still makes sense if the problem is limited to a jam, a stuck reset, or a simple connection leak at the dishwasher hose or drain arm. If the housing itself is cracked, the lower seal is leaking, or the motor shaft has heavy corrosion, money usually goes farther on replacement or full removal. If you are weighing those options, it helps to look at a complete garbage disposal replacement with installation instead of swapping the unit and hoping the old drain setup cooperates.
Installation problems are another reason to bring in a pro. A disposal can look like a direct replacement until the old unit comes down and you find a warped sink opening, a bad flange seal, poor drain alignment, or cabinet plumbing that was pieced together years ago. Those are common in older Vancouver and Burnaby homes. They are also the jobs where a rushed repair tends to come back as a leak.
Removal and disposal planning matter too. The City of Vancouver's Waste Wizard service information explains that collection service depends on property type, so homeowners and strata residents may not handle old units the same way. That matters once replacement or removal is on the table.
On the by-law side, be careful with bold claims. Vancouver has been pushing food-scrap diversion and waste reduction, but if someone says disposals are already banned or about to be banned, check the actual City of Vancouver by-law or council record before spending money based on that advice. If you cannot verify the rule from an official city source, treat it as uncertain and make the repair decision on the condition of the unit, the plumbing around it, and whether compost collection already meets your kitchen needs.
When you call, give the plumber the details that save time: the sound it makes, whether the reset button changed anything, where the leak shows up, and whether you are in a detached home or strata unit. That is usually enough to tell whether you need a repair, a replacement, or a hard stop before the damage gets more expensive.
If your disposal is humming, leaking, jammed, or you're unsure whether it's even worth repairing under Vancouver's changing rules, contact Encano Plumbing & Drainage Ltd.. Their team serves Vancouver, Richmond, Burnaby, New Westminster, Delta, Surrey, and nearby communities with 24/7 emergency response, clear pricing, and practical advice on whether to repair, replace, or remove the unit safely.