
You hear it from the bathroom before you see it, a soft, regular tap landing in the sink long after everyone else has gone to bed. At first, you leave it alone. Then the sound follows you through the night, the handle gets harder to turn, or you notice a damp patch inside the cabinet. Learning how to fix a dripping faucet starts with identifying the leak properly, not buying the first repair kit that looks close enough.
The repair is usually manageable with a basic wrench set, but the correct method depends on whether you have a compression, cartridge, ball, or ceramic disk faucet. The expensive mistake is taking the handle apart without knowing which design is inside, then forcing the wrong cartridge or damaging a small seal. Diagnose first, photograph everything, and replace only the worn component when the faucet body is still sound.
Table of Contents
- Why That Late-Night Drip Matters More Than You Think
- Identifying Your Faucet Type Before You Buy Any Parts
- Tools, Parts, and Preparation for Any Faucet Repair
- Step-by-Step Repairs for Compression, Cartridge, Ball, and Ceramic Disk Faucets
- Troubleshooting the Four Most Common Post-Repair Problems
- A Real Richmond Kitchen Faucet Repair From Start to Finish
- When to Stop and Call a Licensed Plumber in Greater Vancouver
Why That Late-Night Drip Matters More Than You Think
A slow bathroom-sink drip can continue for weeks because it doesn't look urgent. Water disappears down the drain, the cabinet stays mostly dry, and the faucet still supplies water when you need it. The problem is that a leak doesn't need to look dramatic to become a persistent waste of treated water.
California utility guidance says a faucet dripping once per second can waste more than 3,000 gallons of water per year, and the same guidance recommends checking the connection, resealing it with plumbing tape and a wrench, then replacing the aerator or worn faucet parts when necessary. See the California faucet leak repair guidance for that practical sequence. British Columbia's figures use litres, but the lesson is the same. BC Hydro reports that a tap dripping 10 times per minute wastes about 2,000 litres per year, while a leaky faucet can waste up to 11,350 litres annually, as described in this BC Hydro water-saving guidance.

The Capital Regional District gives the local context clearly. In British Columbia, a dripping faucet or showerhead can waste more than 35,000 litres a year, and an intermittent drip can fill a bathtub more than 100 times in a year. Its advice to inspect faucets and toilets at least once a year is sensible for detached homes, rentals, strata units, and commercial washrooms alike. A hidden-leak inspection guide for homeowners can help when the visible drip isn't the only source.
There are secondary costs beyond water use. Mineral deposits stain stainless steel, a leaking valve seat can corrode, and moisture can slowly damage particle-board cabinet bases in older Vancouver condos. Fixing the drip early is usually less disruptive than dealing with a seized internal part or swollen cabinetry later.
Identifying Your Faucet Type Before You Buy Any Parts
The most important diagnostic moment happens before you reach for a screwdriver. Look at the handle arrangement, the movement of the control, and the shape of the cap or body. Then photograph the faucet from above, from the side, and underneath the sink before visiting a Burnaby or Vancouver plumbing supply counter.
Match the outside to the mechanism
Compression faucets have two separate handles, usually marked hot and cold. Each handle turns through several rotations and presses a rubber washer against a valve seat. A compression faucet commonly drips from the spout when the handle is fully closed, especially when the washer has hardened or the seat has become rough.
Cartridge faucets generally use one lever that moves up and down and side to side. The lever controls both temperature and flow, and the decorative cap often hides a retaining screw, clip, or nut. If water comes through the spout while the lever is centred and closed, a worn cartridge is a strong possibility.
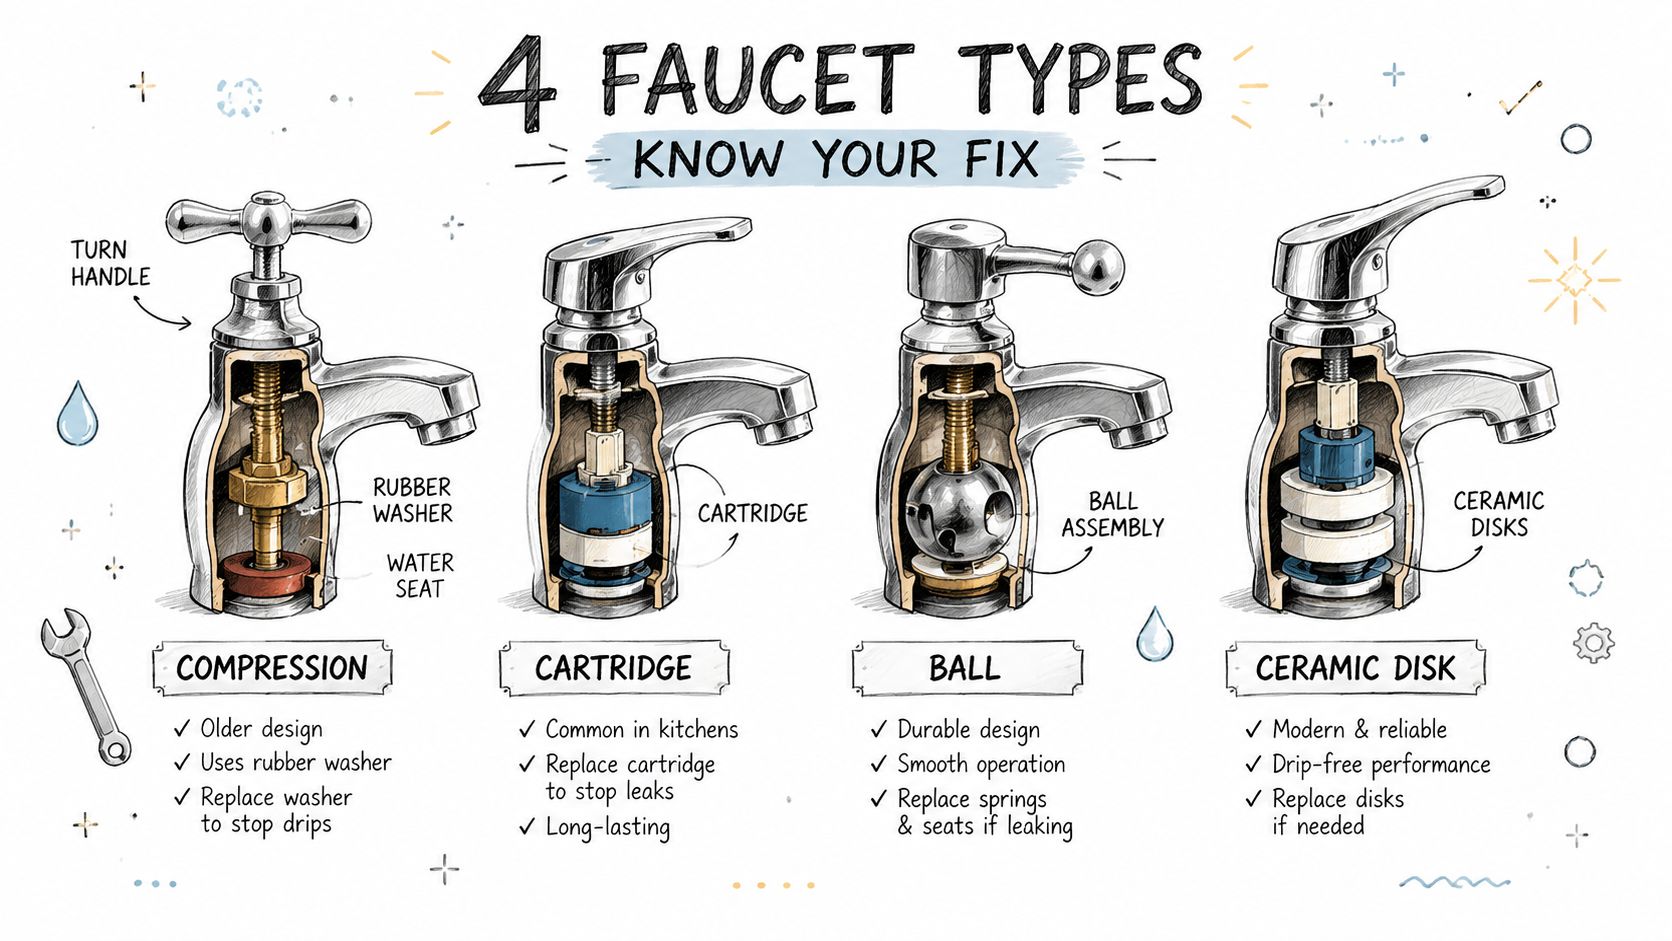
A ball faucet has one lever mounted on a rounded cap. Inside is a polished ball, with small rubber seals and springs controlling the water passages. These faucets often leak around the spout base, although a damaged ball or seal can also allow water through the spout.
A ceramic disk faucet usually has a wider, smooth cylindrical body with one side lever. The control cartridge contains ceramic disks rather than a conventional rubber washer. A drip or reduced flow can come from worn inlet seals, debris, or damage inside the disk cartridge.
Photograph the details that identify the part
Take a close image of the brand mark, handle screw location, cap shape, retaining clip, cartridge stem, and the underside of the old cartridge once removed. Photograph the sink holes and the supply connections too. A repair counter can often match a cartridge from its profile, but “single handle kitchen faucet” isn't enough information.
Practical rule: Never buy a cartridge by appearance alone. Bring the old part, its brand information, or clear photographs showing the stem and retaining arrangement.
Tools, Parts, and Preparation for Any Faucet Repair
The first step is shutting off the water. Find the hot and cold angle stops under the sink and turn them clockwise. Open the faucet afterwards to release pressure and confirm that the flow stops. In older Vancouver Specials, seized angle stops are common enough that you should know where the whole-home shutoff is before opening the faucet body. If you're unsure how to isolate the supply safely, use this guide to shut off your water main safely.
Set a towel or shallow tray below the connections. Plug the drain with a rag before removing screws, clips, springs, or washers. Small parts disappear quickly, and a flashlight makes it much easier to see retaining clips and corrosion beneath a dark counter.
Your basic kit should include:
- Adjustable wrench: Use it on packing nuts and supply connections, with tape around finished surfaces to prevent scratches.
- Allen wrench set: Many modern handle screws sit beneath a small side or rear opening.
- Phillips and flathead screwdrivers: You may need one for the handle and the other for a decorative button.
- Plumber's grease: Apply a light coat to compatible O-rings and moving seals.
- Needle-nose pliers: Useful for retaining clips, springs, and small washers.
- Flashlight: Helps you inspect the valve body and the underside of the sink.
- Towel or tray: Keeps dropped parts out of the drain and protects the cabinet.
Parts by faucet design
Compression faucets usually need a matching rubber washer, O-ring, or both. Cartridge faucets need the exact replacement cartridge, ideally matched by brand and model. Ball faucets use a cam and seal kit, or a replacement ball if the ball surface is damaged. Ceramic disk faucets generally need the complete ceramic disk cartridge assembly and its matched inlet seals.
| Faucet Type | Replacement Parts | Specialty Tools |
|---|---|---|
| Compression | Rubber washer, O-ring, possible valve-seat component | Adjustable wrench, screwdriver |
| Cartridge | Matching cartridge, retaining clip or O-rings where supplied | Allen keys, pliers, cartridge puller if seized |
| Ball | Cam, rubber seals, springs, replacement ball if needed | Needle-nose pliers, adjustable wrench |
| Ceramic disk | Ceramic disk cartridge assembly, matched inlet seals | Allen keys, screwdriver, adjustable wrench |
Don't start until you know which shutoff controls the faucet and the drain is blocked. That preparation takes little time and prevents the two failures I see most often, flooding the cabinet and losing the one small part needed to finish the job.
Step-by-Step Repairs for Compression, Cartridge, Ball, and Ceramic Disk Faucets
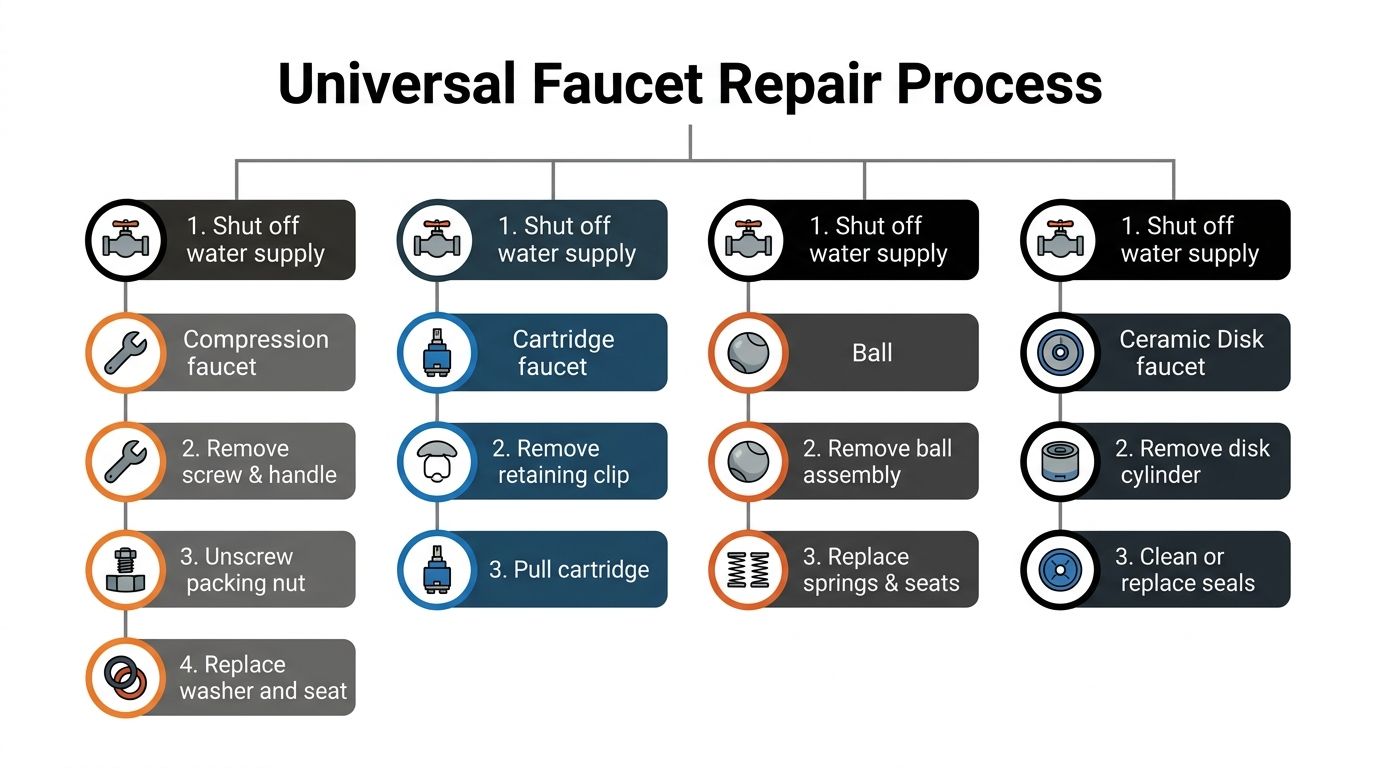
All four designs follow the same broad logic. Verify the water is off, remove the handle, extract the stem or cartridge, inspect the internal parts, install the matching replacement, and reassemble. Tighten by hand first, then use the wrench for a light quarter-turn snug. Over-tightening can distort seals and make the handle difficult to operate.
Compression faucet
Remove the decorative cap and handle screw, then lift off the handle. Loosen the packing nut and withdraw the stem. At the bottom, replace the worn rubber washer and inspect the valve seat for pitting or corrosion. Replace the O-ring around the stem if water was escaping near the handle.
The common mistake is tightening the stem packing nut too aggressively. It may stop a handle leak briefly, but it can crush the packing and make the handle stiff. If the seat is damaged, a new washer alone may not hold the seal.
Cartridge faucet
Remove the handle screw, then lift the lever off. Locate the retaining clip or retaining nut and remove it completely before trying to pull the cartridge. Rotate the cartridge stem only as the manufacturer permits, then pull the cartridge straight out and install the replacement in the same orientation.
A stuck cartridge needs patience, not force. The usual error is trying to pry it out before removing the retaining clip, which can damage the faucet body. A cartridge puller is safer than twisting the exposed stem with pliers.
Ball faucet
Remove the handle and rounded cap, then lift out the cam and ball assembly. Use needle-nose pliers to remove the rubber seals and springs, keeping the parts in order. Install the new springs and seals, place the ball in its locating slot, and refit the cam before tightening the cap.
The small rubber seats can fall straight into the drain opening. Keep the rag in place and don't tip the faucet body while the parts are exposed.
Ceramic disk faucet
Remove the side lever and the retaining screws or cap that secure the disk cylinder. Lift out the cylinder, clean away loose debris, and inspect the inlet seals. Replace the complete ceramic disk cartridge assembly when the disks are damaged or the matched seals have hardened.
Reusing worn inlet seals is a common false economy. The replacement cartridge kit should include the seals that match that cylinder. Once reassembled, open the shutoffs gradually and check the aerator for debris before judging the repair.
Troubleshooting the Four Most Common Post-Repair Problems
A faucet that misbehaves after reassembly usually tells you where to look. Don't immediately buy another part. Recheck alignment, retaining hardware, seals, and the supply path in that order.
| Symptom | Most Likely Cause | First Fix to Try |
|---|---|---|
| Still drips from the spout | Misaligned cartridge, incorrect washer size, debris on a ceramic disk seat | Shut off the water, reopen the faucet, and check alignment and seating |
| Handle is stiff | Over-tightened packing nut or cartridge seated off-axis | Loosen the nut slightly or reseat the cartridge |
| Low flow from the spout | Clogged aerator, partly closed supply valve, kinked supply line | Remove and clean the aerator, then check both valves and lines |
| Leak under the cabinet | Loose supply connection, failed base O-ring, compromised spout shank | Dry the area, run the faucet, and trace the first wet point |
A continuing spout drip after a compression repair often means the washer isn't the correct size or the valve seat is damaged. With a cartridge or ceramic disk design, remove the component again and check that its locating tabs are seated correctly. A grain of debris on a ceramic disk seat can prevent a new seal from closing.
A stiff handle usually comes from excess compression or poor alignment. Back off a packing nut slightly, or remove and reseat the cartridge without forcing the lever through its range. Low flow requires a different diagnosis, start at the aerator and work back to the shutoff valves and flexible supply lines.
Stop chasing the repair if water appears under the cabinet while the faucet is closed, the body or stem is badly corroded, or the leak source isn't clear. Water that reaches the ceiling below can be a fixture connection problem or a larger supply issue, and repeated disassembly can make the damage worse.
A Real Richmond Kitchen Faucet Repair From Start to Finish
In a Richmond two-bath townhouse, a homeowner had heard a single-handle kitchen faucet dripping for three weeks. The strata shutoff valves were old, so the first job was confirming that they closed before taking the handle apart. The faucet was a cartridge design, and the water-loss benchmark for a once-per-second drip is more than 3,000 gallons per year, according to California's published leak guidance.
The homeowner lifted the handle, photographed the brand and retaining arrangement, and removed the cartridge only after taking out the retaining clip. The old cartridge went to a Richmond plumbing supply counter, where it was matched to the replacement. The repair took about 45 minutes and used approximately $35 in parts, including the replacement cartridge. Those figures describe this particular repair, not a guaranteed price or duration for every faucet.
After installing the new cartridge, the homeowner opened the shutoffs gradually, checked the base and supply connections with a dry towel, and ran the pull-out sprayer to clear air from the line. The faucet operated smoothly and the cabinet stayed dry.
Richmond and Vancouver shutoff checklist
- Test the angle stops: Confirm they stop the flow before disassembly.
- Locate the strata master shutoff: Multi-family buildings may require building access or coordination.
- Check the shared tee: Turn off the icemaker if its supply line branches from the same valve.
- Document the setup: Keep photographs of the cartridge orientation and supply connections.
- Follow strata requirements: Ask about approval before replacing the entire fixture or altering shared plumbing.
When to Stop and Call a Licensed Plumber in Greater Vancouver
Some faucet repairs cross the DIY line quickly. Stop and call a licensed plumber if water appears under the sink cabinet or on the ceiling below. That indicates the leak may involve a supply connection, faucet shank, or concealed plumbing rather than the visible spout drip.
Stop if corrosion has fused the stem to the faucet body. Prying against a corroded body can crack the fixture or damage the sink. A faucet older than 15 years may also have parts that are no longer stocked, making a full replacement more practical than repeated searches for obsolete seals.
Recurring drips within 30 days of a repair point toward valve-seat damage or another internal defect. A plumber with the right seat-grinding or repipe tools can assess the body without turning a small fixture repair into cabinet or ceiling damage. Licensed plumbing support in Vancouver is appropriate when the shutoff won't hold, the source is hidden, or the repair keeps returning.
Before calling, test the shutoff if it's safe, photograph the faucet and connections, and check your strata rules. Once a year, remove the aerator, inspect for mineral buildup, and listen for slow drips. Encano Plumbing & Drainage Ltd. serves Vancouver, Burnaby, Richmond, Surrey, and the North Shore for scheduled and emergency plumbing work, including faucet leak diagnosis and repair.
If your faucet is still dripping after you've identified its type, Encano Plumbing & Drainage Ltd. can diagnose the fixture, replace worn valves or cartridges, and check the connections under the sink. Visit Encano Plumbing & Drainage Ltd. to arrange service across Greater Vancouver before a small leak damages the cabinet or ceiling below.