
You come home from a long weekend and find the basement floor drain burping, the cleanout cap displaced, and sewage spread across the concrete. In the Lower Mainland, that kind of backup can start with a municipal surcharge, a blockage, or stormwater pressure that forces wastewater the wrong way through the building sewer. A backwater valve can provide a passive barrier, but only when it's selected, installed, and maintained for the actual plumbing layout.
The decision starts with one question: are any fixtures below the level of the adjoining street or the next upstream maintenance hole? In British Columbia, that answer can turn backwater valve installation from a sensible upgrade into a code-driven requirement. The safest route is to understand the trigger, inspect the site, and decide early whether the work belongs to a licensed plumber.
Table of Contents
- What a Backwater Valve Does and When You Need One
- Main Types of Backwater Valves and How Code Treats Them
- Inspecting the Site and Getting Ready to Install
- How the Installation Actually Goes
- DIY vs Hiring a Licensed Plumber
- Permits, Codes, and Choosing the Right Contractor
- Testing, Maintenance, Troubleshooting, and Common Questions
What a Backwater Valve Does and When You Need One
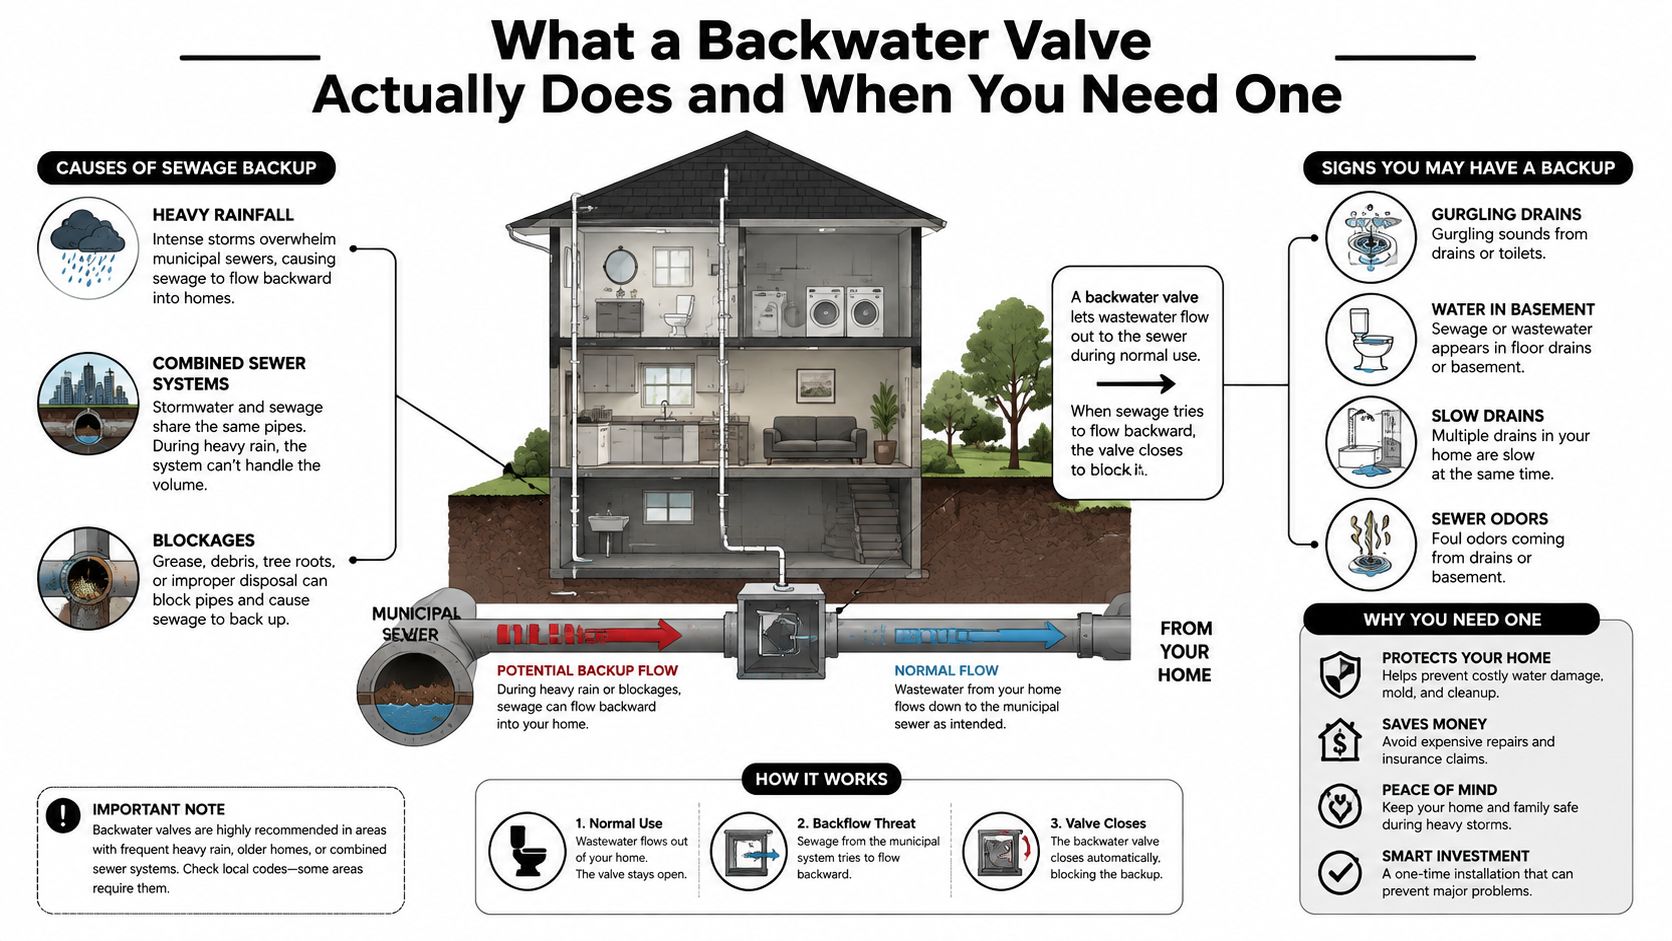
A sewage backup rarely begins with a dramatic flood. In a Lower Mainland basement, the first signs may be a floor drain that rises during rain, a toilet that gurgles, or odour near a cleanout. A backwater valve is a one-way gate installed in a building drain or branch drainage pipe. Wastewater normally flows out to the municipal sewer. If flow reverses, its flapper or disc closes against the seat and helps keep sewage out of basement toilets, floor drains, showers, and laundry fixtures.
The valve only protects the fixtures connected downstream of its location. It does not clear roots, grease, a collapsed pipe, or a private-property blockage. Before choosing a valve, identify the source of the backup and trace which fixtures share the affected drain.
The strongest code trigger is elevation. A basement bathroom, slab-on-grade home with a low sanitary connection, or lower-level suite may need backflow protection when a fixture sits below the adjoining street level and the building drain or branch could be subject to backflow. The BC Plumbing Code requires backflow protection in specified below-grade situations. The provincial code provision also sets conditions for a valve in a building drain, including a normally open design and limits involving more than one dwelling unit in the specified arrangement.
The risk is mechanical, not mysterious
Heavy rainfall, combined sewer conditions, downstream blockages, and nearby construction can raise surcharge risk. A valve is a passive barrier, not a substitute for drainage repairs or a guarantee against every type of flooding. It also needs an accessible location so the flapper can be inspected and cleaned.
Consider a Richmond home with a basement toilet, shower, and sink on one branch below the street sewer elevation. Where the fixtures share that branch, BC code can allow protection on the branch rather than separate valves at each fixture. The branch installation provision supports a cleaner retrofit, provided the correct branch is identified and remains serviceable.
For repeated basement drainage problems, basement drain backup guidance can help distinguish warning signs of a local blockage from a municipal surcharge. If the elevation creates the code trigger, the next decision is practical: confirm the plumbing layout, then determine whether the access and required alterations are suitable for DIY work or need a licensed contractor.
Main Types of Backwater Valves and How Code Treats Them
Homeowners usually encounter three arrangements. The first is a normally open flapper-style mainline valve, installed on the building drain or sanitary lateral. The flap stays open while wastewater flows out, then closes when reverse flow pushes against it. This is generally the design to discuss first for a whole-home retrofit because it can protect several connected fixtures when placed on the correct line.
The second is a swing-style check valve. It also uses a hinged closure, but its geometry, access, flow characteristics, and approval status matter. A valve that looks suitable in a catalogue may not satisfy the BC installation conditions. The third is a fixture-level or floor-drain inline valve, which serves a smaller area and may be useful where a complete building-drain installation isn't practical or permitted.
BC rules are particularly important here. The code describes backwater valves as check valves for gravity drainage systems and recognises normally open designs that conform to recognised CSA standards. It also restricts certain building-drain arrangements, including installations serving more than one dwelling unit. That means a multi-unit building, basement suite, or strata property needs a careful review rather than a quick retail purchase. Canada's flood-preparedness guidance also tells homeowners to obtain municipal permits and follow both manufacturer instructions and municipal requirements.
Backwater valve types at a glance
| Valve Type | Typical Location | Code Status (BC) | Best Fit |
|---|---|---|---|
| Normally open flapper valve | Building drain before the line exits the foundation, or on a shared lower-level branch | Often the primary arrangement to assess, subject to location, standards, and dwelling-unit limits | Whole-home or shared-branch protection |
| Swing-style check valve | Building drain or lateral, depending on the approved assembly | Can be restricted by design and installation conditions | Projects where the approved model and authority requirements specifically allow it |
| Fixture-level inline valve | Directly below a floor drain or on an individual fixture branch | Appropriate only for the fixtures and conditions it is designed to protect | Isolated fixtures or targeted retrofit work |
Placement affects maintenance as much as code compliance. The cover must be reachable, the internal assembly must have room to move, and the valve shouldn't be buried beneath finished flooring or stored goods. A cheap valve in an inaccessible location isn't a practical safeguard because nobody can inspect, clean, or replace it when the mechanism sticks.
Inspecting the Site and Getting Ready to Install
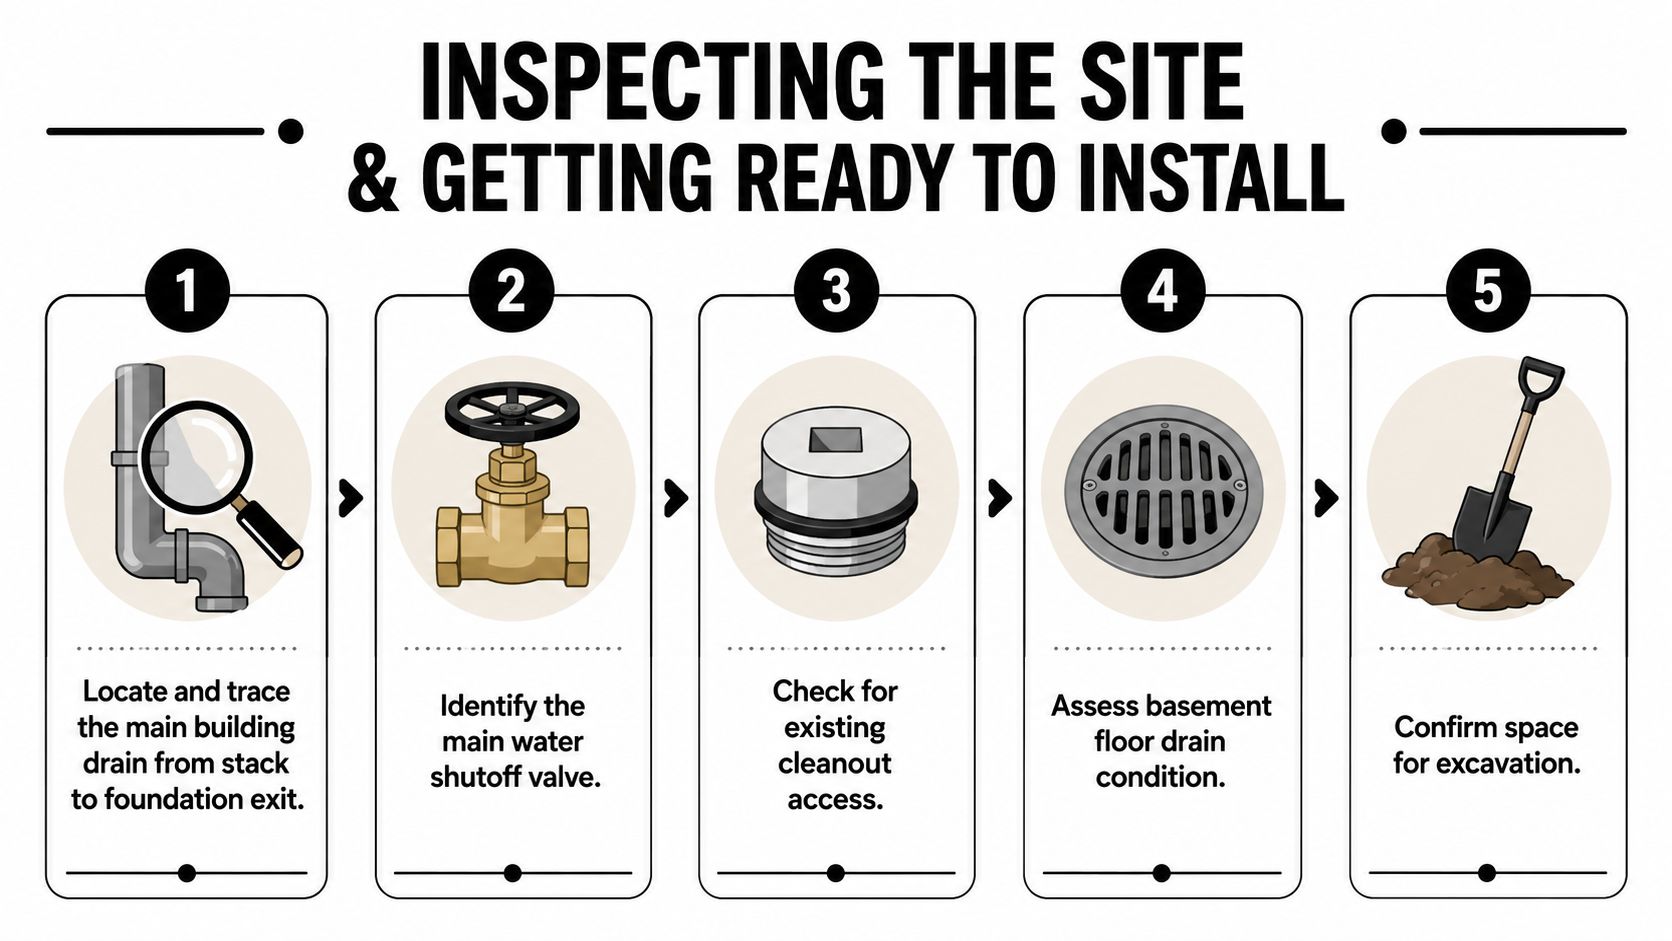
The pre-job inspection often determines whether the work is straightforward or turns into a costly excavation. Start at the main stack and trace the building drain toward the foundation exit. Locate existing cleanouts, note every fixture connection, and identify the proposed valve point before breaking concrete or cutting pipe.
The valve can't be placed casually. If fixtures discharge upstream of the proposed location, closing the valve during a surcharge could affect those fixtures or leave them unprotected. Confirm whether the line is sanitary or storm, especially where a sump connection runs near the building sewer. The federal guidance linked above specifically addresses municipal permits, manufacturer instructions, and local requirements, so don't treat a basement valve as a permit-free plumbing accessory.
A practical pre-job checklist
- Trace the drainage route: Follow the building drain from the stack to the foundation wall, and mark branch connections.
- Confirm the utility layout: Call BC 811 before digging outside or near buried services.
- Check the sewer arrangement: Establish whether the property connects to a combined or separated sewer system.
- Protect the work area: Shut down sump pumps that could discharge into an open excavation, and protect finished flooring from wastewater and dust.
- Prepare the right tools: A cast-iron or PVC cutter, wet/dry vacuum, shielded hubless or Fernco-style couplings rated for the pipe material, primer, and cement may be required.
- Plan excavation safety: Use proper shoring or a trench box for a deep excavation. Don't enter an unsupported excavation.
Cast iron demands extra caution. Edges become sharp after cutting, and old hubs can crack when disturbed. Wear gloves, eye protection, and a respirator when dust is present. Keep a wet/dry vacuum available, but don't use it as a substitute for controlling sewage or groundwater. A clean site assessment also reveals whether a camera inspection is needed before the line is opened.
How the Installation Actually Goes
The work begins with the permit and the layout, not the saw. Confirm that the required permit is posted, identify the main water shutoff, and make sure everyone in the home understands which fixtures must remain unused while the building drain is open. The installer then exposes the drain at the approved location, commonly upstream of the protected fixture connections and where the valve can be reached later.
The existing pipe is cut with the tool suited to its material. Cast iron may require a soil pipe cutter, while PVC calls for a compatible pipe cutter or saw with a clean, square cut. The removed section is measured against the valve body and fittings before final assembly. Dry-fitting matters because a few millimetres of error can leave the valve stressed, out of level, or too close to a wall for maintenance.
Orientation and access decide whether the valve works
The flow arrow on the valve body must point downstream, toward the municipal sewer. The flapper or insert needs unobstructed movement, and the body must sit level as required by the approved installation. A normally open valve must remain open during ordinary low-flow drainage so it doesn't catch solids or create unnecessary turbulence.
Some installations also include an upstream isolation valve, such as a full-port ball valve, when the design and authority allow it. Isolation can make service safer, but it doesn't replace the backwater valve or the required access provisions. California Plumbing Code guidance illustrates the serviceability principle clearly. Fixtures below the next upstream manhole cover need approved backflow protection, the valve must be accessible for inspection and repair, and a concealed valve requires a masonry pit with a removable cover. The California installation provision also describes the need to confirm fixture elevation against the upstream manhole.
An accessible cleanout belongs immediately adjacent to the valve where the local design requires it. California guidance also calls for a covered accessible cleanout on the upstream side, which is a useful serviceability benchmark even when a BC project follows provincial and municipal rules. The California material and installation guidance addresses approved corrosion-resistant materials, noncorrosive components, correct alignment, and the need for the valve to remain open under low flow.
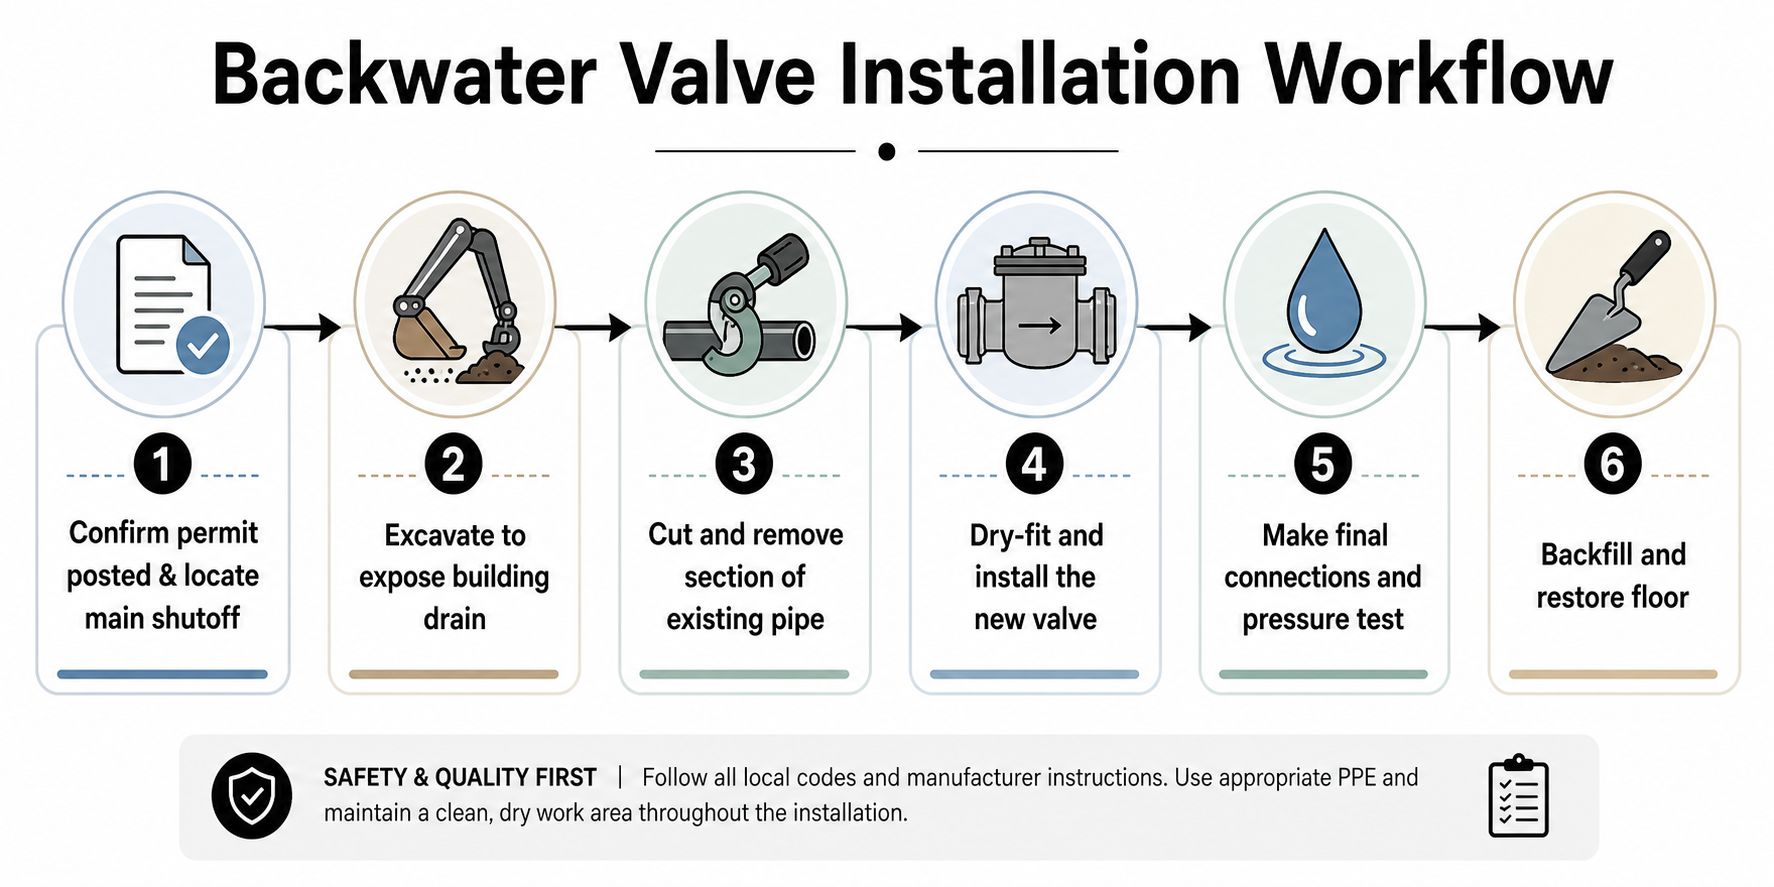
The final connections use compatible shielded couplings or no-hub bands, with pipe ends fully seated and supported. Bedding matters. If the valve body settles after backfill, the pipe can lose slope or place stress on the joints. Backfill in lifts and compact carefully, then restore the slab only after the inspector has reviewed the rough-in. Water or air testing should happen after sign-off, not before the concealed work is approved.
This field video gives a visual overview of the type of workflow involved:
DIY vs Hiring a Licensed Plumber
A homeowner may be comfortable cutting PVC, bedding pipe, and repairing concrete. That doesn't settle whether DIY is allowed. The decisive questions are jurisdiction, scope, access, and risk, especially when the job alters the building sewer or requires a permit.
The proposed savings can look attractive on paper. The plan notes for Lower Mainland retrofits describe a homeowner potentially avoiding $1,500 to $2,500 in labour, while still spending $400 to $900 on the valve, fittings, and concrete in a typical project. Those figures are not a universal quote, and they don't include equipment rental, camera inspection, disposal, restoration, permit handling, or the cost of correcting a failed installation. Treat them as a decision framework, not a promise.
Practical rule: If the work changes the building sewer, confirm the permit and licensing requirements before buying the valve.
Where the DIY route can fail
Breaking a basement slab is the easy part compared with identifying the correct pipe and proving that every protected fixture drains as intended. A crawlspace installation may offer better access, while a finished basement can require dust control, concrete cutting, excavation, disposal, and careful restoration. A sewer camera may be needed to locate the tie-in or find a damaged line that should be repaired before the valve is installed.
| Factor | DIY Route | Licensed Plumber |
|---|---|---|
| Code authority | Homeowner must confirm whether self-performed work is permitted | Contractor can plan the work around applicable permit and inspection requirements |
| Site access | Owner supplies tools, cutting equipment, excavation control, and restoration | Crew brings trade equipment and manages the installation sequence |
| Diagnosis | Camera inspection and pipe identification may require separate arrangements | Assessment can include locating, inspection, and installation planning |
| Failure exposure | Incorrect orientation, poor support, or inaccessible access can become the owner's problem | Written scope and workmanship terms provide clearer accountability |
| Long-term serviceability | Owner must verify access and maintenance provisions | Installer can document the valve location and service requirements |
For a Lower Mainland homeowner, the sensible default is to hire a licensed contractor for a building-sewer alteration. DIY may make sense only where the authority permits it, the installation is within the homeowner's legal scope, the pipe is clearly identified, and the finished valve will remain accessible. Budget matters, but a failed valve can leave finished basement flooring, drywall, storage, and mechanical equipment exposed to contaminated wastewater.
Permits, Codes, and Choosing the Right Contractor
A basement retrofit can look like a straightforward plumbing repair until the pipe runs beneath the slab. In BC, the permit and inspection path depends on the property, the authority having jurisdiction, and whether the work alters the building sewer or requires slab cutting. Confirm those requirements before breaking concrete.
Canada's official flood-preparedness guidance recommends obtaining municipal permits for backwater-valve work and following the manufacturer's installation instructions. That federal guidance on backwater valves is useful background, but the municipality decides which approvals and inspections apply to a specific BC address.
A plumbing permit may be required. Cutting the floor slab can also trigger building approval or a related inspection. Ask the permitting office whether the job needs a rough-in inspection before concealment and a final inspection after installation. Do not rely only on a contractor's verbal assumption.
Questions that expose a weak proposal
A capable contractor should explain the valve location, protected fixtures, access cover, pipe material, and inspection sequence. Ask for:
- Licence and active status: Verify the contractor's licence and standing with the applicable provincial safety authority.
- Insurance and WCB coverage: Request proof of liability insurance and current workers' compensation coverage.
- Specific equipment: Have the written scope identify the valve model, size, approved use, cleanout arrangement, and access method.
- Permit responsibility: Confirm who pulls the permit and who coordinates inspections.
- Workmanship terms: Request written warranty terms and check the duration, exclusions, and process for reporting defects. Do not accept an undefined reference to “project criteria.”
- Documentation: Keep the permit, inspection record, valve information, photographs, any camera report, and a maintenance log.
A valve hidden under a finished floor is not a complete solution. The cover, cleanout, and mechanism must remain serviceable.
Be cautious if a company arrives unsolicited after a flood, demands a large cash deposit, refuses to show licence documents, or pressures you to skip inspection. If the work also involves sewer-line access or excavation, review this guide to trenchless sewer-line repairs while comparing the proposed scope. A contractor should confirm that the existing line can carry normal flow before recommending a valve.
First determine the code and permit path. Then compare written scopes, documentation, access provisions, and warranty terms. That sequence helps a homeowner decide whether the retrofit is within permitted DIY work or belongs with a licensed plumber.
Testing, Maintenance, Troubleshooting, and Common Questions
Before the access cover is closed, confirm that the gate or flapper lifts freely and returns to its seat without rubbing the body. Water introduced through the upstream cleanout should flow normally with the valve open, then show the flap seating when reverse-flow testing is appropriate for the installation. The cover should sit flush, remain visible, and stay clear of shelving, flooring, stored boxes, and other obstructions.
A maintenance routine that works
Inspect the assembly visually at least as often as your plumber and valve manufacturer recommend, and include it in your annual home-maintenance calendar. Remove visible debris, clear the weep hole where the valve design includes one, check for warping, and exercise the gate gently so the seal doesn't stiffen. A practical backwater-valve maintenance guide can help organise those checks.
Troubleshooting starts with the symptom:
- Gurgling fixtures: The flap may be partially seated, or the line may have a developing restriction.
- Slow floor drainage: Sediment or debris may be interfering with the valve or restricting the drain.
- Foul odours: A stuck-open position, damaged seal, dry trap, or separate drainage problem may be involved.
- Backup despite the valve: The blockage may be inside the property, or the valve may protect a different branch than the one experiencing the problem.
Common questions
How often should the valve be tested?
Check it on a regular maintenance schedule and after significant sewer or storm events. Follow the model's instructions, because access and testing methods differ.
Can a homeowner clean it under BC code?
Routine cleaning may be possible when the valve is accessible and the manufacturer permits it. Code compliance still depends on the approved installation, location, and serviceability. Don't remove or modify the assembly if you aren't sure how it is designed.
What should the warranty cover?
Ask for written terms covering workmanship, access components, exclusions, and the process for reporting a defect. The valve manufacturer's product warranty is separate from the contractor's installation warranty.
What should be saved for insurance or resale?
Keep the permit, inspection approval, invoice, valve make and model, installation photos, location measurements, camera footage or report, and maintenance notes. Those records make it easier to explain what protects the home and where a future technician can service it.
Encano Plumbing & Drainage Ltd. can assess basement drainage layouts, inspect sewer lines, plan code-conscious backwater valve installation, and document the completed work for maintenance or future property records. Visit Encano Plumbing & Drainage Ltd. to request an assessment for your Vancouver, Richmond, Burnaby, or Greater Vancouver property.