
You walk into the utility room, laundry area, or basement and see water spreading from under the tank. That's usually the moment your mind jumps straight to worst-case scenarios. It's a fair reaction, especially in Greater Vancouver homes where a leak can damage flooring fast and create bigger problems in strata buildings and finished basements.
A hot water heater leaking from bottom doesn't always mean the tank itself has split. In this climate, misdiagnosis is common. Sometimes it's a failing valve, a drip running down from above, or simple condensation collecting at the base. Sometimes it is the tank, and when that happens, there isn't a patch, sealant, or DIY trick that will save it.
The priority is simple. Make the unit safe, stop more water from entering it, and figure out whether you're dealing with a repairable component or a failed tank.
Table of Contents
- First Steps for a Leaking Water Heater
- Diagnosing the Source of the Leak
- When Repair Is an Option and When It Is Not
- Understanding Repair and Replacement Costs in Vancouver
- Why and When to Call Encano Plumbing and Drainage
- Preventative Maintenance to Avoid Future Leaks
First Steps for a Leaking Water Heater
When you find a puddle at the base, don't start with a wrench. Start with shutdown. In BC homes, tank failures leaking from the bottom are a top cause of emergency plumbing calls, and HomeFixx notes that when water appears at the bottom seam or from underneath the outer jacket, the tank has likely failed internally and needs immediate replacement rather than repair. That same guidance matters even more with gas units, because Technical Safety BC regulates gas appliance replacement and older shut-off valves can break or start leaking when forced.
Do these two things first:
1. Shut off the cold water supply to the heater.
2. Shut off the power or gas to the unit immediately.
If it's an electric tank, switch off the breaker labelled for the water heater. If it's gas, turn the gas control to off. Then close the cold-water shut-off valve feeding the tank. If that valve is stiff, don't reef on it blindly. Older valves sometimes fail when touched, and that turns one problem into two.

Protect the area around the tank
Move anything stored nearby. Cardboard boxes, paint cans, cleaning products, and anything plugged in should come away from the leak area. Put towels down only after the power or gas is off. If the tank sits in a pan, check whether the pan is overflowing or whether water is bypassing it and spreading under finished flooring.
In condos and townhomes, look for the path the water may take next. It often travels farther than people expect.
- Check adjacent rooms: Water can run under baseboards and laminate before it becomes visible.
- Look below if applicable: In a multi-level home or strata unit, staining on the ceiling below can start quickly.
- Watch the relief piping area: If you've had past valve issues, the water may be tracking down the side.
If you suspect the leak is related to pressure discharge rather than tank failure, it helps to understand how the water heater pressure relief valve works and what warning signs it gives.
Know when a DIY repair is already off the table
If water is seeping from under the outer jacket, from the bottom seam, or keeps returning at the base while upper fittings look dry, treat the tank as failed until proven otherwise. Once the inner steel vessel corrodes through, there isn't a safe repair. The goal at that stage is limiting damage, not trying to save the tank.
Diagnosing the Source of the Leak
Water at the base of the tank can come from several places, and in Greater Vancouver, the first guess is often wrong. I see homeowners assume the tank has split, then find out the moisture started at a fitting above, a relief valve, a drain valve, or plain condensation in a damp utility room.

Shut it down and dry everything first
Start with a clean read. Wipe the jacket, the pipes above the tank, the relief valve area, the drain valve, and the floor. Then give it a few minutes and watch for the first point where water returns. Trying to diagnose a tank while every surface is already wet usually leads to the wrong repair.
Inspect from the top down
A bottom puddle often starts higher up because water follows the shell before it drops to the floor.
Use this order:
Hot and cold connections at the top
Check the inlet and outlet fittings by hand and with a flashlight. A slow drip here can track down the jacket and collect under the tank.T&P relief valve and discharge tube
If the discharge tube is wet, the problem may be valve discharge, pressure, temperature, or the valve itself. HomeFixx reports that replacing this valve costs $15 to $30 for the part and $150 to $300 including labour, with one practical example showing a $22 valve replaced in 25 minutes. That pattern looks very different from water seeping out of the tank body.Drain valve near the bottom
Drain valves are small, but they cause a lot of false alarms. Check for moisture at the threads, around the handle, and directly below the valve opening.Tank body and outer jacket
Look for rust trails, staining, bubbling paint, or moisture pushing out from under the lower jacket edge. Those signs point closer to a failed tank than a loose connection.
If the area around the heater has exposed lines, wall cavities, or plumbing overhead, how to spot hidden plumbing leaks in your home can help rule out water that only appears to be coming from the heater.
Don't confuse condensation with tank failure
This particular issue often trips people up in Greater Vancouver homes. In our field experience, a meaningful share of reported bottom leaks turn out to be condensation on the tank exterior, or water from nearby piping above the heater that runs down and pools at the base. That happens more often in cool, damp basements, garages, and utility closets, especially during heavier heater use.
Dry the tank and floor completely, then watch when the moisture comes back.
If the outside of the tank develops broad, even dampness while the unit is heating, condensation is still a real possibility. If you see a repeat drip from one fitting, one valve, or one spot under the jacket, that points to an actual leak. Overhead drips can be just as misleading. I have seen a pinhole in a nearby line drip onto the venting or jacket and leave a puddle that looked exactly like tank failure from the floor level.
A common Richmond call goes like this. There is a small pool under the tank every morning, and the homeowner is preparing for replacement. Once the surfaces are dried and the heater runs through a heating cycle, moisture shows up across the outside of the tank instead of from one fitting or seam. That is a humidity and ventilation problem, not a ruptured vessel.
The trade-off is simple. Condensation can sometimes be addressed by correcting airflow, insulation, or nearby moisture conditions. Water coming from the tank seam, from under the jacket, or from corrosion at the shell usually means repair is off the table and a plumber needs to confirm replacement.
When Repair Is an Option and When It Is Not
A bottom leak can go in two very different directions. Sometimes the fix is a small part and an hour of work. Sometimes the tank itself is finished, and spending money on repairs only buys a day or two before the same puddle comes back.
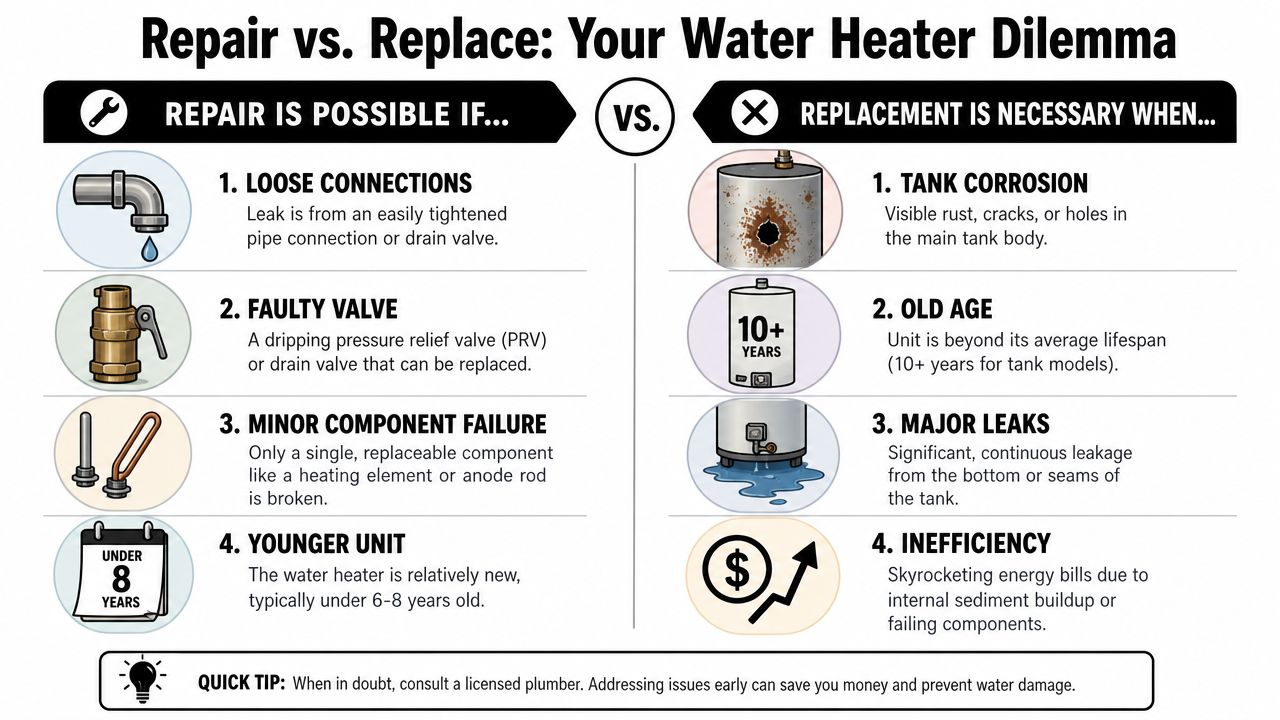
The key is whether the water is coming from a replaceable component or from the vessel. In Greater Vancouver, that distinction gets blurred because a lot of homeowners first see the problem as "water on the floor," not as a clear drip point. By the time they call, they may already be pricing out a new tank or, just as often, hoping a cheap valve swap will solve it.
Repairable leaks
A repair is usually still on the table if the tank body is sound and the leak starts at a serviceable part:
- Loose threaded fittings: If a connection at the top or side is weeping and the tank shell stays dry, the fitting may just need to be tightened, resealed, or replaced.
- A faulty T&P valve: If water is discharging from the valve or its outlet and the valve is the problem, replacing it is often a straightforward repair.
- Drain valve leakage: A drain valve near the bottom can drip slowly and make the leak look worse than it is.
- Electric element gasket issues: On electric tanks, the gasket around a heating element is a common failure point. If caught early, that can often be repaired. If the leak is coming from a corroded seam in the tank near that area, repair is over.
That last one matters in older Vancouver and Burnaby homes with electric tanks tucked into tight utility spaces. From floor level, an element gasket leak and a tank leak can look almost identical. The repair decision changes completely once the cover is opened and the source is confirmed.
Terminal failures
If the tank itself is leaking, replacement is the only sensible answer. BC-based plumbing and HVAC guidance states that leaks originating at the base almost always signal catastrophic tank failure requiring full replacement, and if water reappears at the base while all upper fittings remain dry, replacement is the only viable solution.
Steel tanks do not heal.
Watch for these signs:
- Water at the bottom seam or under the jacket
- Rust streaks on the body of the tank
- A persistent puddle after all upper fittings are confirmed dry
- Pinholes or visible deterioration in the shell
I tell homeowners the same thing on service calls across Richmond, Surrey, and Coquitlam. If corrosion has opened the tank, any repair is temporary at best and risky at worst. The heater is still under pressure, and the leak usually gets worse, not better.
There is also a practical cost trade-off. Replacing a drain valve or element gasket can make sense on a younger unit in otherwise good condition. Putting money into a corroded tank usually does not. If you are already weighing that decision, our guide to water heater replacement cost in Vancouver can help set expectations before you book the work.
One common misstep is authorising a small repair because it is cheaper in the moment, then finding the same puddle back under the heater the next morning. If the source is the vessel, the part was never the problem.
Understanding Repair and Replacement Costs in Vancouver
The cost question matters because people often have to decide quickly. A small component repair feels very different from replacing a tank on short notice, especially if water is already affecting nearby materials.
What the numbers usually mean in practice
For a standard tank-style heater, professional replacement for a bottom leak caused by tank corrosion typically ranges from $800 to $2,500, and one practical Richmond example shows a homeowner quoted $1,450 for a new tank plus installation, including code-compliant seismic strapping required in BC. That range usually reflects the unit type, venting setup, access, code upgrades, and whether related shut-offs or connectors also need attention.
Repair costs can be much lower when the problem is a valve or accessible fitting. If the leak is from a T&P valve, the earlier example shows a far more manageable repair cost than a full replacement. The key is making sure the diagnosis is right before authorising work.
For tankless systems, costs can climb in a different way. In California, standard water heater repairs generally fall between $150 and $650, while tankless repairs range from $200 to $1,100, with a practical example of a $925 tankless repair involving a faulty temperature sensor and valve. The exact market differs, but the trade-off is familiar. Tankless repairs often involve more involved diagnostics and proprietary parts.
If you want a broader local breakdown before approving a job, this page on water heater replacement cost gives useful context.
Estimated Water Heater Service Costs in Greater Vancouver
| Service | Typical Cost Range | Best For |
|---|---|---|
| T&P valve replacement | $150 to $300 including labour, with $15 to $30 for the part | A leak tracking down from the relief valve area |
| Standard tank repair | Qualitatively lower than full replacement when the issue is a valve, fitting, or accessible component | Isolated non-tank leaks |
| Standard tank replacement | $800 to $2,500 | Tank corrosion at the bottom or failed tank seam |
| Richmond practical example | $1,450 | Homeowner with base corrosion on a 50-gallon gas heater |
The practical example most homeowners relate to is simple. A Richmond owner sees a steady pool under a gas tank. Inspection confirms corrosion at the base. The recommendation isn't to patch, re-seal, or “buy a bit more time.” It's replacement, because that's the point where repair stops being real.
Why and When to Call Encano Plumbing and Drainage
Some water heater leaks are easy to identify. Far fewer are safe to deal with fully on your own, especially when gas, old shut-off valves, pressure issues, or concealed water paths are involved.

A professional should get involved right away when the source isn't obvious, when the leak returns after basic checks, or when the tank appears to be leaking from the bottom seam or under the jacket. That's even more important in attached homes and strata properties, where one failed tank can affect multiple units.
The jobs that shouldn't stay DIY
A gas water heater replacement in BC isn't a casual weekend project. Gas connections, venting, shut-offs, and code compliance all matter. The same goes for an electric unit if the tank has failed internally. Once the vessel itself is compromised, the issue isn't maintenance. It's safe replacement.
The smartest call is often the earliest one. Fast diagnosis limits water damage, and it prevents spending money on the wrong repair.
It also helps to have the right tools on site. Modern leak detection, inspection experience, and pressure-related troubleshooting make a difference when the moisture pattern is misleading.
A short visual walkthrough can help you see what a proper service approach looks like:
When a homeowner is stressed, the goal isn't a dramatic fix. It's a safe shutdown, an accurate diagnosis, and a clear answer about whether the unit is repairable or done.
Preventative Maintenance to Avoid Future Leaks
A lot of “bottom leaks” start long before there is water on the floor. In Greater Vancouver, I often see homeowners assume the tank itself has failed, when the first warning was months of condensation, minor valve discharge, or sediment buildup that went unchecked. Good maintenance helps you catch those early signs and avoid replacing a unit sooner than necessary.
For this region, the goal is not just extending tank life. It is separating normal moisture from a real leak before damage spreads to flooring, drywall, or the suite below.
A practical yearly check looks like this:
- Drain a small amount from the tank: Run water from the drain valve into a bucket and look for heavy sediment, rust flakes, or discoloured water.
- Check around the T&P valve outlet: Moisture, staining, or corrosion here can point to pressure or temperature issues rather than a failed tank bottom.
- Inspect the shut-off valve and supply connections: Small drips often travel down the jacket and collect at the base, which is why they get mistaken for a bottom leak.
- Look at the burner area or lower access panels: On gas units, watch for excess moisture and rust near the base. On electric units, check for staining around lower components.
- Inspect the pan and floor surface: Old rust marks, mineral trails, and repeated damp spots help show whether you have an active leak or an intermittent moisture problem.
Sediment is a common cause of premature tank wear, especially in older gas water heaters. It settles at the bottom, holds heat where it should not, and shortens the life of the steel tank. Once the tank seam or inner vessel starts leaking, maintenance will not fix it.
That is the line homeowners need to be clear on. Flushing, visual checks, and catching small drips early can prevent some failures. They cannot repair a rusted-out tank, a split seam, or corrosion hidden under the jacket.
If your heater has already leaked from the true bottom of the tank, the useful maintenance lesson is for the next unit. Install it properly, inspect it once a year, and do not ignore recurring moisture around the base, especially during colder, damp Vancouver months when condensation can hide a more serious problem.
If your water heater is leaking and you need a clear answer fast, contact Encano Plumbing & Drainage Ltd.. Their team handles emergency plumbing, water heater repairs, replacements, and code-compliant installations across Vancouver, Richmond, Burnaby, New Westminster, Delta, Surrey, and nearby communities. When the leak source isn't obvious, or the tank has clearly failed, getting a professional diagnosis quickly is the safest way to limit damage and restore reliable hot water.