

If you're staring at an open wall, an aging copper line, or a basement ceiling full of old repairs, you're probably asking the same question most Vancouver homeowners ask at this point. Is PEX the right move, and if it is, how do you install it without creating the next hidden leak in the house?
That's the right question. PEX tubing installation can be straightforward in a new build, but older homes in Greater Vancouver change the job. Tight joist bays, mixed materials, crawlspaces, short shutoff windows, and awkward retrofit routes are where good planning matters more than speed. The pipe itself is forgiving. The details around fittings, support, protection, and testing are what decide whether the system stays dry.
A practical example. If you're replacing old branch lines to a basement bathroom in an older Vancouver bungalow, you might have easy access in one area and almost none in another. In that case, PEX helps because you can snake longer runs with fewer joints, but you still need to protect the tubing where it passes framing and make clean, code-aware transitions at every connection point.
Table of Contents
- Choosing the Right PEX and Fittings for Your Project
- Essential Tools and Materials for the Job
- Your Step-by-Step PEX Installation Guide
- Pressure Testing and Checking for Leaks
- Common PEX Installation Mistakes and How to Avoid Them
- Beyond DIY When to Call a Professional Plumber in Vancouver
Choosing the Right PEX and Fittings for Your Project
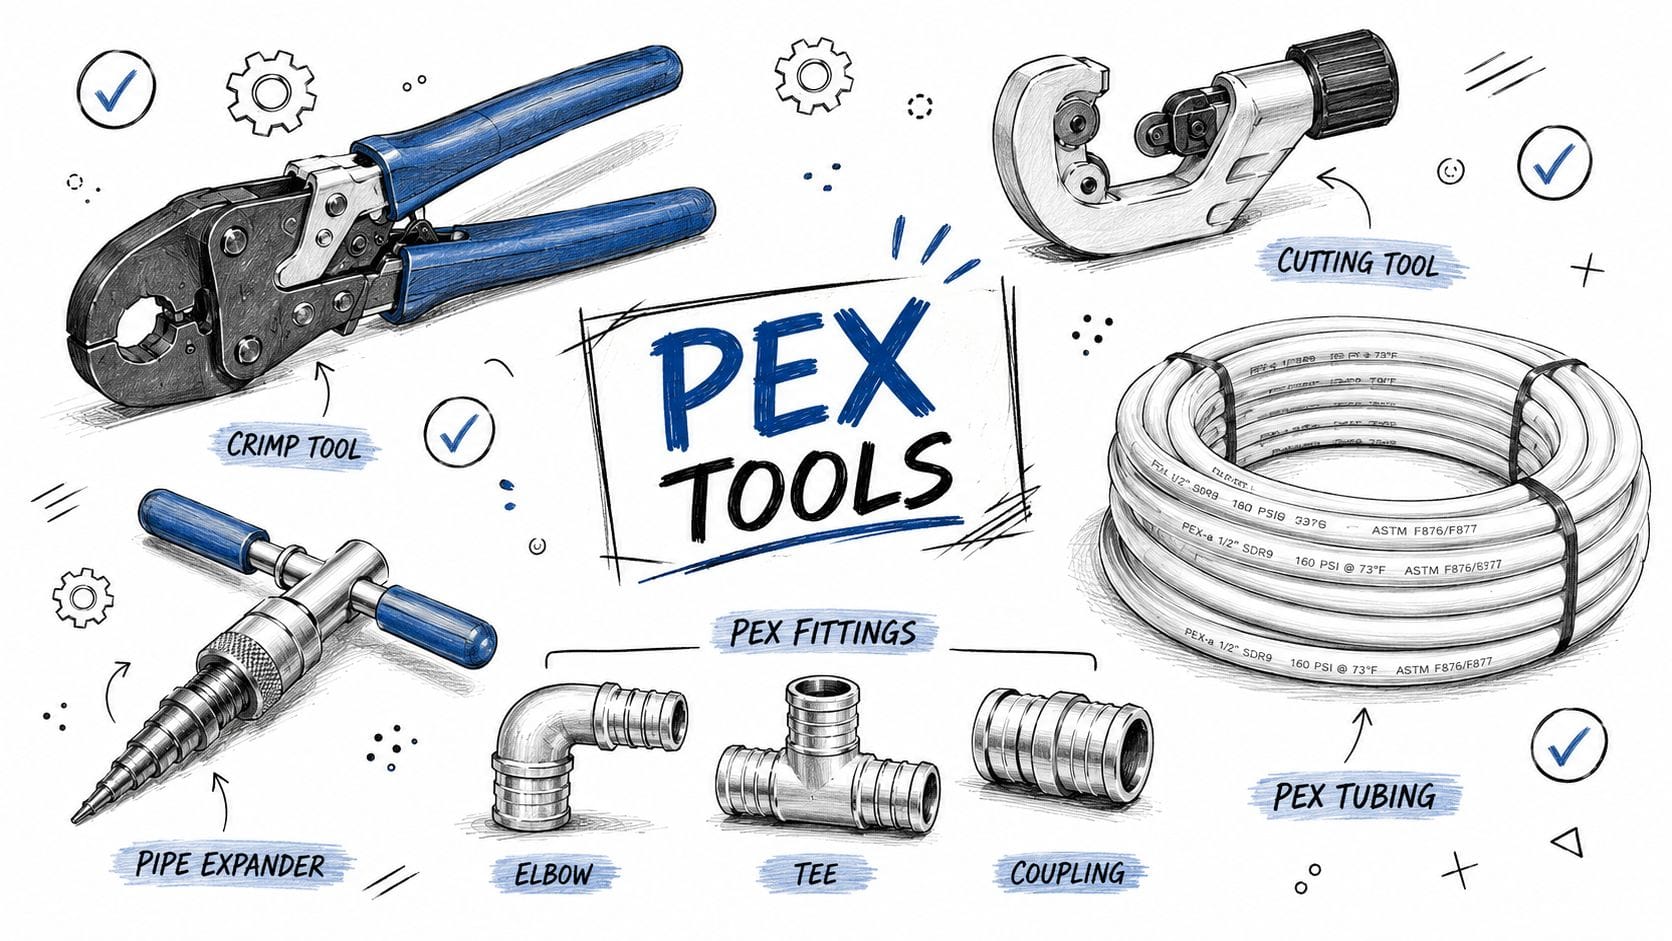
The best PEX system isn't the same for every house. In practice, the right choice depends on three things. How much access you have, what tools you own, and how many connections the job will need.
PEX is widely used for hot and cold water distribution because it can handle 180°F at 100 psi for plumbing service, and the temperature limits are printed on the tubing for field verification according to the PPFA PEX FAQ. That same guidance also matters for your fitting choice. PEX uses mechanical or compression fittings only, not glue, solvent cement, or heat fusion, which is a major difference from other piping systems in residential work.

What actually changes from one system to another
Most homeowners get hung up on the letter. A, B, or C matters, but the bigger issue on a real job is the connection system and how the tubing behaves when you're feeding it through existing framing.
Practical rule: Buy the tubing and fitting system as one planned package. Don't choose pipe first and figure out tools later.
PEX tubing and fitting methods compared
| System | PEX Type | Pros | Cons |
|---|---|---|---|
| Expansion | PEX-A | Very flexible, useful for long bends and retrofit routing, strong option for full repipes | Requires expansion tool, timing and technique matter |
| Crimp | Common with PEX-B | Familiar method, good for repeated standard connections, practical for room-by-room work | Needs dedicated crimp tool and verification of each connection |
| Clamp | Common with PEX-B or PEX-C | Useful when access is tight and tool reach matters | Still tool-dependent, consistency matters |
| Push-fit | Used with compatible PEX systems for repairs | Fast for isolated repairs and temporary access problems | Higher fitting cost and not what most pros choose for large repipes |
Here's the practical trade-off.
- PEX-A: Usually the easiest to route through older framing because it's more flexible. That can save time when you're pulling lines across a basement ceiling and up into a bathroom wall.
- PEX-B: Often makes sense when cost control matters and the route is fairly direct.
- PEX-C: Less common in everyday residential retrofit conversations, but it may still appear at supply houses depending on the application and local stock.
For fittings, the choice usually comes down to job scale.
- One small repair: Push-fit can make sense if you need a fast repair and don't want to buy a full tool set.
- A bathroom renovation: Crimp or expansion is usually more sensible because the fittings become part of a repeatable system.
- A larger repipe: Stick to one method throughout the house. Mixed systems create confusion during future repairs.
A practical Vancouver buying choice
In an older East Vancouver or Richmond home, I'd rather see a homeowner choose a system they can install consistently than chase the “best” product on paper. If the route has multiple turns, limited wall access, and awkward drops, a more flexible tubing system can reduce the number of fittings. Fewer fittings usually means fewer places to make a mistake.
If you're still deciding whether the project should stay as a repair or turn into a larger replacement, this comparison of pipe repair versus pipe replacement helps frame that decision in a practical way.
Essential Tools and Materials for the Job
A PEX install usually goes sideways before the first connection is made. The common problem is a half-complete shopping run. Someone buys tubing and fittings, then realizes on site that the rings, tool, transition adapters, or protection plates do not match the system.
In Greater Vancouver retrofits, the materials list also needs to account for older framing, mixed pipe materials, and tight mechanical spaces. A straightforward run in a newer build is one thing. A line replacement in a 1950s Vancouver Special or an older Richmond crawlspace often needs more protection, more transition fittings, and better planning around access.
Build your shopping list around the connection method and the house
Start with the items every job needs, no matter which PEX system you chose.
- PEX tubing cutter: Use a cutter that gives a clean, square cut every time. Crooked cuts lead to bad seals and callbacks.
- PEX tubing: Buy enough to complete full runs where possible. Fewer hidden joints in walls and ceilings means fewer future leak points.
- System-matched fittings: Tees, elbows, couplings, stub-outs, and adapters must match both the tubing and the connection method.
- Transition fittings: Older Vancouver homes often have copper, CPVC, or galvanized sections still in service. The adapter has to match the existing pipe properly.
- Shut-off valves: Add isolation at fixtures, toilets, laundry boxes, and equipment where future service is likely.
- Support clips and hangers: PEX needs proper support so it does not sag, rub on framing, or make noise when fixtures open and close.
- Sleeves, nail plates, or protective sheathing: Use these anywhere tubing passes through studs, joists, concrete, or areas exposed to abrasion or fasteners.
- Test caps or plugs: Keep these on hand for pressure testing before walls are closed.
Then match the tool kit to the fitting system.
- Expansion system: Expansion tool, expansion rings, and fittings made for that system.
- Crimp system: Crimp tool, go/no-go gauge if required by the manufacturer, and the correct copper crimp rings.
- Clamp system: Clamp tool and stainless clamp rings in the proper sizes.
- Push-fit repair setup: Use only for the repair situations and approved applications the product is designed for, along with the required pipe prep items.
A mismatched tool and fitting set is one of the fastest ways to waste a day.
What belongs on a real retrofit list
Take a basement laundry line replacement in East Vancouver. The visible work looks simple. Two old copper supplies come out, two new PEX lines go in. In practice, you may also need copper-to-PEX transitions, extra clamps for surface-mounted runs, sleeves where the tubing passes through old framing, nail protection near finished wall sections, new quarter-turn shut-offs, and caps for testing.
That is the part many first-time installers miss. The tubing is only part of the job. The small parts are what make the system safe, serviceable, and code-compliant.
If the work expands from a small replacement into a broader piping upgrade, Encano Plumbing & Drainage Ltd. handles pipe repair and replacement projects that include this type of system conversion.
Your Step-by-Step PEX Installation Guide
The cleanest installs start before the first cut. On retrofit jobs, routing is half the work.
Plan the route before you cut anything
Take a real example. You're running new hot and cold lines from a mechanical room to a basement bathroom in an older Vancouver house. One path goes through open joists. Another needs to pass through studs into a finished wall section. That's where you stop thinking like a DIYer and start thinking like an installer.
The route should do three things:
- Use the fewest fittings possible. Every extra elbow or coupling is another connection to make and test.
- Avoid damage points. Sharp edges, exposed sunlight, rough concrete, and areas where future screws or nails are likely all need attention.
- Respect movement. PEX expands and contracts with temperature changes, so a run that looks neat when pulled tight can become a problem later.
Canadian residential installation guidance says to allow 1/8-inch of slack per foot so the tubing doesn't pull tight as it cools and contracts, and the same guidance requires protection with sleeves when passing through concrete or studs, as outlined in the residential PEX design guide from KRAH/KWH Pipe and Kafrit guidance.
That slack matters more than many people realise. A straight, tight run might look cleaner on day one. It often performs worse over time.
Make the connections cleanly and on time
The connection itself is where care beats speed.
For a code-aligned PEX-A expansion install, the field workflow is simple but unforgiving. Make a square 90° cut, slide the expansion ring on, expand the pipe and ring evenly until they're snug to the expander shoulder, then insert the fitting immediately, following the Jones Stephens PEX-A installation guide.
If you're using a cold-expansion system, timing matters too. The fitting should be inserted within 30 seconds of expansion or the pipe can shrink back too far for a proper seal, as noted in the earlier design guide.
Common connection habits that cause trouble:
- Angled cuts: They reduce contact and create uneven sealing.
- Delayed insertion: The tubing starts recovering before the fitting is fully seated.
- Uneven expansion: One side opens properly, the other doesn't.
- Forcing a bad fitting: If it doesn't feel right, stop and remake it.
A connection that “looks fine” isn't the standard. A connection made to the full procedure is the standard.
Here's a useful visual if you want to see routing and handling in action before you start making joints:
Support and protect the run properly
Many homeowner installs often lose points. They focus on the fittings and ignore the route.
Support the tubing so it doesn't drag, rub, or swing loosely in open spaces. At framing penetrations, use sleeves or protective guards where needed. In slab, trench, or buried situations, protect the line properly rather than laying it directly into conditions that can damage it.
The same Canadian guidance that covers residential installation also says poor soil conditions such as mud, rock, black gumbo, or clay should be improved with clean fill or granular fill. For longer buried runs, manufacturer guidance also points to placing pipe in one continuous length with 4–6 inches of sand/gravel backfill and compacting to 90% soil density in heavy-traffic areas, based on the Jones Stephens installation guide linked above.
A practical basement example. If a hot-water line crosses joists, passes through a stud bay, and turns up to a vanity wall, don't cinch it tight at every clip. Let the run move a little. Protect the penetrations. Keep the bends smooth. Those details do more for long-term reliability than trying to make flexible pipe behave like rigid copper.
Pressure Testing and Checking for Leaks
Pressure testing is the part people want to rush. It's also the step that saves walls, flooring, and insurance headaches.
What a proper test is really checking
A test doesn't just tell you whether water comes out where it should. It tells you whether every cut, ring, and fitting was assembled correctly before the system disappears behind drywall or above a finished ceiling.
The weak points usually aren't in the middle of the tubing. They're at the connections, especially if the cut was rough or the fitting wasn't seated cleanly. The most reliable PEX-A expansion joints depend on a square 90° cut and immediate insertion after a full expansion cycle, and jagged cuts or delayed insertion are identified in the installation guidance as leading causes of improper connections that may fail under pressure or over time during post-installation checks.

How to catch the small problems before drywall
Use a method that lets you inspect every accessible joint carefully. Cap the open ends, connect your test setup, and monitor the system according to the requirements of your tools, materials, and local inspection expectations. If a gauge moves or you hear leakage, stop and find the cause before finishing the space.
A simple inspection routine works well:
- Start at the manifold or first branch: Check the most concentrated area of fittings first.
- Move fitting by fitting: Look, listen, and feel around every joint you can access.
- Mark suspect connections: Don't trust memory. Tag them and come back with tools.
- Re-test after correction: One remake should not be the end of the process.
Small leaks are easier to fix when the wall is open and the floor is dry.
If you're trying to distinguish a fresh install issue from an older hidden leak elsewhere in the home, this guide on how to spot hidden plumbing leaks in your home is useful background for what to watch for.
Common PEX Installation Mistakes and How to Avoid Them
Bad PEX installs usually look fine at first glance. The problems show up later, at the fitting, at a rough penetration, or in a neglected crawlspace.
The errors that show up most often
Start with the obvious one. A poor cut.
What it looks like: The tubing end is ovalled, rough, or cut on an angle.
What to do: Cut it back and remake it. Don't try to save a bad end.
Another frequent issue is a rushed retrofit transition.
What it looks like: New PEX tied into old copper or other existing piping with awkward alignment, strain on the connection, or too little support nearby.
What to do: Rework the transition so the connection isn't carrying the stress of the route.
Then there's abrasion.
What it looks like: Tubing pulled tightly through studs, concrete edges, or rough framing without sleeves or protection.
What to do: Pull it back, protect the penetration properly, and route it so the pipe isn't sawing against the structure.
A fourth mistake is overconfidence with hidden areas.
What it looks like: Long runs dropped into crawlspaces or behind access-limited walls with no thought to future inspection, fastening, or local hazards.
What to do: Choose routes that can still be serviced where possible, and protect the tubing based on the actual environment.
Vancouver conditions that change the risk
In Greater Vancouver, the climate is mild compared with much of Canada, but “mild” doesn't mean risk-free. The local problems tend to be moisture-prone spaces, older envelopes, crawlspaces, and retrofit work around existing materials.
Independent commentary on PEX use in homes notes that long-term performance can be affected by chlorine, sunlight or UV exposure, and rodent damage, which are especially relevant when tubing is run near windows, in unfinished areas, or through crawlspaces, as discussed in this PEX plumbing problems overview.
That leads to a practical checklist.
- Near daylight: Don't leave tubing exposed where regular sunlight reaches it.
- In crawlspaces: Think about rodent exposure before you fasten the run and leave.
- On older retrofits: Don't assume the hard part is pulling the pipe. The hard part is usually the transitions and support.
A lot of “PEX problems” are really installation problems. The material gets blamed for mistakes in routing, protection, or connection work.
Beyond DIY When to Call a Professional Plumber in Vancouver
A careful homeowner can handle some PEX work. A full retrofit in an older home is a different category.
Jobs that are still reasonable for a capable homeowner
If the work is isolated, visible, and easy to shut off, it may be manageable. Replacing a short accessible run to a fixture, adding a simple branch in an unfinished area, or correcting one damaged section are the kinds of jobs where a disciplined DIYer can succeed.
That only holds if the route is clear, the material transitions are straightforward, and you can test the work properly before closing anything up.
Where retrofit work stops being simple
The phrase “PEX is easy to install” mostly belongs to new construction. In older BC homes and strata buildings, the main challenge is retrofit complexity, limited access, and safe transitions from existing materials like copper, where failure risk is highest at the connection points, as discussed in this video on PEX retrofit realities in older properties.
That's when calling a licensed plumber becomes the smart move, not a last resort.
Pause and bring in a pro when any of these show up:
- Occupied multi-unit work: Shutoff timing, neighbour impact, and concealed routing raise the stakes quickly.
- Main water line changes: A mistake here affects the whole property.
- Hot water tank or mechanical room tie-ins: These involve more than just tubing and fittings.
- Mixed old materials: Galvanized, old copper, and previous repair work create transition problems that aren't obvious until the system is open.
- Finished spaces with little access: If one wrong connection can damage ceilings, cabinetry, or flooring, the risk jumps.
For homeowners or property managers weighing whether a project has crossed that line, this licensed plumber resource for Vancouver projects gives a practical reference point for when professional involvement makes sense.
If your PEX project has moved beyond a simple repair, Encano Plumbing & Drainage Ltd. can help with retrofit planning, pipe replacement, leak investigation, and code-compliant plumbing work across Vancouver and the surrounding area.