
You hear the rain hammering the windows overnight, and by morning you're already thinking about the basement. Not because there's standing water yet, but because there's that damp smell again. Maybe the corner near the furnace feels cool and clammy. Maybe you've seen a faint water mark along the wall and hoped it was old.
That's how basement water problems usually start in Greater Vancouver. Not with a dramatic flood, but with repeated moisture, saturated soil, and pressure building around the foundation until the house finds the weak spot. In Richmond, that often means a high water table pushing from below. In North Vancouver, slope and runoff can create a different kind of problem, where water keeps moving toward the structure during prolonged rain.
A properly planned sump pump installation gives that water somewhere to go before it ends up on your floor. It's one of the most practical flood-protection upgrades for homes with recurring groundwater issues, and it matters even more in older housing stock where active drainage wasn't always standard. If you're also dealing with drain concerns during storms, this guide on basement drain backup warning signs helps connect the dots.

Table of Contents
- Is Your Basement Ready for Vancouver's Next Rainstorm
- Signs You Need a Sump Pump in Your GVA Home
- Choosing the Right Sump Pump Type and Features
- The Professional Sump Pump Installation Process
- Sump Pump Installation Cost and Timelines in Vancouver
- Hiring a Sump Pump Contractor in the Lower Mainland
- Maintaining Your System and Frequently Asked Questions
Is Your Basement Ready for Vancouver's Next Rainstorm
A lot of homeowners wait until they see actual water on the slab before taking groundwater seriously. That's understandable, but in this region the warning signs usually show up earlier. The soil gets saturated, the foundation stays under pressure, and moisture starts appearing in the lowest part of the basement long before a major failure.
In Greater Vancouver, the challenge changes by neighbourhood. Richmond homes often deal with persistent groundwater pressure. Parts of Burnaby and New Westminster can see water move toward the house through heavy rain and dense soil. On the North Shore, slope can send runoff toward foundation walls fast if drainage outside the home isn't doing its job.
A common situation in local homes
One of the most familiar callouts starts with a homeowner saying the basement only feels damp during heavy rain. Then they add that the storage room smells musty, cardboard boxes are soft on the bottom, or paint on the concrete wall is blistering near one corner. That's often the point where a sump pump stops being an optional upgrade and becomes part of a proper drainage plan.
A sump pump doesn't fix every source of water by itself. If the issue is surface water from grading, clogged perimeter drains, or a roof drainage problem, those need attention too. But when water is collecting below the slab or at the footing level, the pump is the active part of the system that relieves pressure and moves water away from the house.
Practical rule: If moisture shows up repeatedly in the same low area during storms, don't treat it like a one-time event. Repetition usually means the water path is established.
What readiness actually looks like
A basement is better prepared for the next storm when three things are true:
- Water has a collection point: The sump pit is installed at the correct low point so groundwater reaches it first.
- The pump can cycle properly: The pit is large enough, the float can move freely, and the discharge line is laid out to avoid backflow.
- The discharge water leaves the area: Pumped water has to end up far enough from the foundation that it doesn't come right back.
That last part gets missed a lot in rushed work. A pump that removes water but sends it too close to the house only creates a loop.
Signs You Need a Sump Pump in Your GVA Home
Some homes announce the problem with a puddle. Others give quieter warnings for months. If you know what to look for, you can catch groundwater issues before they turn into cleanup, mould remediation, or damaged finishes.
What early moisture signs usually mean
A persistent musty smell in the basement is one of the first signs I take seriously. So is white powder on concrete walls, dark staining near the slab, or patches of mould growth around corners and stored items. Those signs don't prove you need a sump pump by themselves, but they do tell you moisture is entering or lingering where it shouldn't.
Water stains on the lower part of a foundation wall often point to pressure outside the home. When the surrounding soil stays saturated, that pressure pushes moisture through cracks, joints, or porous concrete. In a Burnaby basement, for example, a stain line behind shelving may look minor until the next stretch of rain leaves the floor damp in the same area.
A basement that feels humid year-round can also be signalling groundwater, not just poor ventilation. If dehumidifiers keep filling and the air still feels heavy, it's worth checking whether moisture is entering from below.
When age of the home matters
Home age matters more than many people realise. The mid-1980s became the turning point when sump pump installation started becoming a standard expectation in new residential builds, and older homes in areas like Greater Vancouver often don't have one unless it was added later, according to the City of Madison engineering guidance on sump pumps.
That matters here because Greater Vancouver has plenty of pre-1985 homes. If you own one and you're seeing dampness, water stains, or repeated seepage in the basement, the absence of a sump system may reflect the era the house was built, not the absence of risk.
Basement moisture rarely improves on its own. Homeowners usually see it return with the next heavy rain cycle, often in the exact same spot.
If roof drainage is part of the problem, correcting that at the same time makes a big difference. Poor runoff control keeps loading water into the soil beside the house. This practical overview of downspout installation and drainage routing is worth reviewing if your downspouts discharge too close to the foundation.
A few signs justify a proper assessment sooner rather than later:
- Repeated damp corners: The same area gets wet during storms.
- Efflorescence on concrete: That chalky residue shows water is moving through masonry.
- Visible mould or rusting metal: Moisture has been present long enough to affect materials.
- Finished basement issues: Baseboards swelling, flooring lifting, or drywall softening near the floor.
Choosing the Right Sump Pump Type and Features
A pump that works fine in one Lower Mainland basement can be the wrong choice a few kilometres away. Richmond homes often deal with a high water table and long periods of groundwater pressure. North Vancouver homes can see fast runoff coming down slope toward the foundation. The right equipment has to match how water reaches the pit, how often the pump will run, and how much room the basement layout gives you.
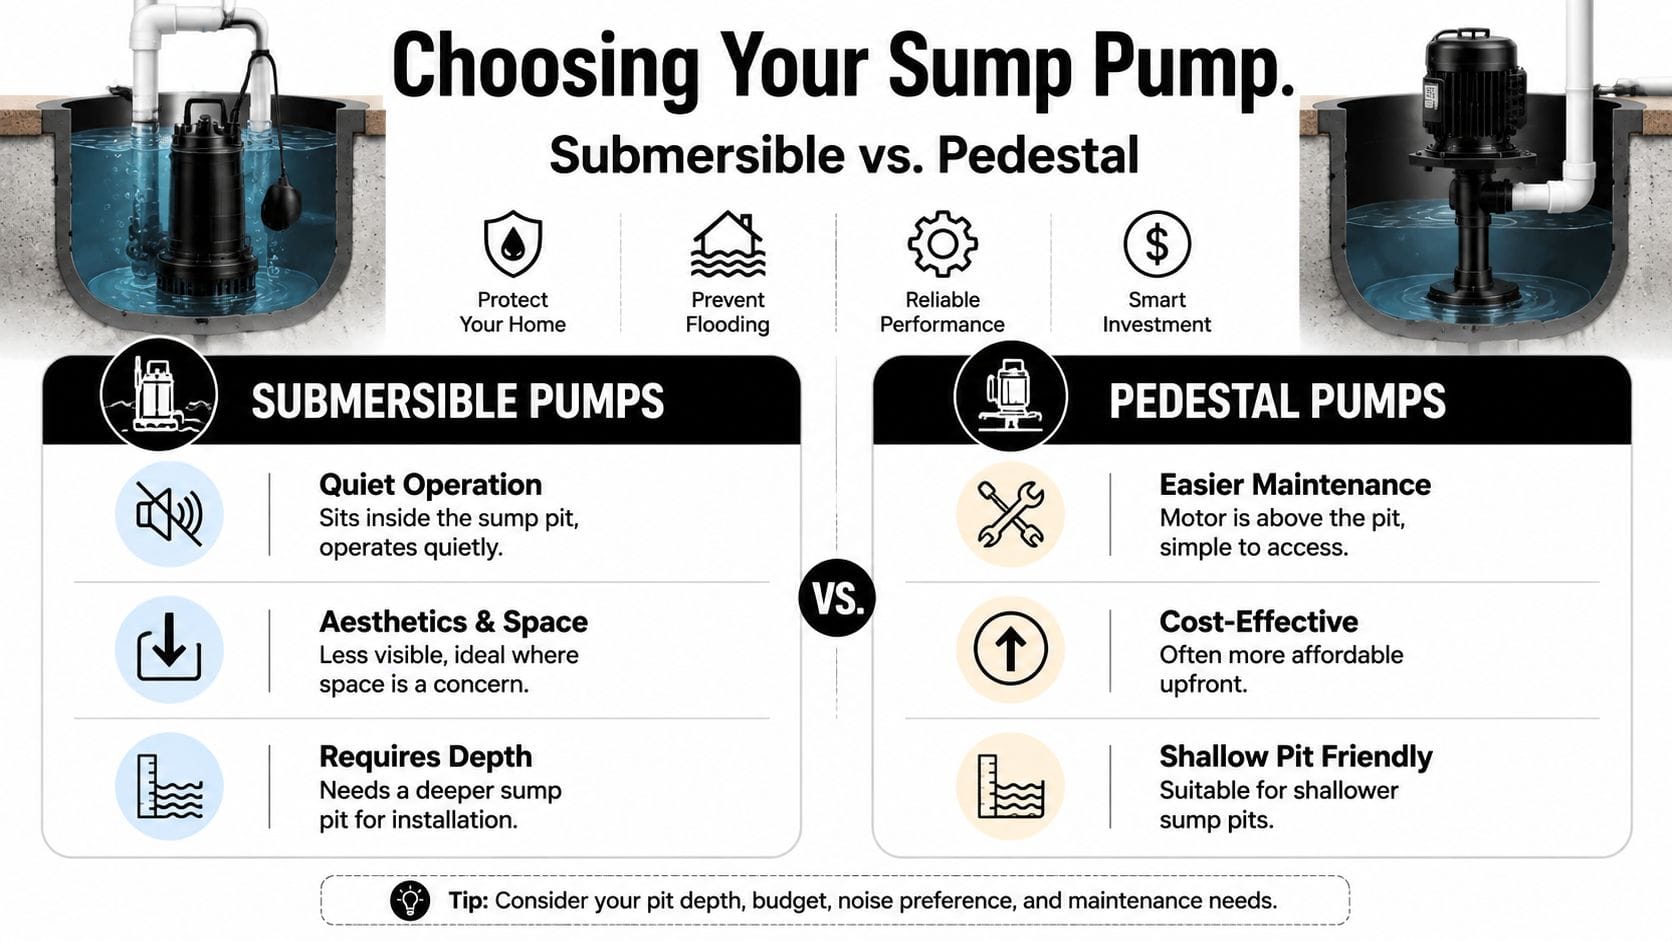
Submersible versus pedestal
In most Vancouver-area homes, the first choice is between a submersible pump and a pedestal pump. Both remove water. The trade-offs show up in noise, service access, pit size, and how the basement is used day to day.
| Feature | Submersible Pump | Pedestal Pump |
|---|---|---|
| Installation position | Sits inside the sump pit | Motor stays above the pit |
| Noise level | Quieter during operation | More noticeable sound |
| Space impact | Less visible | Takes more visible space above pit |
| Maintenance access | Harder to reach quickly | Easier to access |
| Pit requirement | Better with a deeper pit | Can suit a shallower pit |
| Typical fit | Finished or regularly used basements | Utility spaces where access matters most |
Submersible pumps are usually the better fit for finished basements, basement suites, and mechanical rooms where noise matters. They stay out of the way, keep the installation cleaner, and are less likely to be bumped or tampered with. In a city where many homes have upgraded basement spaces, that matters.
Pedestal pumps still have a place. I see them make sense in older homes with shallow pits or utility areas where easy service access matters more than appearance or noise. The exposed motor is easier to reach, but the trade-off is a louder system and a setup that takes more visible space above the pit.
Features that matter in wet Vancouver conditions
Material quality matters more here than it does in drier regions. During long rain events, pumps can cycle repeatedly for hours, and cheap plastic housings do a poor job of shedding heat. Cast-iron or other heavier-duty bodies hold up better under that kind of use.
Switch design matters too. A pump can have enough horsepower and still fail because the float jams against the pit wall or discharge pipe. That problem shows up often in cramped retrofits, especially in older Vancouver homes where the basin was added after the house was built. Matching the switch style to the basin dimensions is just as important as choosing the motor.
Backup power should be part of the decision, not an add-on after the fact.
If your basement stays dry only because the pump keeps up with incoming water, a battery backup is hard to justify skipping. The worst time to lose power is during the same storm that is loading the soil around the foundation. In parts of the region with persistent groundwater pressure, a backup system protects against a very predictable failure point.
These are the features worth prioritizing:
- Battery backup capability: Strong protection for homes that take in water during major storms or power outages.
- Check valve compatibility: Stops discharged water from dropping back into the pit and forcing the pump to cycle again.
- Sealed basin option: Helps with odour control, reduces moisture release into the room, and keeps the setup tidier.
- Serviceable components: Makes future maintenance and pump replacement much easier.
- Alarm capability: Warns you when water rises too high or the primary pump stops keeping up.
Local code and discharge rules also affect what pump setup makes sense. The discharge has to go to an approved location, and the system needs to be configured so it does not create a freezing, flooding, or nuisance problem outside. As part of broader basement flood-protection work, contractors like Encano Plumbing & Drainage Ltd. often match the equipment to the site conditions, not just the pit size. That is the difference between a system that survives one wet season and one that keeps working for years.
The Professional Sump Pump Installation Process
Good sump pump installation isn't a matter of dropping a pump into any hole in the floor. The location, basin size, base preparation, piping layout, and small mechanical details all affect whether the system works for years or starts failing early.
Where the pit goes and why sizing matters
The pit should go where water naturally collects or where the drainage plan directs it. In many basements, that's a low corner or a point identified during inspection of the slab and foundation conditions. The goal is to intercept groundwater before it spreads across the floor.
The basin has to be large enough for the pump and float to operate properly. Guidance cited in installation references states that most building codes require a sump pit to be at least 18 inches wide and 24 inches deep, and that size helps prevent float switch jamming that can happen in undersized pits like a bucket-style setup, as noted in this sump pump installation guidance summary.
For Greater Vancouver conditions, those dimensions line up with what works in the field. A pit that's too small cycles poorly, restricts movement, and shortens equipment life. A proper installation also uses a gravel base and a perforated liner so water can enter the basin efficiently from the surrounding soil.
A practical example makes this clearer. In a Richmond basement where water keeps appearing in the lowest corner, a contractor cuts the slab, digs a pit 24 inches deep and 18 inches wide, adds a 2-inch gravel base, and places a paver to create a flat surface under the pump, following the installation example described in this step-by-step sump pump guide.
The details that separate a reliable install from a problem job
Once the basin is set, the pump is placed on a stable base, not directly in loose debris. The discharge piping then gets assembled with the right fittings and support. One small part that isn't optional is the check valve. In practical terms, it stops the water in the vertical discharge pipe from dropping back into the pit every time the pump shuts off.
A check valve is typically installed 6 to 12 inches above the pump outlet, which is the mechanical requirement highlighted in this primary sump pump installation example from Ferguson. If that valve is missing or badly placed, the pump can short-cycle, run hotter, and wear out sooner.
Another detail that separates a pro job from a callback is the weep hole. Done properly, it helps prevent air lock. Done badly, it creates backflow issues and confusion for the homeowner. The hole needs careful placement and orientation, not random drilling.
Key steps a professional follows include:
- Confirm the low point: The installer checks where water collects and whether the slab layout supports that location.
- Excavate and line the basin: The pit gets proper dimensions, gravel support, and a commercial liner.
- Set and connect the pump: The unit is level, stable, and fitted with the correct discharge assembly.
- Install the check valve and discharge run: The piping is routed so water leaves the building area instead of circling back.
- Test operation under load: The float, check valve, and discharge are all tested before the job is closed up.
What doesn't work is the shortcut version. A small plastic bucket, no proper liner, no check valve, and discharge water dumped near the house will eventually show you why the details matter.
Sump Pump Installation Cost and Timelines in Vancouver
Most homeowners want the same answer first. What's this going to cost, and how long will the basement be torn up? The honest answer depends on the pump type, the difficulty of cutting and excavating the slab, the route for the discharge line, and whether backup power is included.
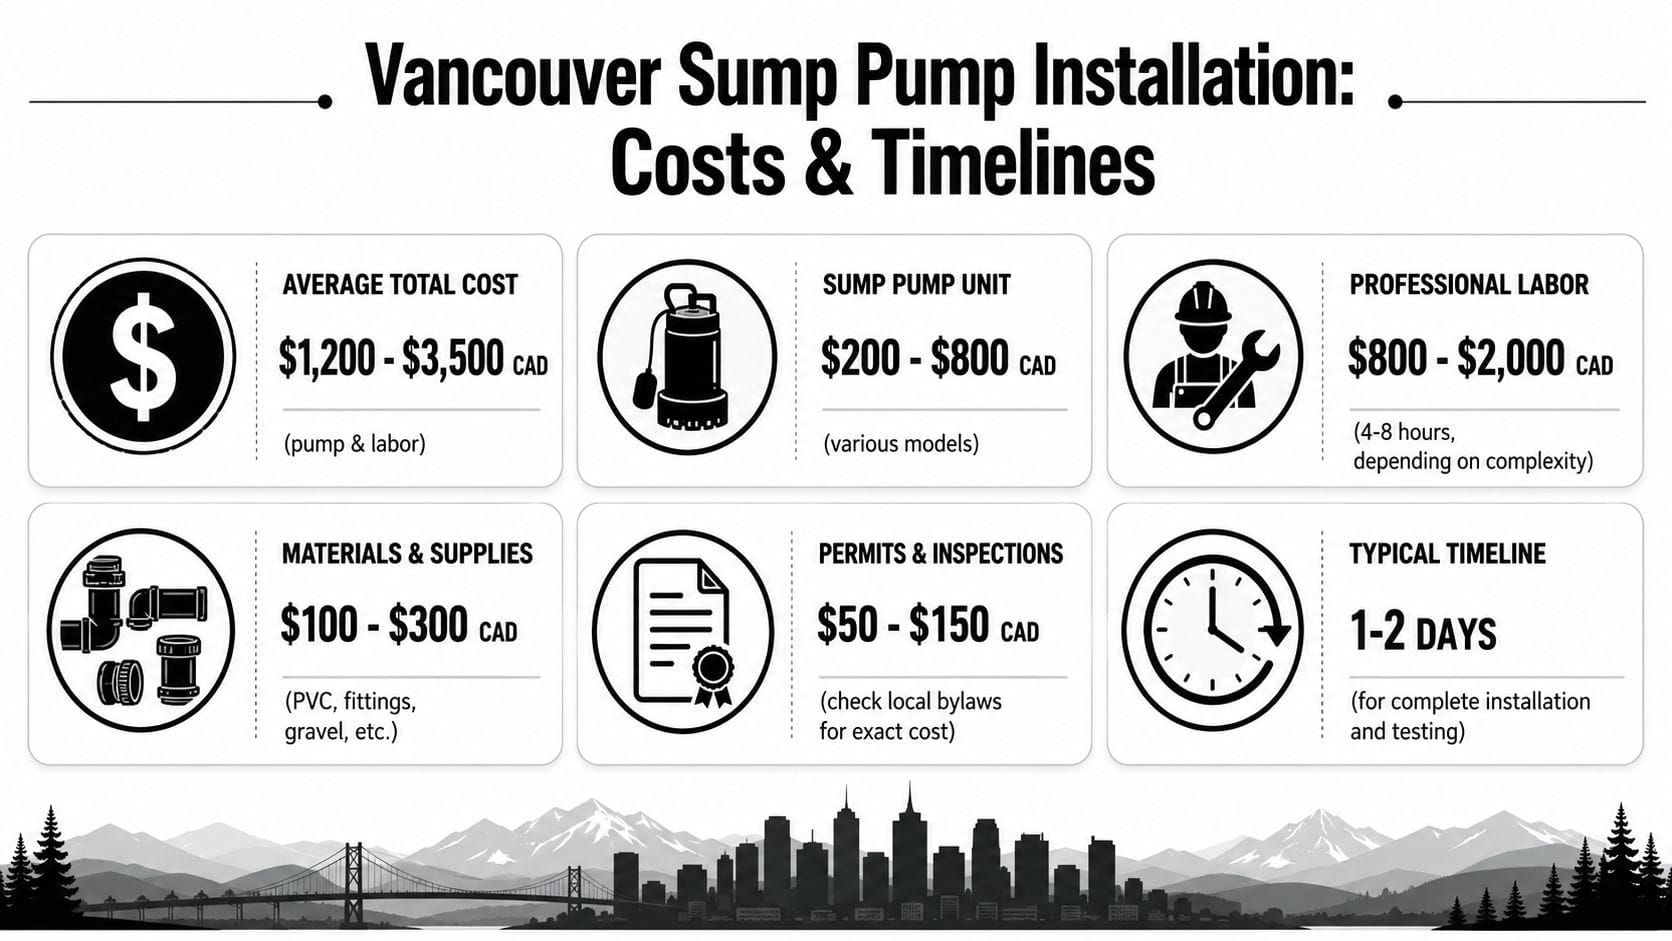
What drives the price
In the Vancouver region, a complete professional sump pump installation typically costs between $900 and $1,400 for standard units, while adding a battery backup system raises the total to $1,900 to $5,500. That same verified local guidance also states the discharge pipe must route water at least 20 feet away from the foundation.
What changes the quote? Access is a big factor. Cutting a basement slab in a tight utility room is different from working in an open unfinished space. Routing the discharge line to a proper exit point can also add labour and materials, especially when the installer has to avoid finished areas or work around existing mechanical systems.
A standard quote usually includes the pump, basin, discharge piping, labour, and the check valve. If electrical work is needed for a dedicated receptacle, or if the discharge route is unusually difficult, the price can move upward.
The cheapest quote often leaves out the parts of the job that prevent callbacks. That's usually where homeowners pay later.
How long the work usually takes
Timelines depend on site conditions, but most straightforward installations are completed within a short project window. A clean, accessible basement with a direct discharge route moves much faster than a retrofit in a finished space with limited options for piping.
From a homeowner's perspective, the practical sequence usually looks like this:
- Day one: Layout, slab cutting, excavation, basin installation, and rough piping.
- Day two if needed: Final connections, discharge routing, testing, cleanup, and restoring the work area.
If the job is part of a larger drainage correction, the sump pump work may be only one piece of the full schedule. That's why detailed quotes matter. They show whether you're paying for a complete water-management solution or just a pump in a pit.
Hiring a Sump Pump Contractor in the Lower Mainland
A sump pump only protects the home if the installation is done properly. That's why contractor selection matters as much as equipment selection. In Vancouver, Richmond, Burnaby, Surrey, and Delta, the installer needs to understand wet basements, local housing types, and how drainage details behave in real weather.
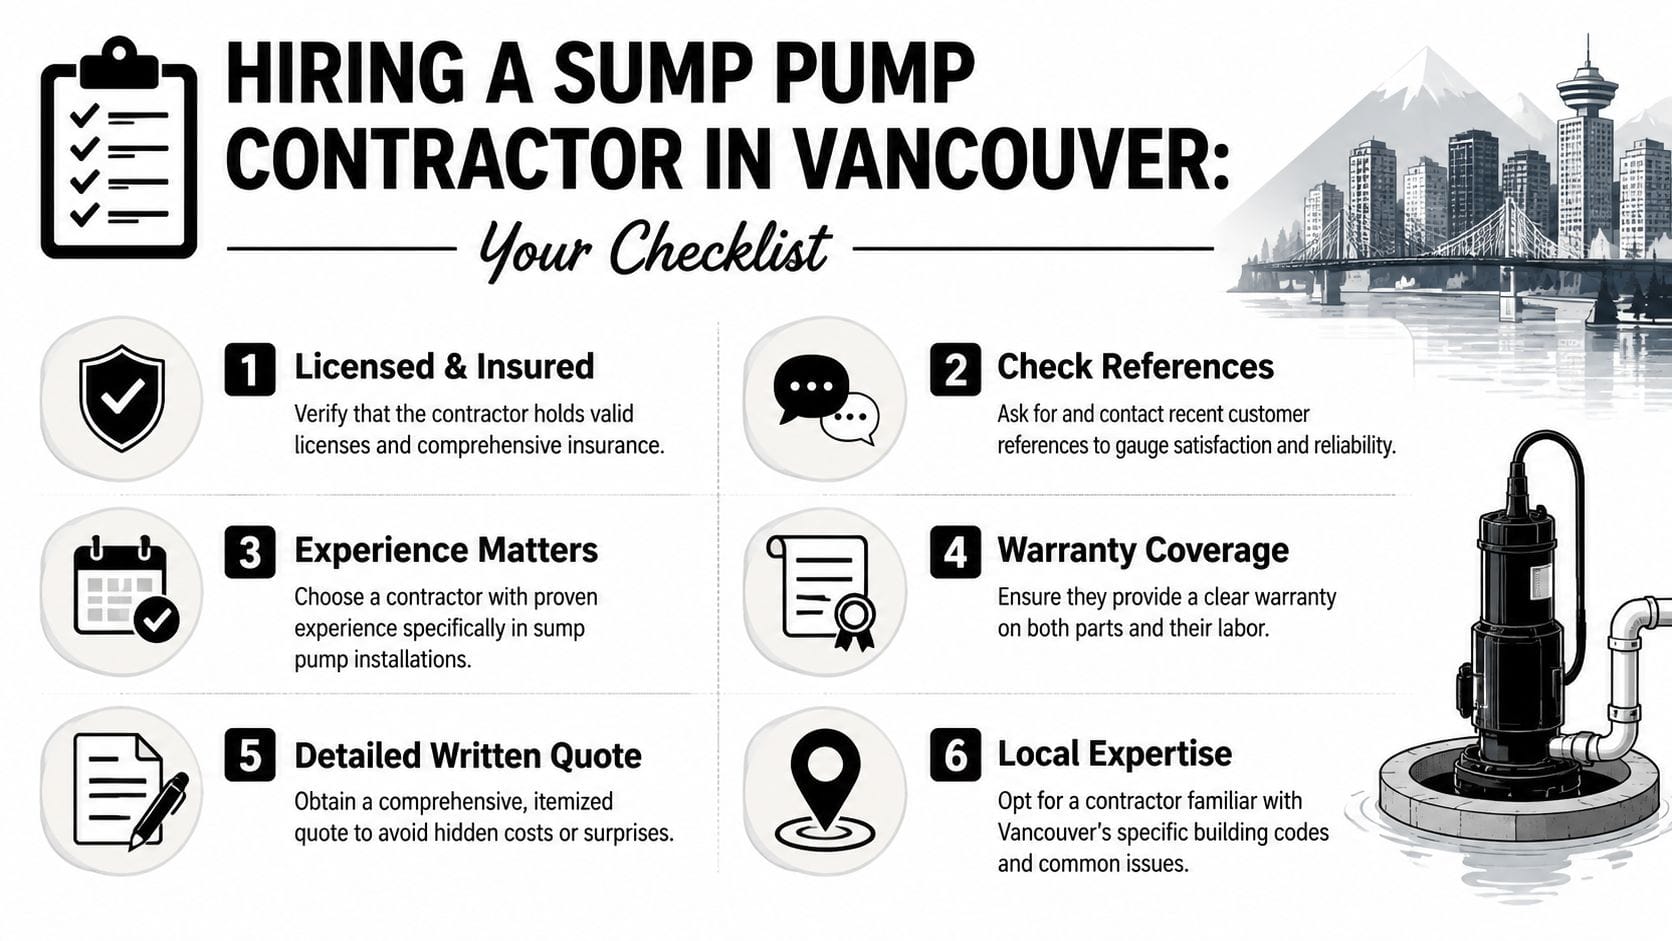
What to ask before you approve the quote
Start with licensing and insurance. If a contractor is cutting concrete, modifying drainage, and installing mechanical equipment in your basement, you want that covered properly. Then ask about direct experience with sump pits, discharge routing, and battery backup systems, not just general plumbing.
A written quote should describe the basin, pump type, discharge plan, check valve, and testing. If those details are vague, the scope is vague. Homeowners also benefit from asking how the contractor handles backflow protection as part of the overall drainage setup. This article on backflow preventer installation and protection planning gives useful context for that conversation.
Use a simple screening checklist:
- Licensed and insured: Ask for current documentation.
- Specific sump pump experience: Not every plumber does this work often.
- Local code familiarity: The contractor should know common expectations across Lower Mainland municipalities and strata environments.
- Itemised quote: You want materials, labour, and scope spelled out clearly.
- Warranty clarity: Ask what's covered on parts and what's covered on labour.
The wrong hire usually shows up in the same places. Poor pit sizing, rushed discharge routing, and no attention to testing. The right contractor explains what they're doing, why they're doing it, and what maintenance you'll need after the install.
Maintaining Your System and Frequently Asked Questions
A sump pump isn't a fit-and-forget device. It's mechanical equipment sitting in a wet environment, and it needs occasional attention if you expect it to work during the next storm.
Simple maintenance that prevents expensive surprises
Homeowners can handle basic checks through the year. Lift the lid if accessible, look for debris in the pit, and make sure the pump hasn't shifted. Test operation according to the manufacturer's instructions and pay attention to unusual noise, vibration, or delayed cycling.
The discharge line also deserves attention. One of the most overlooked details is the weep hole. Data from BC says 34% of residential sump pump failures in Greater Vancouver are tied to improper backflow caused by incorrectly oriented or clogged weep holes, and the proper setup is a 1/8-inch hole drilled at a 45-degree downward angle. That's a small detail, but it has a direct effect on reliability.
A simple maintenance routine looks like this:
- Quarterly visual check: Look for debris, loose fittings, or obvious corrosion.
- Seasonal test before heavy rain periods: Confirm the pump activates and discharges properly.
- Discharge inspection: Make sure water can leave the property path without obstruction.
- Annual professional service: Have the system checked for switch operation, valve condition, and discharge performance.
Maintenance note: If the weep hole is missing, clogged, or drilled in the wrong direction, the system can behave unpredictably even when the pump itself is in good condition.
Frequently asked questions
Is a sump pump enough on its own
Sometimes yes, often no. If water is entering because groundwater is rising below the slab, a sump pump is often the key piece. If roof runoff, grading, or failed exterior drainage is contributing, those issues need correction too.
Do older Vancouver homes often need retrofits
Yes. Many older homes were built before sump pumps became a standard expectation in newer residential construction, so retrofit installation is common when moisture problems show up.
How do I know if the discharge setup is wrong
Watch where the water goes after the pump runs. If it ends up too close to the house, returns toward the footing, or creates a soggy area near the foundation, the routing likely needs correction.
What about strata properties
Responsibility depends on the strata documents and whether the sump system serves a unit or common property. In strata buildings, it's smart to confirm approval, maintenance responsibility, and access before work begins.
Should I call for service if the pump still runs
Yes, if it sounds different, cycles too often, or the basement feels damp despite operation. A running pump can still have float issues, backflow problems, or discharge restrictions.
If your basement is showing signs of groundwater trouble, a properly planned sump pump system can prevent a much bigger repair later. Encano Plumbing & Drainage Ltd. provides sump pump installation, repair, and drainage support for homeowners and property managers across Greater Vancouver.