

A stretch of heavy Vancouver rain has left your finished basement smelling musty. The sump pump seems to be cycling more often, or a narrow strip of lawn beside the foundation stays soggy long after the rest of the yard has dried. Nothing looks dramatic yet, but the clues point toward a buried system that may be struggling to move groundwater away from the house.
That system is usually called a perimeter drain, or a foundation drain. Cleaning it isn't a matter of forcing water through a pipe. A technician needs to understand where the cleanouts are, how the pipe is supported, where water discharges, and whether the obstruction is sediment, roots, damaged pipe, or a failed outlet.
This guide follows the problem from the first warning sign to a sensible maintenance plan. It uses a practical example throughout, a 1970s-era Richmond bungalow with original perimeter drains, so the engineering details stay connected to situations homeowners face.
Table of Contents
- What Spurred This Guide
- How Perimeter Drains Work
- Why Perimeter Drains Fail
- Early Warning Signs Homeowners Notice
- Safe DIY Maintenance and Where to Stop
- What a Professional Cleaning Visit Looks Like
- A Realistic Prevention Plan for Greater Vancouver
- Booking the Right Help in Greater Vancouver
What Spurred This Guide
The Richmond homeowners first noticed a faint damp smell after several rainy days. They opened windows, ran a dehumidifier, and waited. The basement dried out, so the issue seemed minor.
The following season, a small damp patch appeared at the edge of a carpet near an exterior wall. It wasn't standing water, and the wall didn't look damaged. They searched for “musty basement after rain,” checked the sump pump, and wondered whether the problem came from the roof, the grading, or the buried drain around the foundation.
That uncertainty is common. A perimeter drain sits below soil, often beneath landscaping, paving, or additions installed long after the house was built. A homeowner may see only a wet lawn, a basement stain, or a cleanout cap. The actual restriction can be several metres away, hidden inside a pipe or at its outlet.
The first useful question isn't “Can someone flush the drain?” It's “Where is the water supposed to go, and what is stopping it?”
The Richmond bungalow eventually developed a more persistent damp area. By then, the original perimeter drains had accumulated sediment, and one section needed replacement. Earlier inspection might have separated a manageable cleaning job from a repair project before moisture reached the finished interior.
The rest of this guide explains how the system works, why it fails, which checks are safe for a homeowner, and what a professional cleaning visit should include. It also outlines a practical prevention routine for homes, strata properties, and small facilities across Greater Vancouver.
How Perimeter Drains Work
During a cleaning visit, a plumber is tracing a water route hidden below the soil, not just washing out an exposed pipe. Soil presses groundwater against the foundation, while rain adds water from above. The perimeter drain provides a lower path, collecting that water before pressure drives it through cracks, joints, or porous masonry.
The system depends on several parts working together:
- Perforated pipe: Rigid pipe with openings that admit groundwater from the surrounding gravel. A typical BC foundation drain uses a minimum 100 mm rigid perforated pipe, with the invert, meaning the pipe's inside bottom, at least 300 mm below the adjacent interior slab. These dimensions appear in the BC Housing site and foundation drainage guide.
- Granular envelope: Clean, coarse gravel surrounds the pipe, creating open spaces for water to move. The same BC guidance identifies at least 150 mm of cover around the pipe, with only small amounts of material passing a 4 mm sieve. Treat these dimensions as a typical design reference rather than a universal layout for every older home.
- Geotextile filter fabric: This layer separates soil from the gravel and pipe. It works like a fine tea filter, allowing water through while holding back soil particles and fines that could narrow the drainage path.
- Discharge route: Water travels toward a sump, storm sewer, or another approved drainage point. A clear pipe cannot solve the problem if the outlet is blocked, disconnected, or releasing water beside the foundation.

Why slope and depth matter
The pipe needs a continuous route for water to follow. Shifting bedding, a sagging section, or an outlet positioned too high can create a low pocket. Water sits there, and sediment settles in the same place, so a quick flush may provide only temporary relief.
A homeowner looking for a visual explanation can review how weeping tiles work. Perimeter drain cleaning checks the whole water path, including the pipe, gravel, filter layer, cleanouts, slope, sump or storm connection, and final discharge point. Those buried design details explain why a plumber may inspect flow and camera access before choosing flushing, jetting, or repair.
Why Perimeter Drains Fail
A blockage is a symptom, not a diagnosis. The same slow flow can come from loose sediment, tree roots, a crushed pipe, or water that has nowhere suitable to discharge.
The four common failure patterns below require different responses.
| Failure Mode | What the Camera Shows | Warning Sign Above Ground | Typical Fix |
|---|---|---|---|
| Sediment accumulation | Fine material or a silt plug narrowing the pipe | Slow drainage, damp soil, or repeated staining after rain | Controlled flushing or hydro jetting, followed by a flow test |
| Root intrusion | Roots entering through joints or damaged sections | Recurring blockage near mature planting or trees | Mechanical removal, jetting, and possible spot repair |
| Collapsed or bellied pipe | A crushed section, separated joint, or standing water in a sag | Persistent backup despite earlier cleaning | Excavation and spot repair, or replacement of the affected run |
| Failed outlet | The camera reaches a blocked, disconnected, or unsuitable discharge point | Water collecting beside the foundation or a sump that receives little flow | Outlet correction, repair, or connection to a suitable drainage route |
Sediment and fines
Sediment often begins outside the pipe. If unsuitable backfill, deteriorated filter fabric, or disturbed soil allows fines into the gravel envelope, those particles can migrate toward the perforations. The camera may show a cloudy passage, loose grit, or a dense plug near a low point or outlet.
A flush can restore flow when the pipe remains sound and the material has a clear route out. If sediment returns quickly, repeated jetting treats the result rather than the cause. The technician may need to assess the gravel envelope, filter fabric, pipe fall, and discharge route.
Roots, collapse, and outlet problems
Roots seek moisture, especially around joints or cracked pipe. The camera may show hair-like growth at first, followed by a dense mass that catches more debris. Mechanical augering or high-pressure jetting can remove the growth, but a damaged joint may need repair.
A collapsed or bellied pipe behaves differently. Water may move temporarily after cleaning, then collect again in the same location. A failed outlet can produce a similar complaint, because the pipe remains full when the final discharge point is blocked or poorly positioned.
The Richmond bungalow had two separate findings, a root mass at one corner and a silt plug near the outlet. A quick flush might have opened the route for a short time, but it wouldn't have corrected both conditions.
If the same blockage returns after cleaning, ask whether the pipe is failing or the system is poorly arranged. Maintenance may not be the real fix.
Early Warning Signs Homeowners Notice
You don't need a camera to notice that a foundation drainage system may be under stress. The clues usually appear gradually, then become more obvious during or after rainfall.
Subtle clues
- Musty basement smell: Moisture may be reaching the wall or slab even before you see water. Check the affected wall after rain and arrange an inspection if the smell keeps returning.
- White efflorescence: Powdery white deposits on concrete indicate that moisture has travelled through the masonry and left mineral residue behind. Photograph the area and note whether it grows after wet weather.
- Peeling paint or rusty trim: Damage at the bottom of finished basement walls can indicate repeated dampness near the floor or foundation edge. Don't repaint until the moisture source is identified.
- A soggy foundation strip: Soil that stays wet along one wall can point to poor surface drainage, a downspout discharge issue, or a restricted buried route. Check where roof water lands before assuming the pipe is blocked.
Signs that deserve faster attention
- Frequent sump cycling during dry weather: The pump may be receiving more water than expected, or the discharge route may be restricted. Check the pump outlet and have the perimeter system assessed.
- Water stains near a floor drain: Water may be backing up through the drainage network rather than entering through the wall. Keep stored items away from the area and arrange a diagnostic visit.
- Water backing out of a cleanout or floor drain: Treat this as an urgent blockage. Avoid adding more water to the system and call for professional help.
The Richmond homeowners saw a small damp patch on a carpet edge two years before standing water appeared. That delay changed a relatively simple cleaning assessment into a section replacement. The lesson isn't that every damp patch means excavation. It's that early moisture deserves documentation and diagnosis.
For a closer look at the relationship between backup symptoms and drainage problems, see this guide to basement drain backup.
A practical rule is simple: if one of these signs appears in a home over 20 years old that has never had its drains professionally cleaned, make a camera inspection the next step. The age threshold and maintenance history don't prove failure, but they justify looking inside before the problem reaches finished surfaces.
Safe DIY Maintenance and Where to Stop
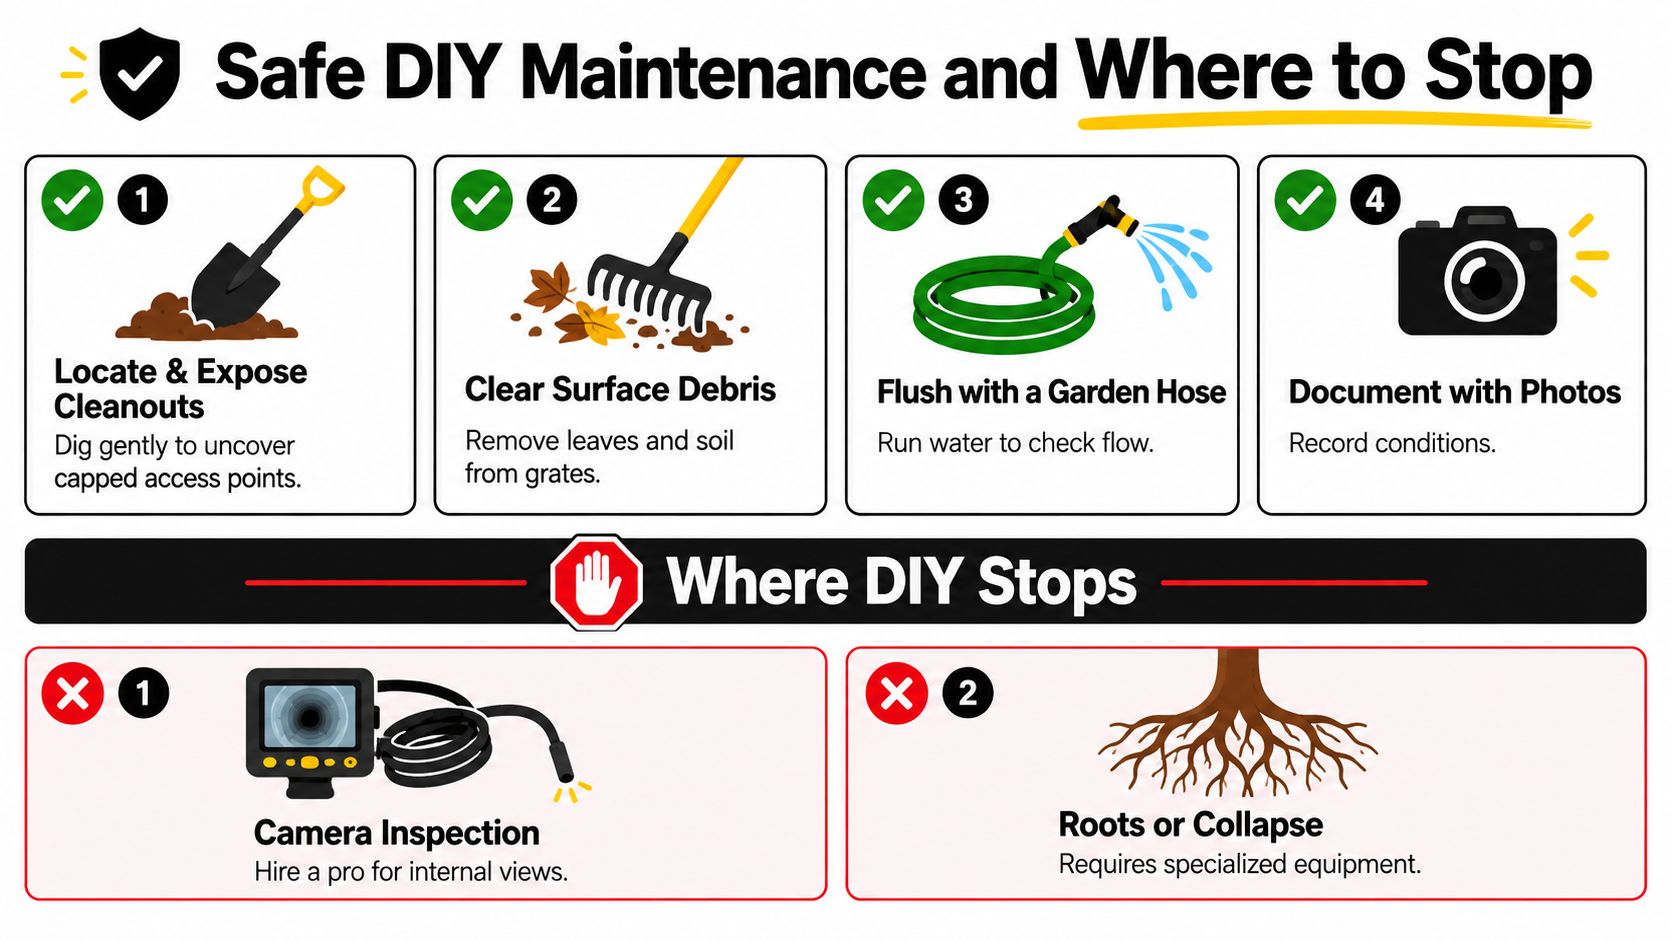
A homeowner can perform a limited visual and flow check. The safe objective is to learn whether an accessible run accepts water and whether water exits at the expected destination. It isn't to force a hidden blockage through an unknown pipe.
A cautious homeowner check
Start by locating the capped cleanouts around the foundation. Dig gently if soil or mulch has covered them, and don't pry aggressively against a cap that appears damaged. BC guidance identifies maximum cleanout spacing of 15 m for one-way rodding and 30 m for two-way rodding on a 100 mm drainage system, with corner cleanouts required for certain unidirectional layouts, as described in this BC drainage guide.
Once you know the direction of flow, remove the cap carefully. A garden hose and flashlight are suitable for a light check. Feed water from the downstream end toward the sump or outlet, use modest flow, and watch for water emerging at the other end. If it moves freely, let the run clear briefly, then replace the cap securely.
A Burnaby homeowner used this approach on a single cleanout run with light silt. A hose, flashlight, and careful observation were enough to confirm flow in under an hour. That result doesn't prove the entire foundation system is healthy, but it avoids unnecessary equipment for a minor, accessible issue.
Stop when the system gives you a warning
Stop the attempt if you find:
- Roots: Root intrusion needs a camera and suitable removal equipment.
- No flow: If water doesn't move after several minutes, don't keep increasing pressure.
- Visible damage: Crushed, cracked, or separated pipe needs assessment before cleaning.
- Basement backup: Stop adding water and protect the interior.
- Unknown cleanout locations: Don't introduce high-pressure water into a route you can't trace.
Rented jetting equipment can send water toward an unknown outlet, flood a basement, or worsen a weak pipe. A professional may use a camera, jetter, mechanical auger, or excavation, depending on what the inspection finds. If the system connects to a sump, a homeowner should also understand the pump and discharge arrangement, which is covered in this guide to sump pump installation.
Record the cleanout locations, direction of flow, water appearance, time until flow begins, and any areas that remain wet. Photograph caps, exposed pipe, standing water, and the discharge point. Those notes can save time during a later visit.
What a Professional Cleaning Visit Looks Like
A proper service call starts with diagnosis, not a hose aimed at the nearest opening. The technician should establish the system's access points and discharge route before choosing equipment.

The usual sequence
First, cleanout location. Buried or paved-over caps may need to be exposed. The technician maps the accessible runs and checks whether each opening is suitable for inspection.
Next, video inspection. A camera identifies the obstruction and shows the pipe's condition. Sediment, roots, displaced joints, a collapsed section, standing water, and an obstructed outlet look different on screen. The footage also helps distinguish a cleaning problem from a repair problem.
Then, tool selection. High-pressure jetting can remove sediment and some root growth when the pipe is structurally sound. Mechanical augering can address harder local blockages. Vacuum extraction may be appropriate where heavy silt has collected and needs to be removed rather than pushed farther along the system.
The Richmond bungalow illustrates why this order matters. The camera showed a root mass at one corner and a silt plug at the outlet. Both were cleared in one visit because the technician knew where each obstruction was and could confirm the pipe remained serviceable.
After cleaning, the technician should conduct a controlled flow test. A final camera pass can confirm that the obstruction has cleared, the pipe remains continuous, and water reaches the intended discharge point.
A short visual demonstration can help homeowners understand the role of inspection equipment before a technician arrives:
What the report should contain
Ask for a pipe map, before-and-after footage, the flow-test result, and written recommendations. The report should identify which sections were inspected, what was removed, whether the outlet accepted water, and whether follow-up repair is advisable.
Service pricing varies with access, blockage type, equipment, and repair needs. A straightforward jetting visit for an accessible system generally sits at the lower end of a provider's range, while buried cleanouts, multiple obstructions, or spot repairs increase the work involved. Request transparent pricing before authorising additional work, especially if excavation may be necessary.
A Realistic Prevention Plan for Greater Vancouver
A wet coastal climate puts regular demands on foundation drainage, but every property doesn't need the same service pattern. A newer, accessible single-family system with no symptoms differs from an older home beneath mature trees or a strata complex with shared drainage.
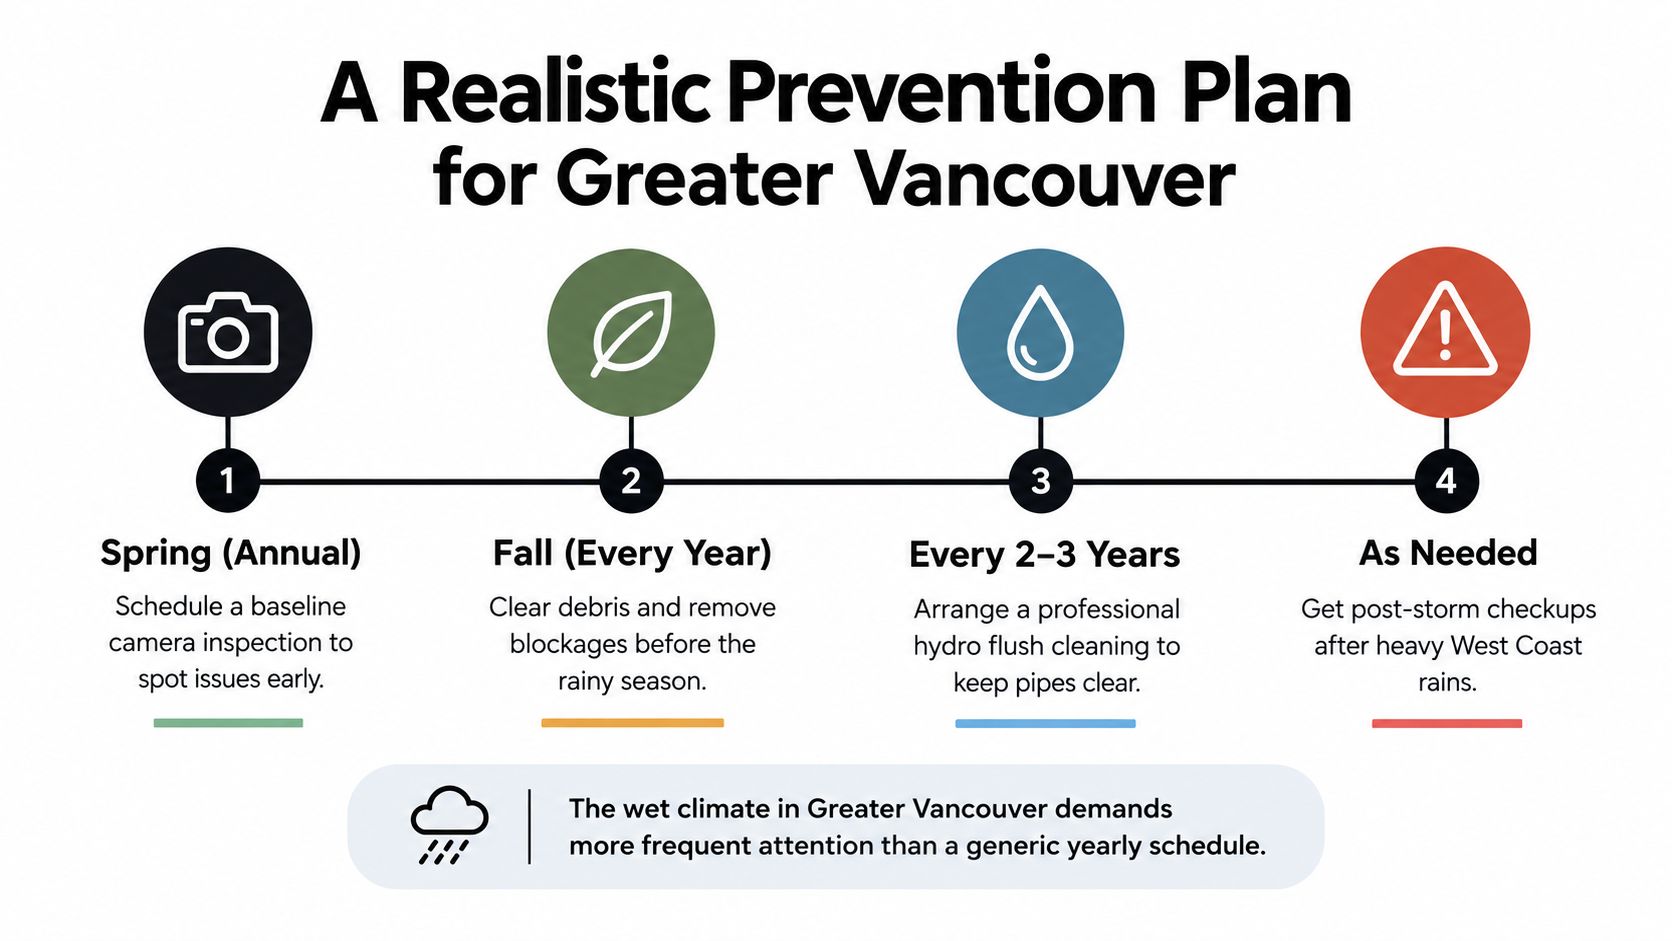
For a typical single-family home, plan a baseline camera inspection and cleaning roughly every two to three years. Properties older than 30 years, homes surrounded by mature trees, and strata complexes with shared drainage justify annual checks. These intervals are practical planning guidance, not a substitute for responding to symptoms or site conditions.
Seasonal habits that protect the buried system
Spring is a useful time to check cleanout access, sump operation, and the visible discharge route. Before the rainy season, clear leaves and soil from grates and keep downspouts directed away from foundation walls.
CMHC housing guidance recommends exterior grading away from the house at approximately 10 percent, with downspouts routed away from foundation walls, because surface water can overload a perimeter drain even when the buried pipe is clear. Review the CMHC guidance on surface drainage before changing grades, paving, or drainage connections. Site conditions and current requirements should be verified before construction work.
Avoid deep planting and new paving directly over a known drain run. Roots can reach wet pipe joints, while paving can bury access caps and make future inspection more disruptive. Keep a clear record of where cleanouts and discharge points are located.
A Vancouver homeowner tied a phone reminder to the first major autumn rainfall rather than to a fixed calendar date. That simple trigger kept the inspection on track during busy years, because it connected maintenance to the weather that places the load on the system.
Keep one page per visit. Record the date, camera findings, work completed, photographs, flow-test result, and next recommended date. For a strata or rental property, add the cleanout map and discharge location so the next contractor starts with useful information instead of repeating the discovery work.
Booking the Right Help in Greater Vancouver
Your next step depends on what the house is telling you.
If the basement is dry and you want a baseline, book a camera inspection with a written report. If you notice a mildew smell, damp staining, or unusual sump activity, request a full cleaning assessment with video before and after the work. If water is actively entering the basement or backing up through a cleanout or floor drain, ask about same-day or next-day emergency response.
A suitable provider should be able to explain the access plan, identify the intended outlet, and tell you which tool fits the obstruction. Look for video inspection, high-pressure jetting, clear pricing before extra work begins, and a willingness to provide the camera footage and pipe map after the visit.
Encano Plumbing & Drainage Ltd. is a family-owned Greater Vancouver contractor serving Vancouver, Richmond, Burnaby, New Westminster, Delta, Surrey, and nearby communities. The company provides scheduled and emergency drainage service, including camera inspection and high-pressure jetting, with online and phone booking and 24/7 emergency response.
Before calling, save this checklist:
- Describe the symptom: Note musty odour, staining, soggy soil, sump cycling, backup, or active water.
- Give the property details: Mention the home's approximate age, basement type, nearby mature trees, and any previous drain work.
- Ask about diagnosis: Confirm that the visit can include camera inspection and a controlled flow test.
- Clarify the price: Ask what the initial service includes and how additional cleaning, repair, or excavation will be authorised.
- Request records: Ask for footage, a pipe map, findings, and follow-up recommendations.
If your Richmond, Vancouver, or Greater Vancouver property has recurring dampness, slow drainage, or an overdue foundation check, Encano Plumbing & Drainage Ltd. can inspect the system, clean accessible perimeter drains, and identify when repair is more appropriate than another flush. Visit Encano Plumbing & Drainage Ltd. to book online or request drainage service.