Most advice on shower valve replacement cost starts with an average price. That's the wrong starting point. The retail valve may be a modest part of the invoice, while access through finished tile, pipe alterations, waterproofing, testing, and code compliance determine what the work really involves.
A cartridge repair can be a controlled service call. A concealed valve-body replacement can become a plumbing, drywall, waterproofing, painting, and tile-restoration project. The only reliable way to compare quotes is to identify the failed component, the access route, the required valve type, and what happens after the plumber opens the wall.
Table of Contents
- The Hidden Reality Behind Shower Valve Pricing
- Diagnosing the Failure and Access Requirements
- Navigating BC Anti-Scald Code Compliance
- Understanding Local Permit Exemptions and Rules
- Breaking Down a Realistic Vancouver Estimate
- Evaluating Professional Installation Versus DIY
- Securing Reliable Plumbing Service in Greater Vancouver
The Hidden Reality Behind Shower Valve Pricing
A shower valve has two very different replacement scenarios. The first is an internal cartridge or stem repair, where the valve body remains in the wall. The second is replacement of the concealed body itself, which may require cutting into a finished wall and rebuilding the connections.
Available California-oriented cost coverage places cartridge replacement around $150–$450, while a valve-body replacement can range from roughly $600–$1,400 when accessed from an adjacent wall and about $1,200–$3,000 when tile, waterproofing, and wall finishes must be opened and restored. These are comparison figures, not a Vancouver price list, but they demonstrate why the hardware's shelf price doesn't tell you much about the completed job. See the replacement cost comparison for the underlying California-oriented ranges.
Practical rule: Price the access route before pricing the valve.
A cartridge sits inside the existing body. If the cartridge is available, the body isn't damaged, and the retaining parts come apart cleanly, the plumber can often work through the trim opening. That avoids demolition and keeps the restoration scope small. A failed body is different. Corrosion, cracked castings, damaged seats, or incompatible older components may require the plumber to expose the in-wall piping.
The final bill then reflects more than the valve. It may include isolation and drainage, removal of the old assembly, copper, PEX, or CPVC adaptation, soldered or press connections, pressure testing, access-panel construction, substrate repair, waterproofing, tile work, painting, disposal, and trim installation.
Why two similar showers produce different quotes
Two bathrooms can have the same symptom, such as a dripping handle, but completely different repair conditions. One may have a removable panel in a hallway closet. Another may have a tiled shower with no matching replacement tile and a finished bedroom wall behind it.
A low quote can therefore be incomplete rather than efficient. Ask whether it covers diagnosis, the cartridge or valve body, trim, wall access, pipework, testing, waterproofing, finish restoration, permits, and taxes. If those items aren't separated, you can't tell whether you're comparing two solutions or one complete scope against one partial allowance.
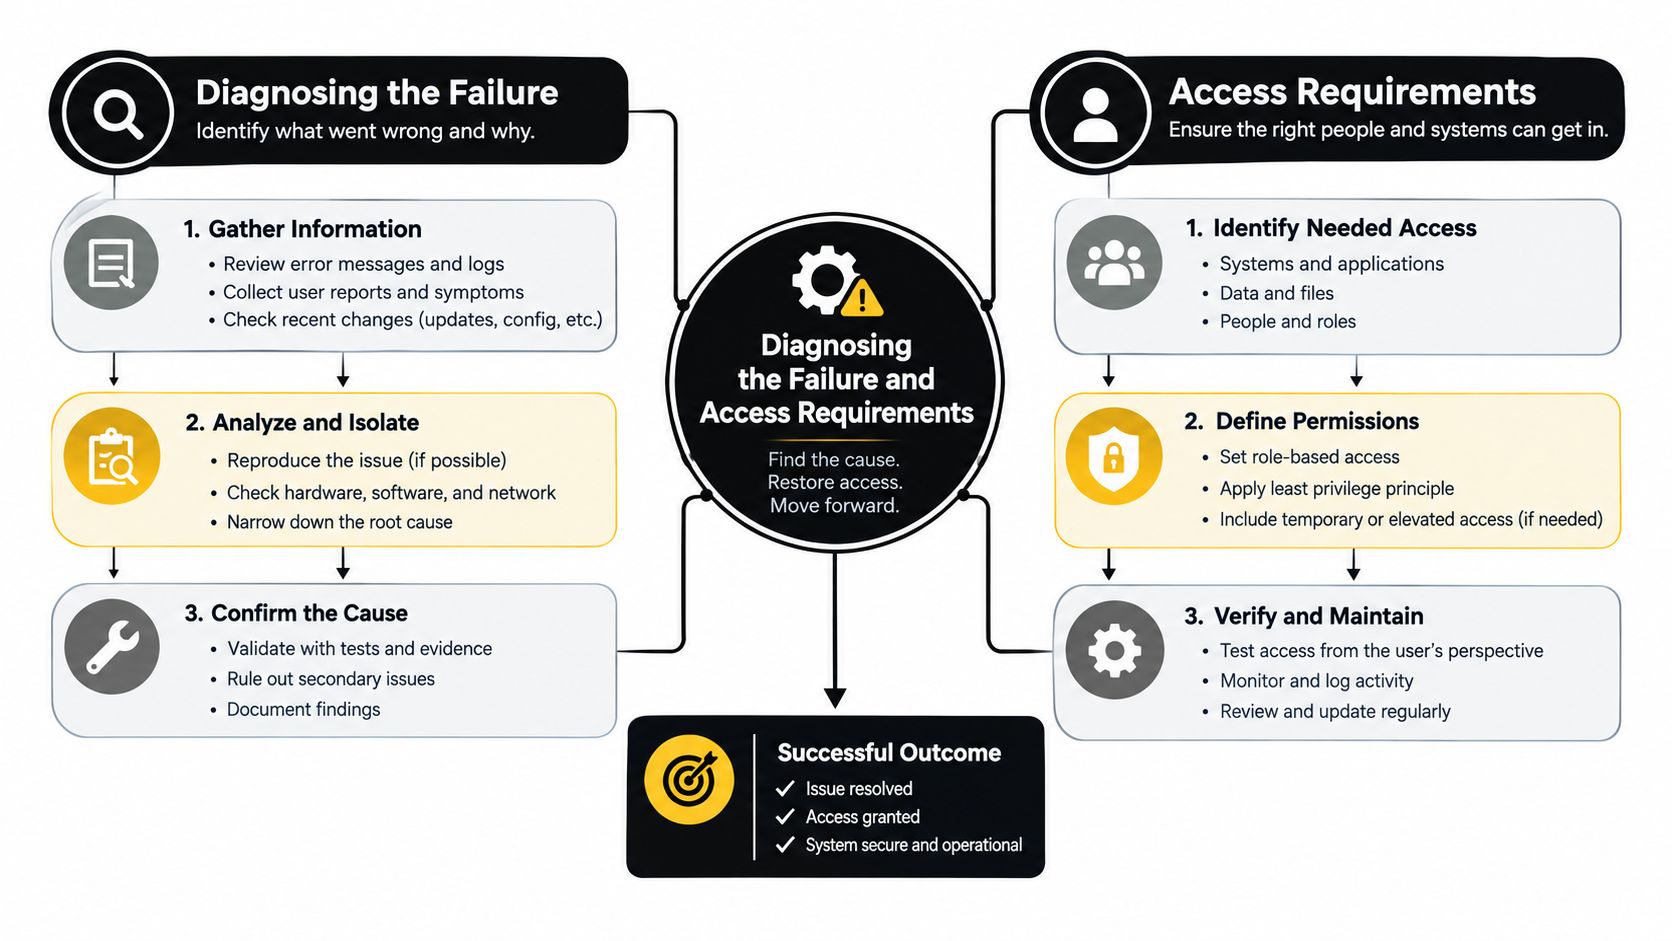
Diagnosing the Failure and Access Requirements
A good estimate begins with diagnosis, not a product catalogue. The first question is whether the handle, cartridge, valve body, or concealed piping has failed.
Use the symptoms as a decision tree
- Handle problem: A loose, cracked, or slipping handle may only need a fastener, adapter, or trim component. Don't assume the valve body has failed because the handle feels wrong.
- Cartridge symptoms: Dripping after the shower is off, difficult temperature adjustment, or hot and cold water mixing poorly can point to a worn cartridge. A cartridge repair usually preserves the existing wall and finish.
- Valve-body symptoms: Persistent leakage after a correct cartridge replacement, visible corrosion, damaged threads, or a body that cannot hold the replacement cartridge suggests a deeper repair.
- Concealed-leak indicators: Moisture on the opposite wall, staining below the shower, soft drywall, unexplained odours, or water movement when the shower runs can indicate leaking in-wall connections rather than a trim problem.
The access route is often the largest labour variable. An existing access panel may allow the plumber to remove and rebuild the valve from behind. An adjacent closet or unfinished wall can also reduce restoration work. Finished tile at the front of the shower is the most disruptive option because removal can damage the waterproofing layer and leave the contractor searching for matching tile.
A like-for-like cartridge repair usually avoids wall demolition. Replacing the concealed body can require opening tile or an adjacent wall, adapting copper, PEX, or CPVC connections, pressure-testing the altered piping, repairing the substrate, and restoring waterproofing, as described in this technical replacement guidance.
What the quote should identify
Request a written scope that answers these questions:
- Which component failed? Cartridge, valve body, diverter, trim, or supply connection.
- Where will the plumber work? Through the trim opening, an existing panel, the rear wall, or the tile face.
- What pipe material is present? The connection method and labour can change with copper, PEX, or CPVC.
- What restoration is included? Drywall patching, waterproofing, tile, paint, and disposal should be explicit.
- How will the repair be tested? The altered piping should be pressure-tested before the wall is closed.
For a homeowner comparing service options, this shower valve repair resource can help frame the difference between a component repair and a concealed replacement. The key is to avoid approving demolition before the contractor has established why access is necessary.
Navigating BC Anti-Scald Code Compliance
An older two-handle shower valve may work mechanically while failing to provide modern temperature protection. Replacing it isn't always a matter of matching the old trim. The new assembly must control temperature safely and suit the shower's actual operating conditions.
British Columbia plumbing guidance requires valves supplying fixed-location shower heads to be individual pressure-balanced or thermostatic-mixing valves, with an outlet temperature no higher than 49°C to limit thermal shock and prevent severe burns. The British Columbia plumbing guidance also applies the safety principle across occupancies, including homes, strata properties, rentals, commercial premises, and government facilities.
Pressure balancing versus thermostatic control
A pressure-balancing valve reacts when hot- or cold-side pressure changes. If someone flushes a toilet or opens another tap, the valve adjusts the balance to reduce a sudden temperature swing.
A thermostatic-mixing valve regulates the mixed-water temperature more directly. It can offer more precise temperature control, but it still has to match the building's water pressure, the showerhead's rated flow, and the manufacturer's installation requirements.
Neither design excuses poor selection. A valve with a minimum operating flow above the showerhead's actual flow may regulate poorly. Reusing trim that doesn't fit the new valve can create alignment and sealing problems. A temperature stop set incorrectly can leave the shower unsafe even when the valve itself is compliant.
Safety check: Ask the installer to identify the valve type, confirm the temperature limit, and explain how the setting will be tested after installation.
The code requirement can change the economics of a repair. A cartridge-only solution may be reasonable when the existing body is compatible and still provides the required control. If the old body is obsolete, damaged, or unable to accept a compliant cartridge, replacing the complete valve may be the safer route.
A professional should document the valve model, the trim compatibility, the temperature-stop adjustment, the connection method, and the post-repair test. That record is valuable for a landlord or strata manager because it shows what was installed and helps prevent a future technician from guessing at an unidentified assembly.
Code compliance isn't an optional upgrade when an installation is altered. It protects occupants from unstable temperature and gives the owner a defensible record of the work.
Understanding Local Permit Exemptions and Rules
Permit questions depend on the municipality and the scope. A homeowner in Vancouver may have a different answer from a homeowner in Richmond, Burnaby, Surrey, or another Greater Vancouver jurisdiction, even when the bathroom fixtures look identical.
The City of Vancouver states that a plumbing permit is generally required when a homeowner installs, changes, or upgrades part of a plumbing system. It specifically exempts repairing or replacing valves or faucets and repairing or replacing fixtures that remain in the same location, according to the City of Vancouver plumbing permit guidance.
Repair work and alteration work aren't the same
| Scope | Likely permitting question |
|---|---|
| Replace a cartridge in the existing valve | Is this a repair with no layout change? |
| Replace a valve in the same location | Does the local exemption cover the replacement? |
| Move the control | Treat it as a plumbing alteration and confirm the permit requirement |
| Reroute supply piping | Ask the municipality before work starts |
| Change the plumbing layout | Expect a different review and inspection scope |
A like-for-like repair may avoid a permit fee, but the exemption shouldn't be assumed outside Vancouver. If the plumber moves the valve several inches, changes the supply route, adds a new outlet, or rearranges the system, the job may no longer fit the repair exemption.
Why documentation matters
Unpermitted work can become an ownership problem later. Strata corporations may need records for common-wall responsibilities, waterproofing concerns, insurance questions, or future renovation approvals. Landlords and commercial managers also need a clear account of what was altered, who performed the work, and whether testing was completed.
Ask the contractor to state the permit position in writing. A useful estimate might say that the proposed same-location valve replacement is being treated as repair work, subject to municipal confirmation, or that the altered piping requires a permit and inspection. That wording is more useful than a vague line saying “permits extra.”
The scope also affects scheduling. Inspection access, wall closure, drying time, and finish trades can delay the final restoration even when the plumbing itself is complete. If a contractor promises a finished tiled wall without checking the existing waterproofing system or tile availability, the quote probably hasn't accounted for the actual access conditions.
For strata and rental properties: Photograph the existing trim, wall surfaces, access route, valve label, and completed pressure test before closing the wall.
The correct question isn't whether permits cost money. It's whether the proposed work changes the plumbing system, affects shared construction, or creates a record that future owners and managers will need.
Breaking Down a Realistic Vancouver Estimate
A published Vancouver project example places a complete shower-valve-and-trim installation at approximately $4,200–$6,500 CAD, with a sample base total of $5,339.35. That sample includes about $3,889.35 in labour and $1,450 in materials for in-wall replacement and drywall restoration, as shown in this Vancouver shower valve project estimate.
The figure represents a renovation-style scope, not a regulated price. It includes in-wall replacement through drywall access, restoration work, a contractor-supplied chrome kit, testing, disposal, and permit and inspection allowances. A same-location repair through an existing opening can be much smaller, while a tiled shower with front access can demand more coordination.
Sample Vancouver Shower Valve Project Breakdown
| Project Component | Estimated Cost (CAD) |
|---|---|
| Plumber and general-contractor labour | $3,889.35 |
| Materials, including chrome trim kit | $1,450 |
| Sample base project total | $5,339.35 |
Treat this table as a scope template rather than a promise. A useful quote should show whether labour includes wall opening, pipe adaptation, pressure testing, drywall patching, painting, and disposal. It should also state whether tile replacement, waterproofing repair, permit fees, inspection charges, and unexpected damage are included or excluded.
Make tax treatment visible
British Columbia applies 5% GST and 7% PST to taxable goods and services under the provincial government's sales-tax policy. PST is calculated on the selling price before GST and can include charges such as delivery, transportation, or handling. The exact tax treatment of plumbing labour and supplied materials can depend on the transaction and applicable exemptions.
For a practical example, if the taxable invoice is $1,000, PST at 7% adds $70, creating a $1,070 subtotal. GST at 5% on that subtotal adds $53.50, producing a total of $1,123.50. The contractor should itemize labour, materials, disposal, and permit-related charges so you can compare an all-in quote with one that excludes taxes.
For more budgeting context, compare the scope against this plumbing repair cost guide, but don't substitute a broad guide for an on-site assessment.
Evaluating Professional Installation Versus DIY
Replacing a handle or cartridge can be a reasonable homeowner task when the model is identified, the shutoff works, and the repair stays within the existing valve body. A concealed valve-body replacement is a different level of work. It combines plumbing connections, wall access, waterproofing, finish restoration, and testing in a location where a small error can remain hidden until water damage appears.

Where DIY often makes sense
A careful homeowner may be able to remove and identify a cartridge, clean accessible components, or replace a handle. The work still requires shutting off water, protecting the trim, using the correct puller when needed, and avoiding damage to the valve body.
Stop before forcing a seized cartridge or cutting into a wall without a restoration plan. A broken retaining ring or damaged body can turn a controlled repair into an urgent replacement.
Where professional work earns its cost
A valve-body replacement may involve soldering or press connections behind a finished wall. Poor alignment can prevent the trim from sitting correctly. A weak connection can leak after the wall is closed. A failed waterproofing repair can allow moisture into the substrate even when the plumbing connection itself holds.
The plumber also needs to verify that the new valve suits the showerhead flow, meets BC anti-scald requirements, and is installed at the correct depth for the trim. After connecting the valve, the altered piping should be pressure-tested before access is closed. The restoration phase may then require a drywaller, painter, tiler, or waterproofing specialist.
The false economy: Saving on the plumbing portion doesn't help if a concealed leak forces you to reopen the finished wall.
A professional quote should separate plumbing from restoration. It should identify who is responsible for waterproofing, whether the contractor will coordinate other trades, and what warranty applies to each part of the work. For another service perspective, see this shower plumbing repair information.
The right comparison isn't DIY against an inflated invoice. It's a controlled, tested installation against the risk of paying for the same access and restoration twice.
Securing Reliable Plumbing Service in Greater Vancouver
A reliable quote starts with a site assessment or a clearly defined diagnostic visit. The contractor should inspect the trim, identify the valve model where possible, check the access route, determine whether moisture is present, and explain what evidence supports cartridge repair versus body replacement.
Be cautious when an estimate contains only “replace shower valve” with no access allowance. That phrase doesn't tell you whether the contractor includes a rear-wall opening, tile removal, new trim, pipe adaptation, pressure testing, drywall repair, waterproofing, disposal, permits, or taxes.
Questions that expose the real scope
- Access: Where will the plumber open the wall, and who restores it?
- Compatibility: Which valve and trim are proposed, and will the existing showerhead flow support the valve?
- Compliance: How will the installer confirm the 49°C outlet limit and anti-scald performance?
- Testing: Will the altered piping be pressure-tested before the wall is closed?
- Contingency: What happens if corrosion, damaged pipe, or wet substrate appears?
- Documentation: Will the owner receive the model information, photographs, and test results?
Modern diagnostic tools can reduce unnecessary demolition. Video inspection can help investigate related drainage or concealed piping concerns, while acoustic leak detection can help locate active leaks before a contractor opens a broad section of wall. These tools don't eliminate access work when the valve body must be replaced, but they can make the opening more targeted.
For homeowners, landlords, strata managers, and facilities teams across Vancouver, Richmond, Burnaby, New Westminster, Delta, Surrey, and nearby communities, Encano Plumbing & Drainage Ltd. offers scheduled and emergency plumbing service, diagnostics, rough-in corrections, and wall-access coordination. The company lists 10+ years of experience and 24/7 emergency response, and its technicians use tools including video inspection and acoustic leak detection.
Encano Plumbing & Drainage Ltd. can assess whether your shower needs a cartridge repair or a full valve-body replacement, then provide an itemized scope covering access, compliant hardware, testing, and restoration. Visit Encano Plumbing & Drainage Ltd. to request a project-specific assessment for your Vancouver-area property.