
Your shower starts with a drip that won't quit. Then the handle gets stiff, the temperature swings hot to cold, or you notice staining near the trim plate and wonder if water is getting behind the wall. That's usually the point where a simple annoyance turns into a real shower valve replacement decision.
For Vancouver homeowners, this job isn't just about swapping parts. Local housing stock, older galvanized lines in many pre-1970 homes, moisture behind tile, and BC code requirements all affect how the work should be done. A proper replacement restores temperature control, reduces the risk of hidden leaks, and gives you a valve setup that matches today's safety standards. If you're comparing repair versus replacement, it helps to review common shower plumbing repair options in Vancouver before opening the wall.
Table of Contents
- Introduction to shower valve replacement
- Recognizing when your shower valve needs replacement
- Preparing for shower valve replacement with tools safety and permits
- Valve removal and installation steps
- Testing troubleshooting and final adjustments
- Estimating cost time and choosing DIY versus professional help
Introduction to shower valve replacement
A shower valve sits behind the wall, but it controls almost everything you feel at the showerhead. When it wears out, you'll notice it fast. Water may keep running after shutoff, the handle may feel loose or gritty, or the temperature may drift every time someone uses another fixture in the home.
Shower valve replacement fixes more than comfort. It helps prevent water intrusion, brings older setups closer to modern anti-scald expectations, and gives you a clean starting point if the trim kit is outdated or the cartridge is no longer reliable. In Vancouver, that local context matters because coastal moisture and older plumbing layouts punish rushed work. If you know what to look for, prepare properly, and respect the valve depth and sealing details, this is a job you can judge clearly before deciding whether to tackle it yourself.
Practical rule: If the symptom is outside the wall but the cause is behind tile, slow down before buying parts. The right diagnosis matters more than the first wrench turn.
Recognizing when your shower valve needs replacement
John in Burnaby noticed two symptoms at once. His shower temperature jumped around during use, and the tile near the trim plate stayed damp longer than it should. That combination usually points away from the showerhead and toward the valve assembly itself.
Some shower valves can be repaired. In the region, Vancouver-area shower valve repairs usually run between $150 and $350, with simple cartridge work at the lower end and wall-opening jobs higher up. But repair only makes sense when the valve body is sound, parts are available, and the leak hasn't spread beyond the trim area.
Common symptoms that point to the valve
A failing valve rarely hides completely. Watch for these signs:
- Temperature swings during a shower. If the water turns sharply hotter or colder when another fixture runs, the balancing function may be failing.
- A steady drip after shutoff. This often means worn internal seals or a damaged cartridge seat.
- Reduced pressure at the showerhead. Mineral buildup inside the valve can restrict flow even when the showerhead itself is clean.
- Noisy operation. Whistling, chattering, or banging at the handle can mean internal wear or unstable pressure through the valve.
- Moisture at the trim plate. Water marks, soft drywall on the back side of the wall, or staining at grout lines can mean the leak is inside the cavity.
Single-handle valves often fail at the cartridge or balancing mechanism. Dual-handle systems can be trickier because older stems, seats, and supply-side wear all interact.
Why older Vancouver homes need closer attention
Homes built before 1970 often still have original galvanized steel piping, and those systems are more prone to leaks and pressure issues, according to this Vancouver plumbing guide on common problems in older homes. In practice, that means a “simple valve issue” sometimes turns into a broader rough-in problem once the wall is open.
A quick inspection at home helps narrow it down:
- Check the handle feel. If it binds, slips, or needs force, the cartridge may be worn.
- Inspect the trim plate edge. Darkening, mould, or recurring caulk failure can point to hidden moisture.
- Listen during operation. Changes in sound when moving from hot to cold often reveal internal trouble.
- Look at the wall behind the shower. A closet or adjacent room often shows staining before the bathroom side does.
If the shower only drips from the head, don't assume the showerhead is the problem. A worn valve can keep feeding water even when every visible part looks fine.
Preparing for shower valve replacement with tools safety and permits
Preparation decides whether the work goes smoothly or stalls halfway through with the wall open. Before touching the trim, confirm the valve brand if you can, check whether you're doing a like-for-like replacement or changing pipe layout, and shut off the home's water safely using a clear procedure such as this guide on how to shut off the water main safely.
Tools and materials worth having before you start
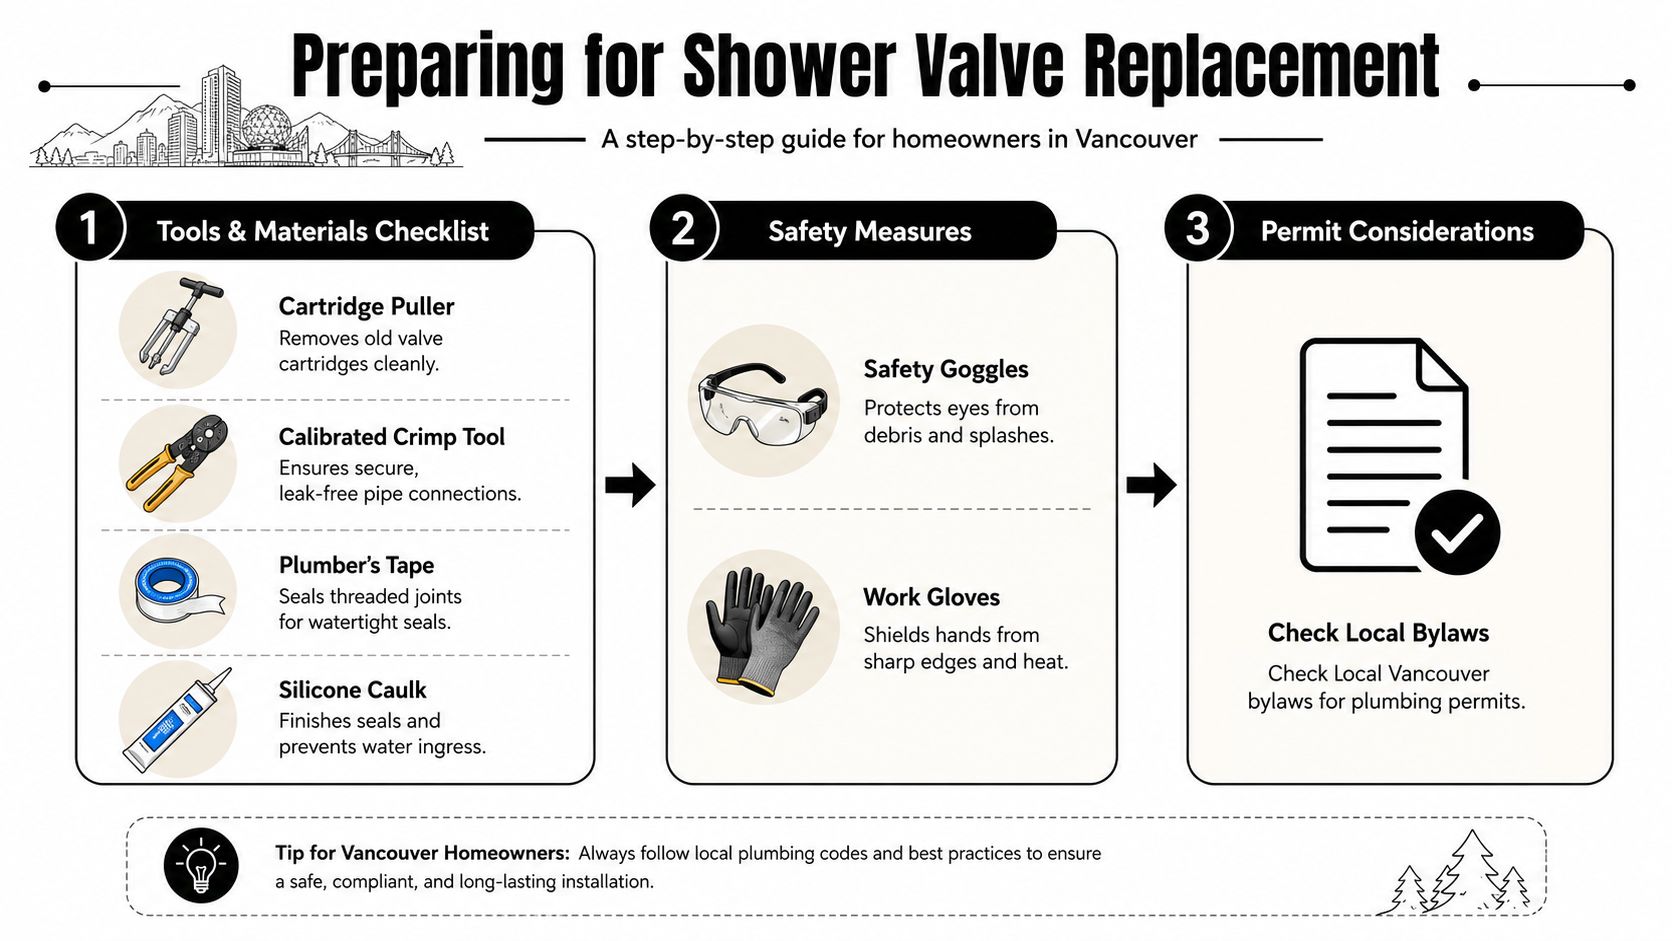
Generic guides often just say “basic plumbing tools”. That's not enough for this job. A useful prep list includes:
- A cartridge puller if the old cartridge is seized and you're disassembling before full removal.
- A calibrated crimp tool if the installation uses PEX and approved crimp fittings.
- Plumber's tape for threaded connections that require it.
- Silicone caulk for finishing around the trim plate.
- Safety goggles and work gloves because you'll be working around sharp cut edges, water, and possibly old fasteners.
- Drop cloths and a vacuum to control dust and debris when opening access.
If you're replacing only the cartridge, extraction technique matters. BC code guidance tied to anti-scald valve requirements also notes that expert plumbers achieve a 96% success rate reinstalling retainer clips without deformation. Bent clips create instability, and instability creates callbacks.
BC permit and code details that DIYers often miss
In Metro Vancouver, homeowners can usually do a like-for-like shower valve replacement without a permit if the plumbing structure isn't altered, based on Vancouver-area homeowner permit guidance for plumbing work. That exemption generally covers swapping a cartridge or replacing a valve body in the same location without changing the system layout.
What doesn't fit that exemption is the part many people discover too late. If you open walls extensively, add new piping, move the valve position, or alter the rough-in arrangement, local permit requirements can change. Check the municipality before you start, especially in strata properties where access, shutoffs, and restoration rules may also apply.
Safety and ordering checks before opening the wall
A few small decisions save a lot of grief:
- Match the rough-in system. Don't order trim first and assume it fits the existing valve body.
- Confirm anti-scald compliance. BC code requires a pressure-balancing or thermostatic valve, as noted in the code-related guidance above.
- Plan wall access carefully. If there's a rear access panel, use it. It usually makes a cleaner repair than cutting finished tile.
- Stage parts before demolition. Waiting on one adapter with the water off is a miserable way to spend a day.
A clean setup is part of the repair. If your tools, fittings, and replacement parts aren't laid out first, mistakes multiply once the old valve is out.
Valve removal and installation steps
The rough-in stage is where most shower valve replacement problems begin. Not at the handle. Not at the trim. Behind the wall, where alignment, support, and pipe condition all matter.
Open the wall and verify what you actually have
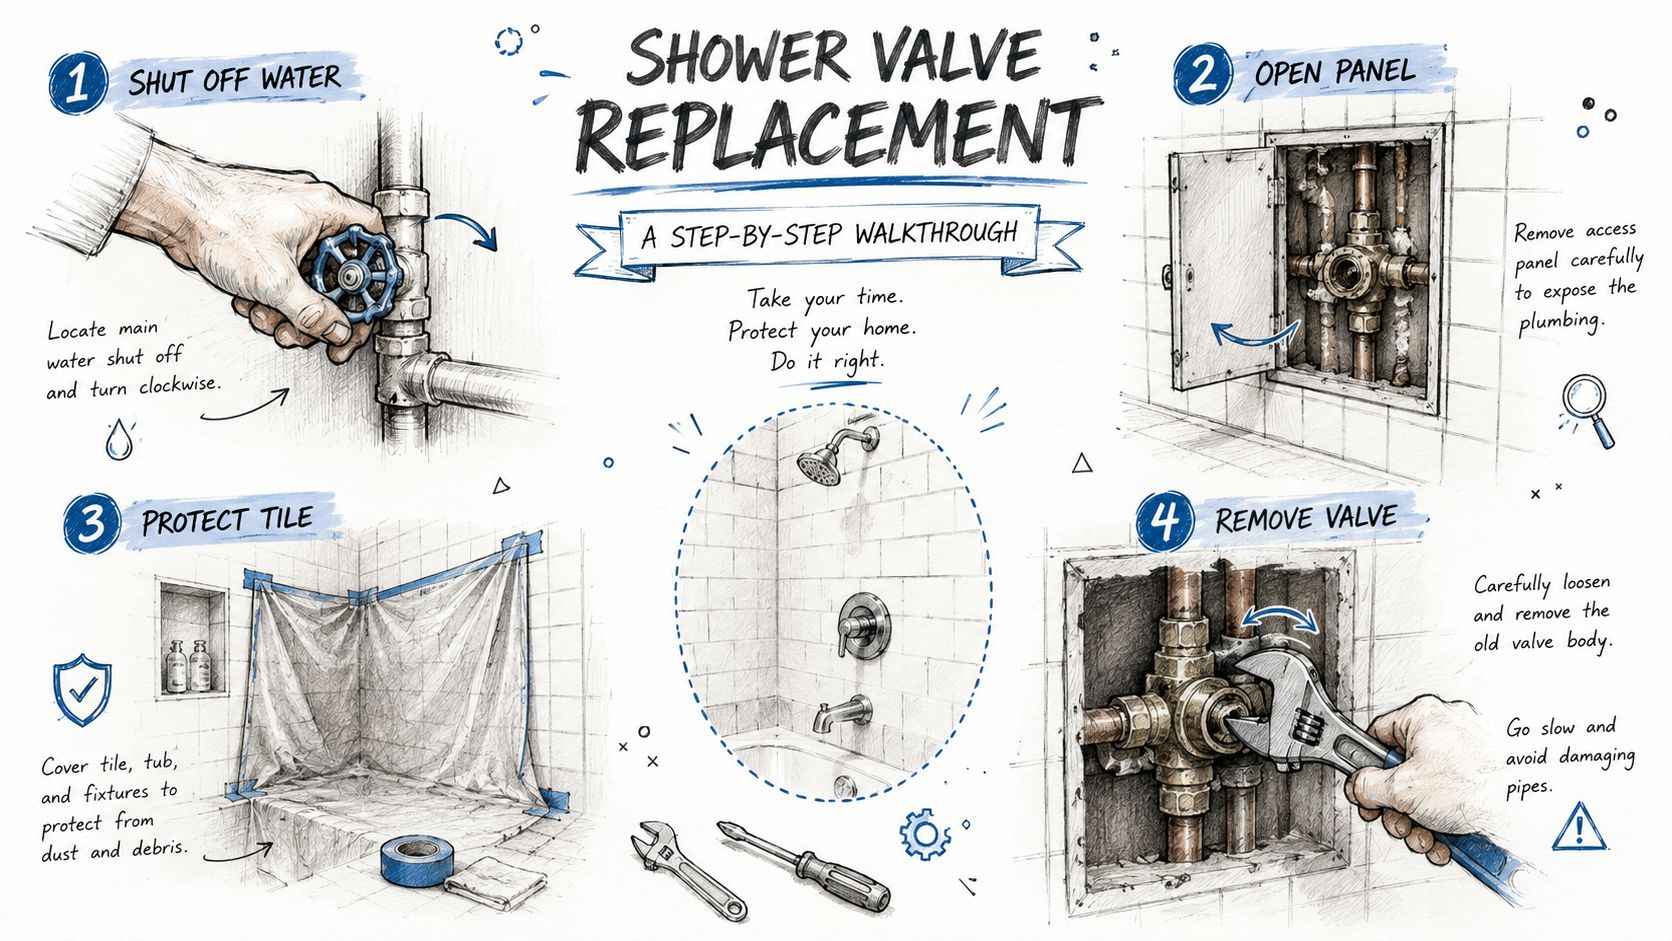
Start with the trim. Remove the handle, escutcheon, and any decorative sleeve so you can inspect the valve body. If the wall has rear access from a closet or utility space, open from there first. It's usually easier to patch drywall than tile.
Before cutting pipe, identify the material. In Vancouver homes you'll commonly find copper in older builds and PEX in newer work or remodels. Also check how the valve body is mounted. A solidly blocked and strapped valve is easier to replace accurately than one that was left floating in the wall.
Use this stage to inspect for corrosion, old moisture staining, and cracked solder joints or stressed fittings. If the cavity smells musty or the framing shows water marks, dry and evaluate the area before installing anything new.
Remove the old valve without damaging good pipe
Once the water is off and the lines are drained, disconnect the old valve body based on the pipe type and access you have. With copper, leave yourself enough straight pipe to clean and reconnect properly. With PEX, avoid making cuts so close to fittings that you lose flexibility for the new connection.
When the valve uses a retainer clip and cartridge assembly, remove those parts carefully before body removal if the manufacturer's design calls for it. Vertical extraction matters. Twisting or crushing the clip can turn a clean disassembly into a parts chase.
A practical example. If you've got an older single-handle pressure-balancing valve in a Burnaby condo and the back side is accessible through a linen closet, the cleanest method is often to open the closet wall, cut out the old body, and leave the tile side untouched. That approach keeps restoration simpler and lets you mount the new valve squarely.
Field note: Save the old trim and cartridge until the new valve is fully in. Matching orientation and confirming hot-left cold-right is easier when the original parts are still on hand.
Set the new valve body at the right depth
This is the detail generic guides often rush, and it's one of the most important ones. In Greater Vancouver installations with copper piping, the valve body should be mounted at 1/2 inch to 3/4 inch from the finished wall surface so the trim plate sits flush, and installing the valve too deep beyond 1 inch is linked to a 22% failure rate in DIY jobs because of trim misalignment and hidden leaks.
That depth range matters for three reasons:
- Trim fit. Too shallow and the trim won't sit right.
- Handle engagement. Too deep and the handle adapter may not engage properly.
- Moisture control. A badly seated trim plate leaves opportunities for water to work behind the wall.
Dry-fit against the actual finished wall plane, not just the open stud cavity. If tile, backer, and waterproofing layers aren't installed yet, account for all of them before fastening the valve body.
Make the connections and install trim
With copper, clean the pipe ends properly and keep heat controlled so you don't damage nearby framing or valve components. Many plumbers remove heat-sensitive internals before soldering if the manufacturer allows it. With PEX, use the specified crimp method and verify the connection carefully before closing the wall.
Later in the job, testing confirms the final seal, but connection quality starts here. Threaded joints that require sealing should get plumber's tape. The valve body should also be supported firmly so handle movement doesn't stress the piping every time someone turns the water on.
For a clear visual of the sequence, this walkthrough video helps show the order of work and rough-in thinking:
A quick comparison of connection choices
| Connection type | What works well | What usually goes wrong |
|---|---|---|
| Copper | Strong, stable rough-in when the valve is well blocked and the pipe is in good condition | Overheating parts, poor cleaning, weak support |
| PEX | Faster fitting assembly and easier adaptation in tight cavities | Bad crimps, poor tool calibration, unsupported valve movement |
The last step before trim is orientation. Make sure the valve is upright, the hot and cold sides are correct, and the manufacturer's plaster guard or depth guide has been respected. A valve can be perfectly connected and still perform badly if it's set crooked or too deep.
Testing troubleshooting and final adjustments
Don't close the wall the moment the water turns back on. Test first, then adjust, then finish.
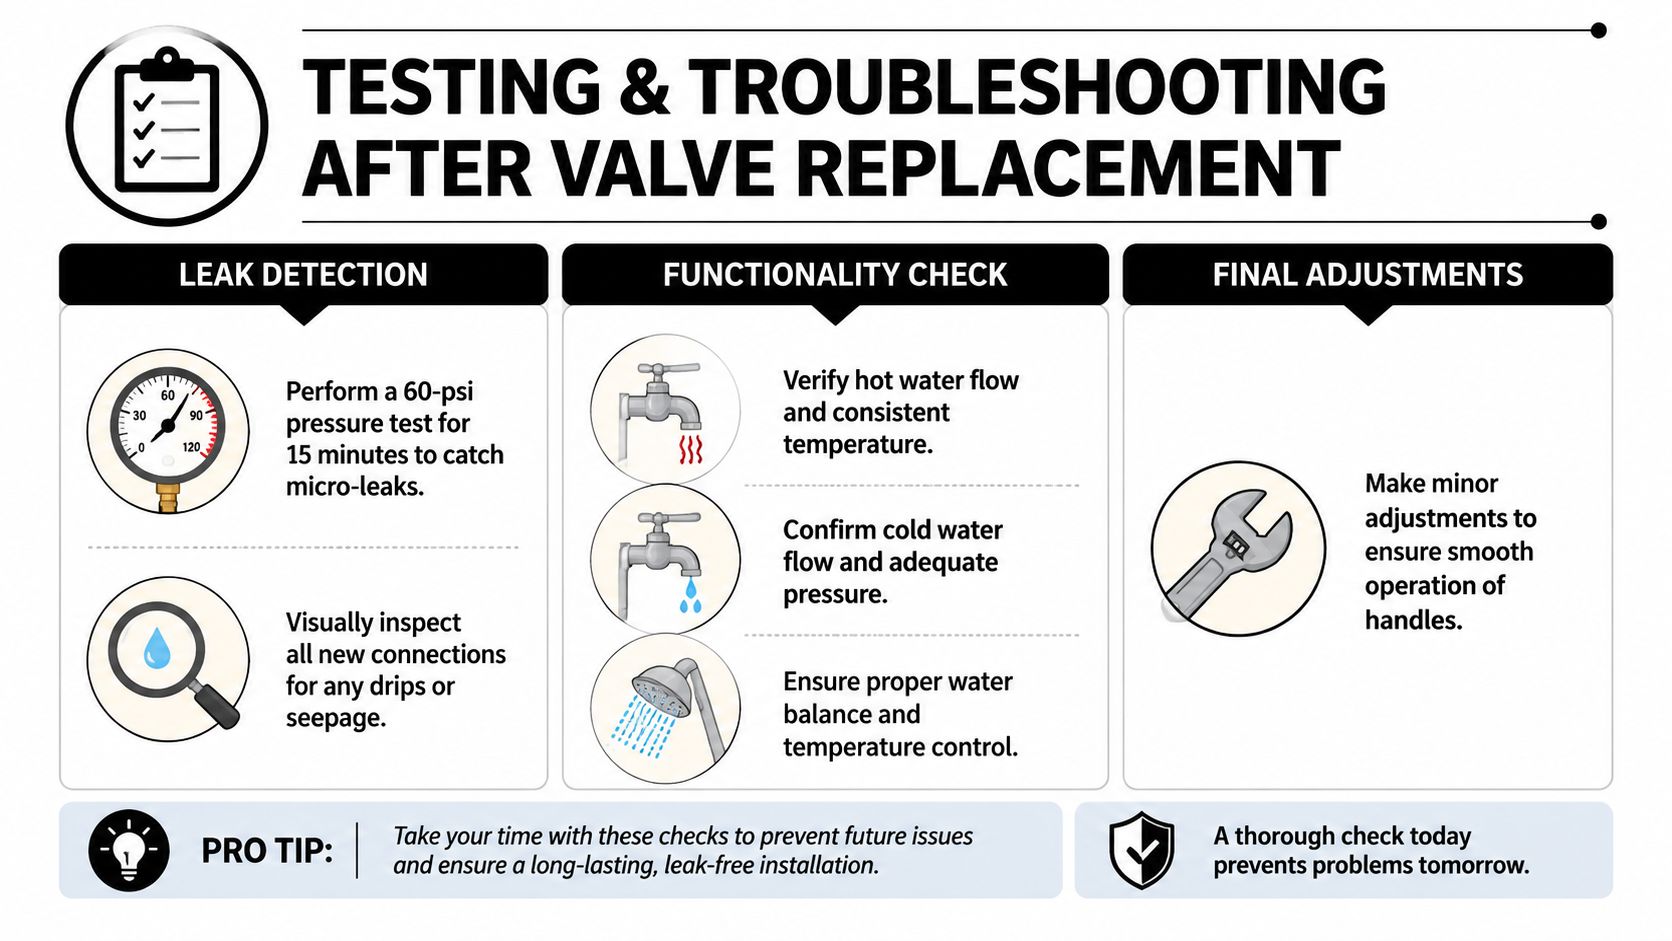
For PEX systems, the connection should be pressure tested at 60 psi for 15 minutes before trim installation to catch micro-leaks. During that test, inspect every new joint with a light and dry paper towel. Even a small bead of moisture matters.
What to verify before closing the wall
Use a simple checklist:
- Leak check. Inspect all new joints, the valve body, and the shower riser connection.
- Temperature balance. Confirm the valve transitions smoothly and doesn't overreact when flow changes.
- Hot and cold orientation. If they're reversed, fix it now. Don't hope the trim will hide the issue.
- Diverter operation. If the system includes a tub spout or diverter, make sure flow shifts cleanly.
- Trim plate seal. A 3/8-inch bead of silicone caulk around the trim plate is important because omitted sealing can allow moisture intrusion behind tile in BC's humid coastal conditions.
Common problems and the likely cause
A few patterns show up repeatedly:
- Drip after installation usually means debris in the cartridge, a damaged seal, or an internal part not seated fully.
- Handle feels rough often points to misalignment or overtightened trim components.
- Weak flow can come from clogged supply-side debris after the work, not just the showerhead.
- Water near the escutcheon may mean the trim plate isn't sitting flat against the finished wall.
If something feels off during testing, stop there. The wall should only be closed after the valve runs quietly, transitions smoothly, and stays dry under pressure.
Estimating cost time and choosing DIY versus professional help
For budgeting, the local range is a useful reality check. In Greater Vancouver, a full shower valve replacement typically costs between $649 and $1,000, including labour, materials, and minor wall repair fees. Basic services can start lower, while complex installations with wall access, older plumbing, or higher-end valve setups can climb significantly within the broader local range noted in that cost guide.
DIY makes the most sense when the job is precisely like-for-like, access is good, the piping is in decent shape, and you're comfortable setting the valve depth accurately. Professional help is usually the better call when you have older galvanized lines, uncertain wall conditions, a multi-unit building, or a rough-in that may trigger permit and restoration issues. If you're comparing the budget side before deciding, this Vancouver guide to plumbing repair cost expectations is a practical starting point.
Time is the other trade-off. A straightforward replacement can move quickly when every part fits and access is simple. A hidden leak, a mismatched valve body, or corroded supply piping can slow the work fast. That's why many homeowners choose a licensed plumber for anything beyond a straightforward cartridge or direct swap.
If your shower valve is leaking, drifting in temperature, or showing signs of hidden wall moisture, Encano Plumbing & Drainage Ltd. can help with compliant shower valve replacement across Vancouver and surrounding communities. Their team handles diagnostics, rough-in corrections, wall-access coordination, and emergency plumbing work, which is especially useful when a “small valve issue” turns out to be a deeper leak behind tile.