
You're probably looking at a new tankless water heater because you want reliable hot water, less wasted space, and a cleaner setup than an old tank in the corner of the garage or mechanical room. That part is easy to understand. What catches many Vancouver homeowners off guard is that the heater itself is only part of the job.
Tankless water heater venting is what makes the whole system safe and dependable. If the venting is poorly designed, badly sloped, too long, terminated in the wrong place, or built with the wrong material, the unit can lock out, corrode early, spill exhaust where it shouldn't, or fail inspection. In Greater Vancouver, our damp weather, colder snaps, tight lot lines, and local code requirements make those details even more important than the generic online guides suggest.
Table of Contents
- Why Venting Is the Most Critical Part of Your Installation
- How Tankless Water Heater Venting Works
- Choosing Your Venting System Materials and Types
- Navigating BC Venting Codes and Clearances
- Common Venting Installation Mistakes to Avoid
- Venting Costs Maintenance and Troubleshooting
- Conclusion Hiring a Licensed Technician in Greater Vancouver
Why Venting Is the Most Critical Part of Your Installation
A lot of homeowners focus on the appliance brand, the hot water capacity, and where the new unit will hang. Those things matter. But the venting decides whether that heater runs safely in the first place.
A tankless gas water heater burns fuel inside your home. That means it has to get combustion air properly and send exhaust gases outdoors properly. If either side of that process is wrong, you don't just get poor performance. You create a safety issue inside the home.
Exhaust management is a safety system
The vent isn't just a pipe that carries away smoke. It's part of a sealed combustion system that controls airflow, pressure, condensate movement, and exhaust discharge. That's why sloppy venting work causes problems that homeowners often notice as “random” shutdowns, strange noises, drips, error codes, or exhaust smells near windows.
Practical rule: If a tankless unit is installed cleanly on the wall but the venting is wrong, the installation is wrong.
Online advice often falls short for Vancouver homes. A generic guide might show a simple straight pipe through a wall and leave it at that. Real homes in Richmond, Vancouver, Burnaby, Surrey, and Delta often have tighter access, longer runs, roofline complications, nearby openings, and damp conditions that make condensate management a serious part of the job.
Efficiency and lifespan depend on venting too
Poor venting doesn't just create risk. It also works against the reason many people bought a tankless unit in the first place. The heater has to move air in and exhaust out at the rate the manufacturer designed for. If the route is too restrictive, badly supported, or not sealed correctly, the burner and fan can't operate the way they should.
That can show up as:
- Frequent lockouts: The unit protects itself when airflow or combustion conditions fall outside its safe operating range.
- Premature wear: Corrosive condensate, vibration, and strain on the fan all shorten service life.
- Warranty trouble: If the venting doesn't meet code or manufacturer instructions, warranty claims can become difficult.
- Comfort complaints: Homeowners notice delays, interruptions, or inconsistent operation even though the heater is new.
A proper installation treats the heater and vent as one system. That's the mindset a licensed gas fitter brings to the job. The appliance gets the attention, but the venting gets the precision.
How Tankless Water Heater Venting Works
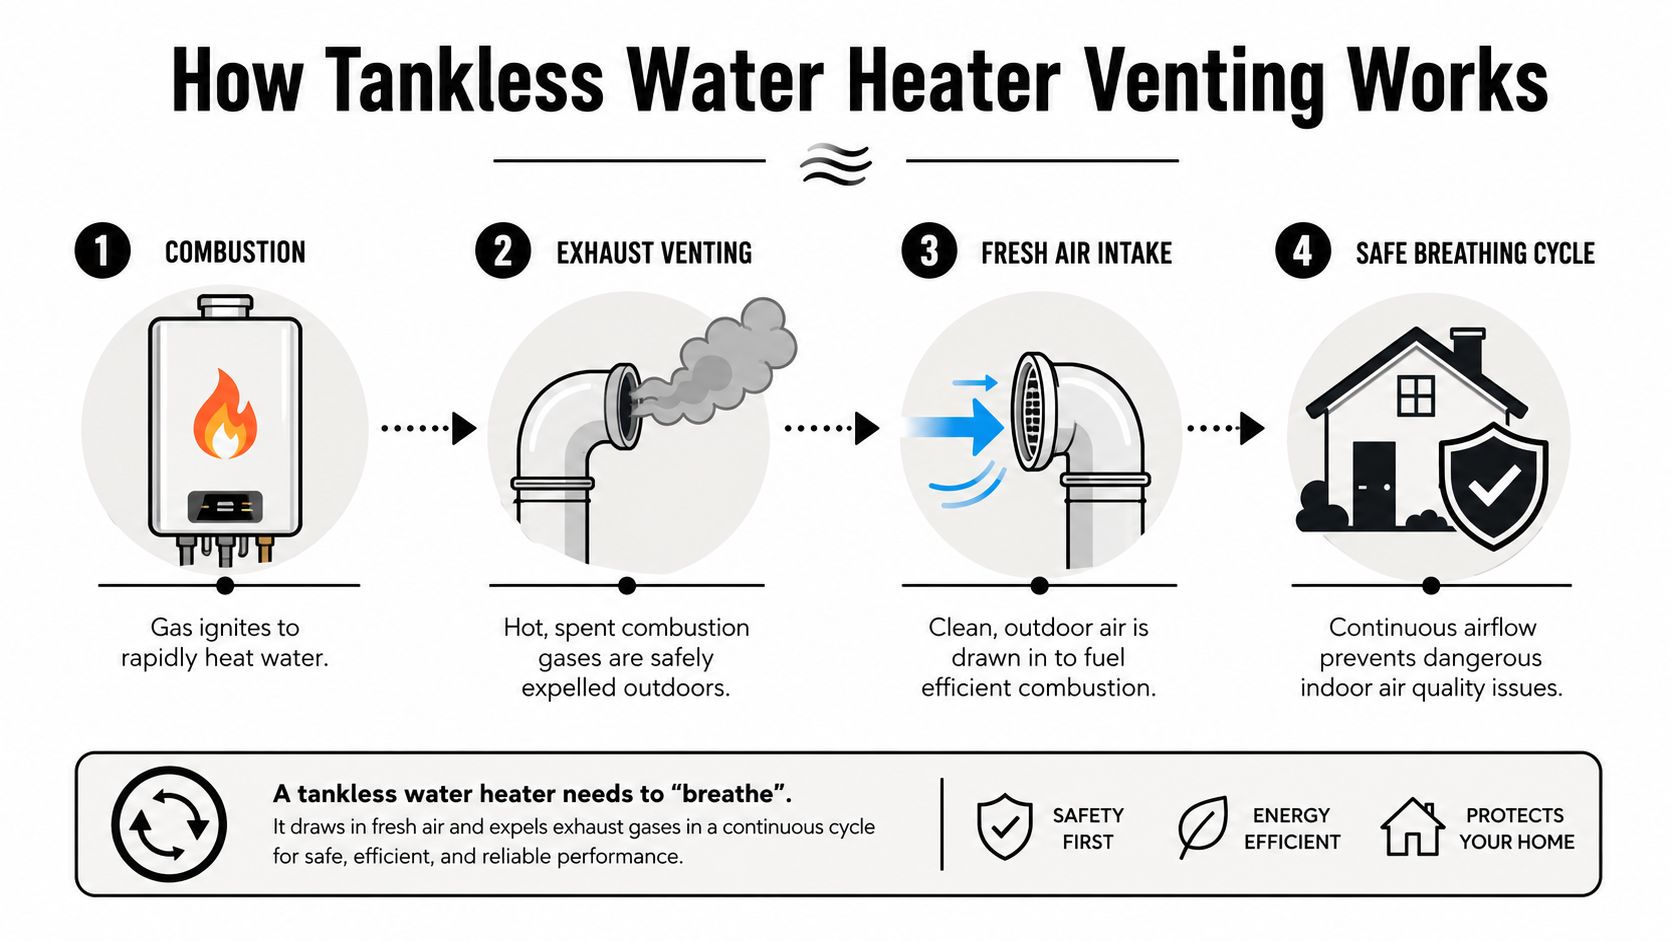
The easiest way to understand tankless water heater venting is to think of the appliance as needing to breathe. It takes air in, burns gas, heats water, and pushes exhaust out. If that breathing cycle is restricted or contaminated, the unit can't run properly.
To make that easier to picture, this process flow helps.
The basic breathing cycle
Most modern high-efficiency gas tankless units in homes use a two-pipe system. One pipe brings in fresh outdoor air for combustion. The other pipe sends combustion gases outdoors.
That matters because the heater isn't supposed to borrow random air from the room and dump exhaust wherever it can. It needs a controlled air path. That controlled path protects indoor air quality and helps the burner operate the way it was designed.
Here's the simple sequence:
- Fresh air enters through the intake pipe.
- Gas ignites inside the heat exchanger.
- Water heats quickly as it passes through the unit.
- Exhaust exits outdoors through the vent pipe.
The video below gives a helpful visual overview of how the venting side of the system works in practice.
Condensing and non-condensing units are not vented the same way
Homeowners can be misled on this topic. Not every tankless gas heater vents the same way.
Condensing units are common because they're high-efficiency. They cool the exhaust enough that moisture forms inside the venting system. That moisture is condensate, and it's acidic. Because exhaust temperatures are lower on these units, approved plastic vent materials such as PVC or CPVC may be used when the manufacturer allows it.
Non-condensing units run hotter at the vent. They typically need vent materials that can handle higher exhaust temperatures, often with more demanding installation requirements.
A vent material that's acceptable for one tankless model may be completely wrong for another. The right answer comes from the appliance listing and the manufacturer's venting instructions, not guesswork.
Why homeowners should care about the difference
If someone installs venting based on what was used on a different unit, or what was “left over from another job,” that's where failures start. Material choice, jointing method, routing, support, and termination all depend on the appliance category.
A practical example. A homeowner in Vancouver replaces an older gas unit with a newer condensing model and expects the venting to be a simple swap. It often isn't. The new heater may need a different vent path, different pipe material, and a proper way to handle condensate that the old setup never had.
That's why tankless venting has to be planned as part of the installation, not treated like an afterthought once the heater is already on the wall.
Choosing Your Venting System Materials and Types
A lot of venting problems start here. The heater itself may be a good unit, but if the vent material or vent style does not match the manufacturer's listing and the actual layout of the home, you end up with ignition faults, nuisance shutdowns, condensate leaks, or a failed inspection.
In Greater Vancouver, I also look at weather exposure and condensate management early. Our damp climate is hard on poorly planned vent runs, especially on condensing units with long horizontal sections or terminations exposed to wind and spray.
Direct vent and other approved vent configurations
Most gas tankless units installed in homes use a direct vent setup. The appliance draws combustion air from outside and sends exhaust back outside through a listed vent system. On some models that is a two-pipe system. On others, it may be a concentric termination built around an approved manufacturer vent kit.
Homeowners often hear terms like power vent, direct vent, or sealed combustion and assume they are interchangeable. They are not. The right question is simpler. What vent configuration does your exact heater allow, and can it be installed in your home without awkward offsets, excessive run length, or a termination location that causes service problems later?
That matters on Vancouver-area homes with tight side yards, basement mechanical rooms, lane houses, and garage installs. A vent route that looks fine on paper can become a poor choice once you account for wall construction, snow-free height above grade, wind exposure, and a practical path for draining condensate.
Comparison of Vent Pipe Materials for Tankless Heaters
| Material | Typical Use | Pros | Cons |
|---|---|---|---|
| PVC | Common on approved condensing units | Readily available, workable, often suitable for lower temperature exhaust where manufacturer permits it | Not universal, wrong choice for hotter vent applications, must be installed exactly to listing and manufacturer instructions |
| CPVC | Condensing applications where higher temperature tolerance than PVC may be needed | Better heat tolerance than PVC, widely recognised in approved vent systems | Still model-specific, not a substitute for checking the approved venting method |
| Stainless steel | Often used where higher heat or specific vent listings require it | Durable, appropriate for demanding applications, suitable where plastic venting is not | Higher material cost, more involved installation |
| Polypropylene | Used on some listed high-efficiency systems | Good corrosion resistance in the right application, purpose-built for certain appliances | Availability and compatibility depend on brand and listing |
Material choice is where the trade-offs become real.
PVC and CPVC are common on condensing units, but only where the manufacturer approves them. I have seen homeowners assume any white plastic pipe will do because it looks similar to drain piping. It will not. Vent pipe has to match the appliance listing, the approved jointing method, the run length limits, and the support requirements. If any of those are off, the system can leak flue gas or condensate and give you years of intermittent trouble.
Stainless steel usually costs more, but there are jobs where it is the better answer. Higher vent temperatures, tougher routing conditions, and model-specific requirements can make stainless the safer long-term choice. Polypropylene also has its place on some listed systems, particularly where corrosion resistance matters, but availability and brand compatibility can limit your options.
The cheapest vent package is not always the lowest-cost installation over time. In Richmond and Delta, for example, I pay close attention to low wall terminations, moisture exposure, and whether the vent route will collect condensate in a way that stresses joints or freezes up in cold snaps.
A common example is a garage install with a long run to an outside wall. The selected material may be approved, but the installation still has to be sloped correctly, supported properly, and arranged so condensate drains where it is supposed to. If the route is forced to fit the room instead of being planned around the unit's venting rules, service calls usually follow.
If you are still weighing the bigger equipment choice, our guide to tankless water heater installation options gives useful context before you commit to a gas venting system.
Navigating BC Venting Codes and Clearances
A tankless unit can run fine on the first day and still be vented wrong. I see that in Greater Vancouver more than homeowners would expect. The problems usually show up after the first stretch of wet weather, a cold snap, or an inspection tied to a renovation or home sale.
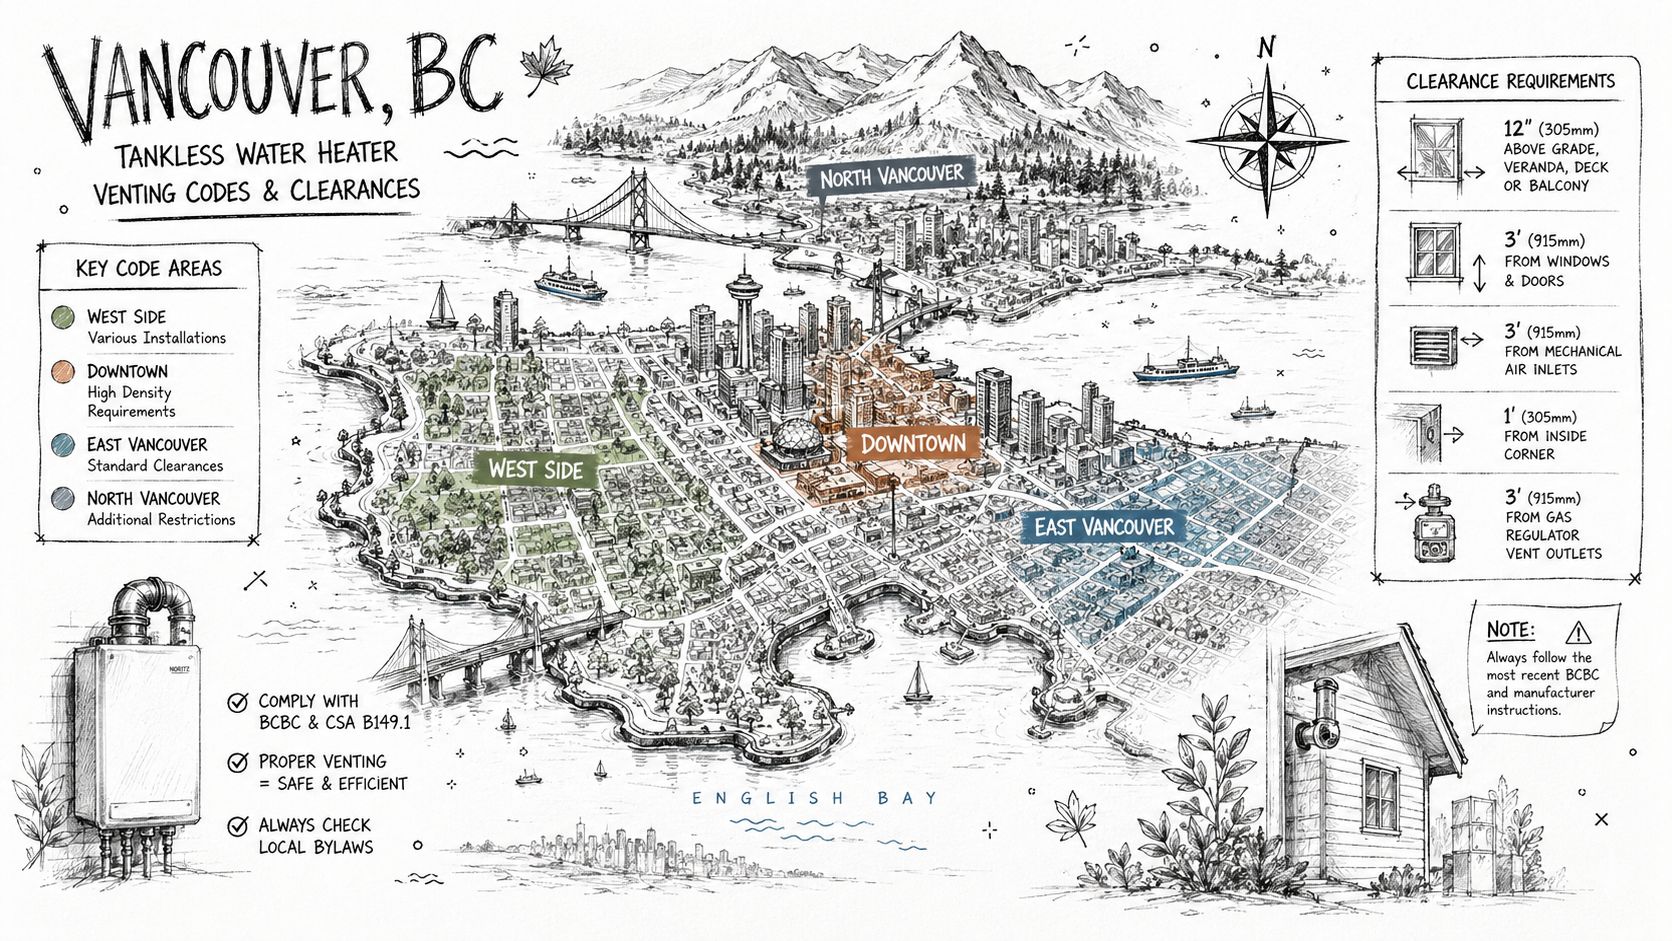
Clearances that matter on real homes
The vent terminal has to end in a location where exhaust can leave the house safely and stay out of windows, doors, soffit vents, and air intakes. That sounds simple until you are working on a Vancouver lot with tight side yards, a deck overhead, mature landscaping, and a neighbour close by.
The exact clearance rules depend on the appliance listing, the venting method, and the BC Gas Code requirements in force for the installation. In practice, the checks that cause trouble most often are these:
- Clearance to openings. The terminal must be kept far enough from windows, doors, and mechanical air intakes so flue gases cannot be pulled back into the home.
- Height above grade or snow level. A low termination may pass a quick visual check in summer, then become a service problem once leaves, standing water, frost, or snow build up around it.
- Distance from the property line and neighbouring structures. This matters on narrow lots in Vancouver, Burnaby, and New Westminster where the shortest vent route is often not the legal one.
- Location under decks, eaves, and overhangs. These areas can trap moisture and exhaust, and they often fail clearance requirements even when the vent pipe itself is installed neatly.
A Richmond house is a good example. The shortest route may put the terminal near a ground-floor window, under a soffit, or too close to a fence line. At that point, the right fix is usually a different route or a different termination point, not forcing the original plan to fit.
Condensate control matters more in Vancouver
Condensing tankless heaters produce acidic condensate, and our local climate makes poor drainage show up fast. If the vent is not pitched and supported the way the manufacturer requires, water sits in the line, stresses joints, and shortens the life of the vent system. In winter, that same moisture can freeze at the termination and cause nuisance shutdowns.
The BC code framework and listed venting instructions also require tight joints, proper support, and condensate management that matches the appliance design. For common-vented installations, the vent run and condensate drainage details are more demanding, as outlined in this commercial gas tankless common venting manual used for BC installations.
I pay close attention to slope on every horizontal section, especially in crawlspaces, garages, and long sidewall runs. A vent can look straight and still hold water if one hanger is off or one section sags slightly.
Code compliance is also a service issue
Homeowners usually think of code as an inspection item. In the field, it is also a reliability issue. Bad clearances can lead to recirculation. Poor terminal placement can stain siding, damage soffits, or create icing. A vent route that ignores manufacturer limits and BC requirements can leave you with recurring error codes that no amount of resetting will solve.
Generic online guides miss this part. Greater Vancouver homes deal with damp air, wind exposure, compact lot layouts, and renovation-era framing that often limits the clean vent route. Getting the clearances right on paper is only part of the job. The installation also has to work through a wet Lower Mainland winter without pulling exhaust back into the house or trapping condensate in the vent.
Common Venting Installation Mistakes to Avoid
It usually starts with a house that seems straightforward. The new tankless unit is tucked into a basement corner or garage, the plumber has a route in mind, and the vent looks fine once the wall is closed up. Then winter hits in Greater Vancouver, condensate sits where it should have drained, the terminal ices up, or the unit starts locking out because the vent system was never set up properly in the first place.
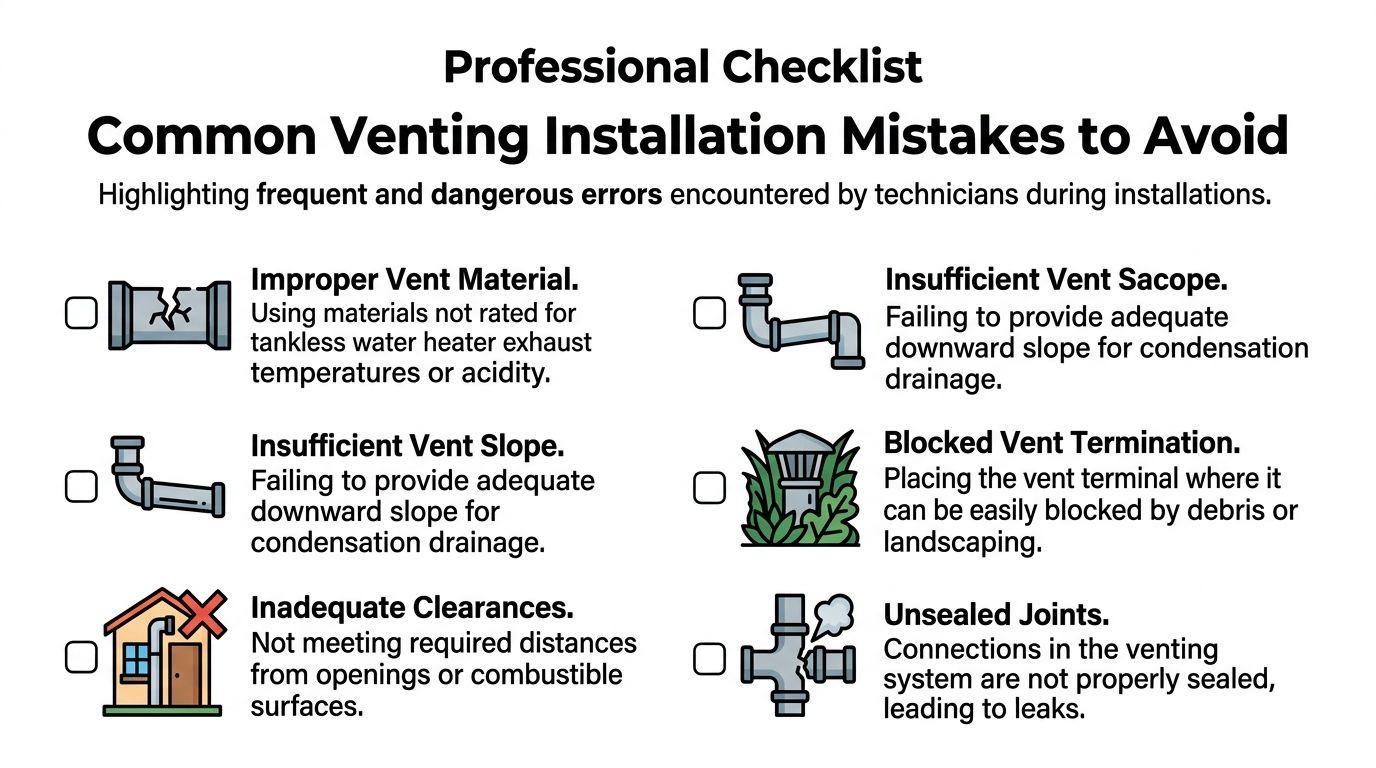
A bad vent install rarely comes from one obvious mistake. In the field, I usually find a chain of smaller ones. Too many fittings. A horizontal run that lost its slope between hangers. A termination placed where damp air, wind, and tight lot lines increase the chance of recirculation. On a condensing unit, those details affect combustion, drainage, service life, and safety.
One common problem is overbuilding the route. In a finished basement or a renovation where the heater location was chosen for convenience, the vent run can end up longer and more restrictive than the appliance allows. The fan may keep up at first. Over time, you start seeing nuisance shutdowns, rough operation, and harder diagnosis because the root problem is in the vent design, not the heater itself.
Other mistakes show up all the time in Vancouver-area homes:
- Improper joint assembly: Using the wrong cement, skipping the listed joining method, or rushing cure time can lead to leakage or premature failure.
- Sagging horizontal sections: Even a small low spot can hold acidic condensate.
- Poor terminal placement: Openable windows, soffits, walkways, fences, and shrub growth can all create operating problems if the clearances are wrong.
- Mixing parts from different vent systems: If the components are not approved to work together for that appliance, the install should not go ahead.
- Ignoring condensate behaviour: In our climate, moisture management is not optional. A vent that is technically connected but drains poorly will give you trouble.
A neat-looking install can still be unsafe.
I see this in Surrey, Burnaby, and East Vancouver renovations where the mechanical room is nowhere near a clean exterior termination point. The proposed route looks acceptable until you count every elbow, every rise, and every section that has to stay properly supported. At that point, the right decision may be to move the unit, change the vent design, or rethink the job scope before installation starts. That is also why the full project budget matters. Homeowners comparing layouts should look at the total tankless water heater installation costs, not just the price of the appliance.
The avoidable mistake is forcing the house to fit the heater location instead of fitting the venting system to the house. In Greater Vancouver, with damp winters, close neighbours, and BC clearance rules, venting has to work on paper and in real weather. That takes planning, listed parts, and careful installation.
Venting Costs Maintenance and Troubleshooting
Homeowners usually ask two practical questions. What affects the venting cost, and what can I do after installation to keep problems from building up? Both matter, because venting isn't just part of the install day. It affects long-term operation.
What affects venting cost
The cost of tankless venting varies with the route, the material, the number of fittings, the termination location, and how difficult the home is to work in. A short, direct wall termination is simpler than a long run through finished areas or up through a roof.
The big cost drivers are usually:
- Route complexity: More turns, longer runs, and harder access increase labour and material needs.
- Material selection: Some vent materials and listed system components cost more than others.
- Building constraints: Finished walls, tight side yards, and awkward rooflines add time.
- Condensate handling: High-efficiency systems need careful planning so moisture drains and doesn't collect where it shouldn't.
If you're budgeting for the overall project, this page on tankless water heater installation costs is a useful starting point.
What homeowners should check
You don't need to service the venting yourself, but you should know what to look at between professional visits.
- Check the outside terminal: Make sure leaves, debris, nests, stored items, or snow aren't blocking airflow.
- Watch for staining or dripping: Moisture marks near the vent path can point to condensate or joint problems.
- Listen for changes: If the unit sounds strained, starts and stops oddly, or gives vent-related errors, don't ignore it.
- Notice the installation area: In unconditioned spaces, insulation and moisture control matter. In BC, the first 2 metres (6.5 feet) of storage tank inlet and outlet piping must be insulated with at least 12 mm (0.5 inches) of insulation, and that principle is especially relevant for water heating systems in cold spaces, as noted in BC climate zone guidance.
A practical example. In an unheated Delta garage, a tankless setup may operate in a colder, damper environment than a utility room inside the building envelope. If nearby piping is left exposed and uninsulated, you can end up with heat loss and condensation issues that make the installation look wet or perform poorly even when the heater itself is fine.
For troubleshooting, the best homeowner rule is simple. If the issue could involve combustion air, exhaust, or vent leaks, stop guessing and call a licensed gas fitter.
Conclusion Hiring a Licensed Technician in Greater Vancouver
Tankless water heater venting is where a lot of installations succeed or fail. The unit can be top quality. The plumbing connections can look tidy. None of that makes the job safe if the venting is poorly planned, badly terminated, loosely sealed, or installed without regard to BC code and manufacturer requirements.
That matters more in Greater Vancouver than many people realise. Damp conditions, colder weather, narrow lot lines, nearby openings, and finished living spaces all make vent design more demanding. Small mistakes in venting don't stay small for long. They turn into corrosion, lockouts, exhaust concerns, inspection issues, and avoidable repair bills.
When you hire someone for a gas tankless installation, check for the basics that protect you:
- Valid gas fitting credentials: The person doing the work should be properly licensed for gas work in BC.
- Liability coverage: Gas and venting work should never be done without proper insurance.
- Brand-specific familiarity: Tankless systems are not interchangeable. The installer should know the venting instructions for your exact unit.
- Clear discussion of the route: A qualified technician should be able to explain where the vent will run, where it will terminate, and why.
If you want a better sense of what licensed gas work should involve, this guide to licensed gas line installation is worth reviewing.
A proper venting installation protects your family first. It also protects the appliance you paid for. That's why this is not a DIY corner to cut.
If you need help with a tankless water heater venting upgrade, replacement, or code-compliant installation in Vancouver, Richmond, Burnaby, New Westminster, Delta, Surrey, or nearby communities, contact Encano Plumbing & Drainage Ltd.. Their team handles residential and commercial plumbing, heating, gas, and drainage work with a focus on safe installation, clear communication, and long-term reliability.