

You fill the kettle, hear the tap run, and catch that faint chlorine smell in the kitchen before the coffee's even ground. In a lot of Greater Vancouver homes, that's the moment an under sink water filter starts looking less like a luxury and more like a practical fix, especially when the water already meets public standards but still leaves a taste people don't like. The point isn't to re-plumb the whole house, it's to clean up the water where you drink it.
Table of Contents
- Why Greater Vancouver Homeowners Choose Under Sink Filtration
- How Under Sink Water Filters Work
- Comparing the Main Types of Under Sink Filters
- Understanding Certifications and Contaminant Reduction Claims
- Will It Fit Under Your Sink and Connect to Your Plumbing
- Maintenance Costs and Cartridge Lifespan You Should Budget For
- DIY Installation Versus Hiring a Professional Plumber
Why Greater Vancouver Homeowners Choose Under Sink Filtration
Metro Vancouver homeowners usually aren't chasing “dirty water” in the dramatic sense. They're trying to deal with the everyday stuff, taste, smell, and the small but real concern of specific contaminants at the kitchen tap. In British Columbia, public systems are regulated to meet Canadian guideline values, and the Guidelines for Canadian Drinking Water Quality set the federal maximum acceptable concentration for total trihalomethanes at 0.100 mg/L (100 µg/L) and lead at 0.005 mg/L (5 µg/L). Those numbers matter because they show why many households focus on point-of-use treatment instead of overhauling an entire building's plumbing qualitywaterlab.com.
A kitchen filter makes sense in that context. It targets the tap you use for drinking, tea, coffee, soup, and pasta, while leaving the rest of the house alone. That's a big reason under-sink systems became mainstream in Canadian homes, they preserve pressure, avoid a full retrofit, and let homeowners address a narrow set of measurable concerns without tearing apart walls or chasing every fixture in the house.
Practical rule: if the water tastes fine at the bathroom tap but you still don't like it in a glass, point-of-use treatment is usually the right conversation.
A Richmond homeowner I worked with chose an under-sink setup after comparing it with whole-house filtration. The kitchen cabinet had room, the rest of the house didn't need treatment, and the family wanted cleaner-tasting water without losing faucet performance. That's the kind of choice that holds up in real life, especially in mixed-age Vancouver-area homes where the right answer is often the narrowest one that solves the actual problem.
How Under Sink Water Filters Work
A kitchen cabinet in Vancouver tells you a lot about the job before any water runs through the system. Older homes may have copper, PEX, or mixed fittings, while strata units often leave very little room around the shutoff valve, drain pipe, and garbage disposal. An under sink water filter has to fit that geometry first, then do the filtration work.
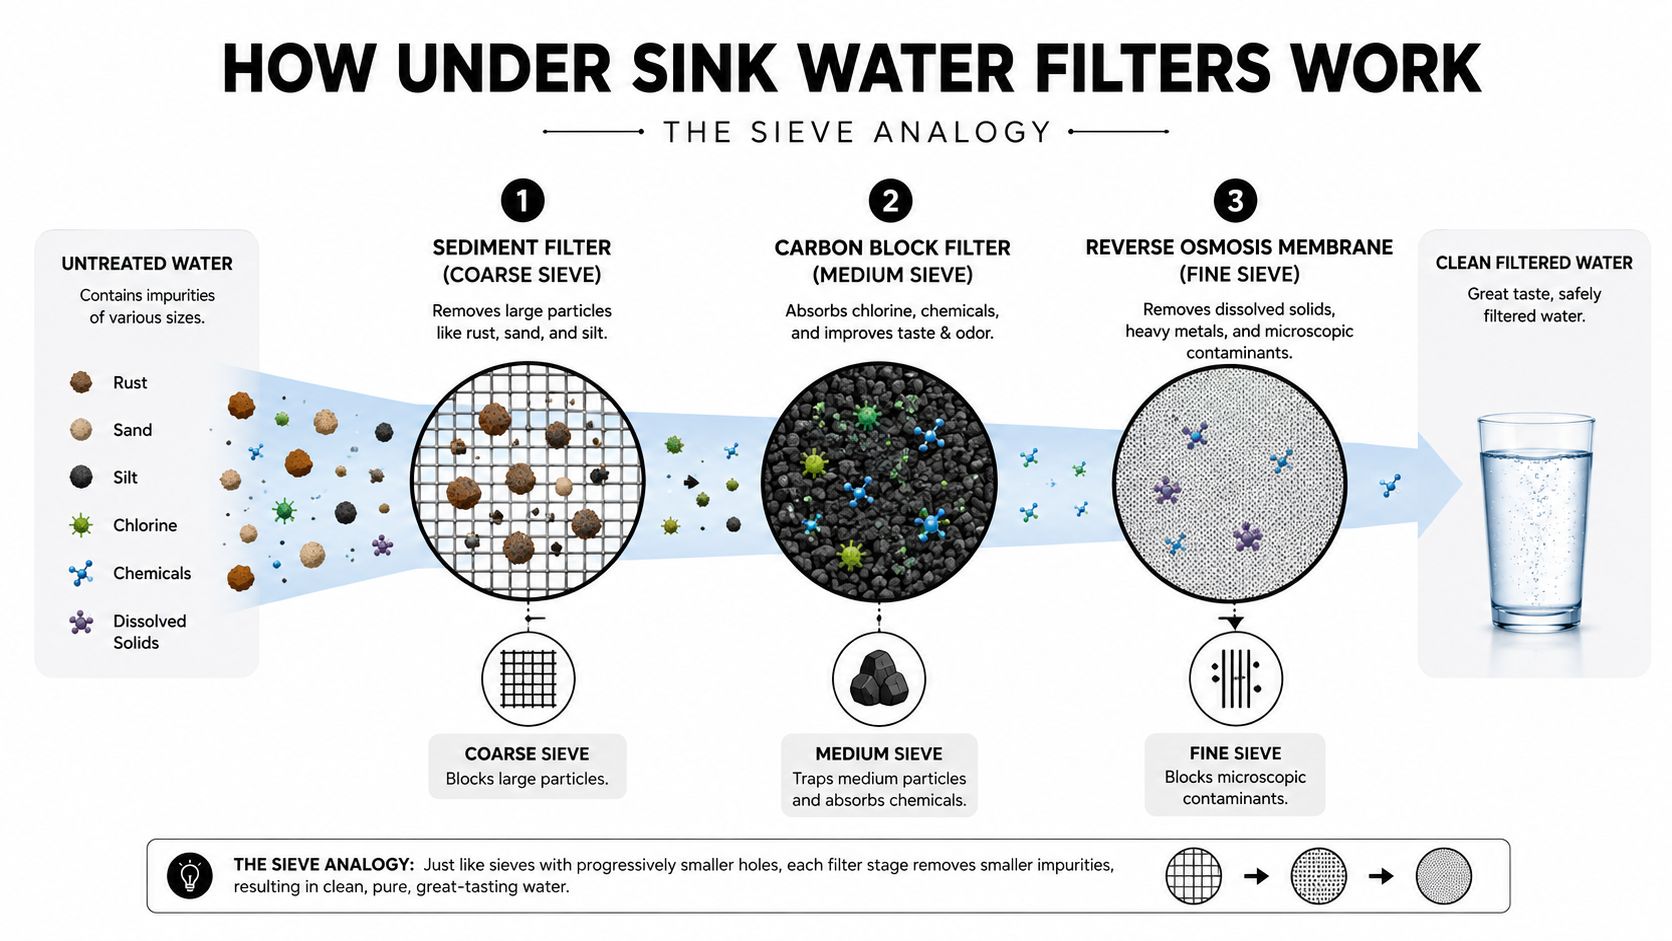
Most systems use staged treatment. The first stage catches sediment and visible particles, the next stage addresses taste, odour, and common chemical concerns, and a final membrane, on systems that include one, handles finer contaminants. Water keeps moving because household supply pressure pushes it through the media, so the filter has to suit the home's pressure and daily demand, not just the marketing brochure.
Two plumbing layouts show up most often. An inline system ties into the existing cold-water line and sends filtered water through the main tap path. A dedicated-faucet system uses a separate small faucet at the sink, which keeps filtered water apart from regular hot and cold supply and usually makes day-to-day use cleaner and easier in a busy kitchen.
Cabinet space and access matter just as much as the filter media. I've opened plenty of Vancouver cabinets where the system itself would have fit, but the tubing bends, shutoff location, or filter canister clearance made the install awkward. In those cases, the right choice is the system that can be serviced without fighting the cabinet every time a cartridge change comes due.
Product specs deserve close attention. A common under-sink profile is 0.72 gpm service flow with 20 to 80 psi operating pressure and up to 800 gallons maximum capacity. That means you are buying a fixed amount of usable water at a predictable pace, not endless output, and the system needs to perform in your actual kitchen, with your actual pressure and use pattern.
A filter that looks impressive but slows the tap in a working kitchen becomes annoying fast. Coffee makers, kettles, and quick-fill cooking pots expose weak flow right away.
A typical Vancouver kitchen can live with that kind of setup for daily drinking and cooking without much fuss. The water comes out steadily enough for a glass or a pot, but the cartridge still has a finite service life, so the job is balancing flow, capacity, and the space available under the sink.
A short video walk-through can help if you want to see the plumbing layout before shopping.
Comparing the Main Types of Under Sink Filters
The right filter depends on what you want removed, how much cabinet space you have, and whether you're willing to deal with drain lines or cartridge changes. In Greater Vancouver homes, carbon is usually the simplest answer for taste and chlorine issues, while reverse osmosis becomes more relevant when you want a broader reduction profile and can live with the extra plumbing complexity.
Carbon block, reverse osmosis, UV, and sediment
Carbon block filters are the workhorse for everyday kitchen use. They're strong on chlorine taste and odour, and they're often the easiest to live with because they keep flow decent and don't need a drain connection. They won't remove dissolved solids the way RO does, so if your concern is narrow and mostly aesthetic, carbon is usually the cleanest fit.
Reverse osmosis systems go farther. They're a good match when you want a tighter reduction profile, but they also bring the trade-off everyone notices under the sink, a drain connection and more involved installation. That extra wastewater line is the reason many homeowners hesitate, especially in older Vancouver cabinets where access is already tight.
UV systems are used for microbial concerns, but they're not a universal solution for taste or chemical reduction. Sediment filters are the first line of defence when you need to catch visible particles, but by themselves they won't solve the common kitchen complaints that most homeowners notice.
| Filter Type | Best For | Removes | Flow Rate | Wastewater | Typical Cost Range |
|---|---|---|---|---|---|
| Carbon block | Taste, chlorine, everyday kitchen use | Chlorine and some common chemical concerns | Usually steady for normal sink use | No | Varies by system |
| Reverse osmosis | Broader contaminant reduction | Dissolved solids and more, depending on certification | Slower than simple carbon systems | Yes | Varies by system |
| UV | Microbial treatment | Microorganisms when properly installed | Depends on system design | No | Varies by system |
| Sediment | Particle control | Rust, sand, and larger debris | Usually good | No | Varies by system |
For a quick overview of system styles, this internal guide on water filtration system types is a useful companion if you're comparing point-of-use setups against other options.
The main thing to remember is that the best filter is the one that matches the actual issue. If you're chasing chlorine taste, a heavy-duty RO system can be more complexity than you need. If you're worried about a wider list of contaminants, a simpler carbon-only unit may not go far enough.
Understanding Certifications and Contaminant Reduction Claims
Marketing language gets slippery fast in water filtration. NSF/ANSI certification is the cleaner way to read a product, because it ties claims to measured performance and structural safety instead of vague promises about “advanced media” or “proprietary technology.” For Greater Vancouver homeowners, that matters more than pore-size slogans, because a fine membrane doesn't automatically prove reduction for lead, PFAS, or chlorine.
What the standards mean in practice
NSF/ANSI 42 covers aesthetic effects, things like taste, odour, and chlorine. NSF/ANSI 53 is the one you look at for specific health-related contaminants, such as lead and cyst reduction. NSF/ANSI 401 addresses emerging compounds, and P473 is relevant for PFAS. Those labels give you a better starting point than a sales page that just says “multi-stage.”
Independent certification data show some under-sink systems tested to NSF/ANSI 42, 53, 401, and P473 with reported reductions including 99.995% cysts, 99.6% lead and microplastics, 99.7% PFAS (PFOA/PFOS), 97.3% chlorine, and 91% chloramines images.thdstatic.com. That's the kind of documentation that lets a homeowner compare products on evidence instead of on packaging.
Practical rule: if the certification sheet doesn't name the contaminant you care about, the product claim doesn't count for much.
A simple way to read a data sheet is to ask three questions. First, which standard is listed. Second, which contaminant reduction claim is certified. Third, what the flow and pressure conditions were during testing. That last part matters because certifications are always tied to test conditions, not to every possible real-world scenario.
If you're checking a product before buying, this internal resource on water quality testing can help you think more clearly about what you're trying to remove before you pick a cartridge. A lot of bad purchases start with the wrong contaminant target, not with the wrong brand.
A quick reading habit
- Match the standard to the problem: use 42 for taste and odour, 53 for health-related concerns, 401 for newer compounds, and P473 for PFAS.
- Look for the exact contaminant: if you care about lead, the sheet should say lead, not just “metals.”
- Check the test context: pressure and flow conditions affect how meaningful the claim is.
- Ignore unsupported pore-size bragging: fine pores are useful, but certification is what proves performance.
Will It Fit Under Your Sink and Connect to Your Plumbing
Even straightforward-looking installs often surprise homeowners when the cabinet geometry gets in the way. The filter body may be compact, but the space under a sink in Greater Vancouver can be awkward, especially in older homes where the shelf height, shutoff valve position, drain lines, and previous pipe routing all compete for the same room.
Measure the cabinet before you buy
Start with vertical clearance. If the cartridge has to be changed from below, you need enough room to lift it out without scraping the housing or disconnecting half the system. A practical guide calls for at least 4 inches of clearance below the lowest cartridge, and that is the kind of detail people miss until they are crouched under the sink with a wrench in hand frizzlife.com.
Horizontal room matters just as much. The system body needs space, the tubing needs room to bend, and the fittings must remain reachable during maintenance. Tubing should curve gently instead of folding sharply, and the same guide notes tubing curves of at least 3-inch radius, which is a useful benchmark in tight cabinets where bins and cleaning supplies already take up space.
Check the plumbing before you assume it's simple
The cold-water shutoff is the next decision point. If it is a straightforward compression connection, the install is usually manageable. If it is hard-piped, or if the line has been awkwardly modified over the years, the job can stop being a filter install and become a plumbing repair.
Reverse osmosis systems add another layer because they need a drain connection. That works in a roomy cabinet, but it can become difficult if the sink already has a dishwasher tie-in, a disposal, or a crowded drain stack. In Richmond strata units, I have seen the drain area packed so tightly that the filter fit, but the wastewater line had nowhere sensible to go.
Practical rule: if you cannot service the filter comfortably, you have not really installed it properly.
Burnaby homes with mixed-age plumbing create a different headache. One side of the under-sink cabinet might have newer fittings, while the other side still has older valve hardware or odd transitions. That is why “will it fit” is less about brand choice and more about cabinet geometry, service access, and how much of the existing plumbing you are willing to alter.
The internal installation guide at under-sink water filter installation is worth reading if you are trying to decide whether your cabinet is a straightforward job or a cramped retrofit that needs planning.
Maintenance Costs and Cartridge Lifespan You Should Budget For
The purchase price is only part of the bill. The cost of an under sink water filter shows up later, in cartridge replacements, and the lifespan depends on how much water your household uses, how dirty the incoming water is, and whether the system is running near its limits. A cartridge that looks inexpensive can become the pricier choice if it needs frequent swapping or uses proprietary replacements that only one supplier carries.
As noted in the specifications overview above, some compact systems use a common 800-gallon maximum capacity. That ceiling does not mean every home reaches the same replacement point on the same timetable, but it gives you a practical benchmark. For a Vancouver family of four, that capacity usually translates to only a few months of normal kitchen use if the system is handling drinking water, coffee, tea, and cooking every day. A single-person household will stretch it longer, but a busy kitchen will get there sooner.
What to watch for
- Slower flow: the faucet feels weaker than it did after installation.
- Taste change: chlorine or other off-flavours start creeping back.
- Time passed: even if flow seems okay, the cartridge may have reached its service window.
- Fit and compatibility: proprietary cartridges can cost more over time because you are tied to one format.
The budget question is not just the first cartridge, it is the replacement rhythm over the life of the system. In Greater Vancouver, that matters because kitchen water use is often uneven. Some homes in newer developments use the filter mostly for drinking water, while older houses with bigger households may run it for cooking, kettles, and refills all day. Once you add the cartridges, shipping, and the nuisance of sourcing the correct replacement, a cheap unit can stop looking cheap.
Cabinet access also affects maintenance costs. If the filter sits behind the trap, next to a disposal, or under a crowded sink in a strata unit, a simple cartridge change can turn into a frustrating job. I tell homeowners to check whether they can reach the housing, twist it clear, and reinstall it without moving half the plumbing around. If that answer is no, the maintenance burden is part of the purchase price, even if it never shows up on the receipt.
Write the replacement date on the cabinet door or keep it in your phone, then treat maintenance like any other household service instead of waiting for the taste to fail first. That small habit keeps the system performing the way you paid for it.
DIY Installation Versus Hiring a Professional Plumber
A basic inline carbon filter can be a reasonable DIY job for someone comfortable with shutoff valves, tubing, and leak checks. The moment the project involves a new faucet hole, a hard-piped shutoff, or an RO drain line, the margin for error gets much smaller. In a lot of Greater Vancouver homes, the plumbing underneath the sink decides the answer before the filter brand does.
When DIY is realistic
DIY makes sense when the setup is simple, the cabinet has room, and you're only connecting to an existing cold-water line with straightforward fittings. You'll need basic hand tools, patience, and the discipline to test for leaks before you close the cabinet. If the system is a direct fit and the plumbing is friendly, it can be a clean Saturday job.
When to call a plumber
Hard-piped shutoffs, cramped strata cabinets, and mixed-age plumbing are the usual red flags. So are installations that need a dedicated filtered-water tap drilled into a countertop or sink, or any job where local code compliance could matter for insurance or future resale. The more custom the routing, the more sense it makes to have someone who does this kind of work regularly.
If the stop tap is buried, the drain is crowded, or the cabinet has no room to service the cartridge, the job isn't “simple” anymore.
When you hire help, ask whether the plumber has installed under-sink filtration before, not just general plumbing. As covered in the fit-and-plumbing guide above, the details under the sink often decide whether the install stays tidy or turns into a rework job. Encano Plumbing & Drainage Ltd. handles under-sink water filter installation as part of its filtration work, along with repair and maintenance for those systems, which matters when cabinet space is tight and the drain layout is awkward.
A quick decision check helps:
- Choose DIY if the shutoff is simple, the cabinet is roomy, and the filter doesn't need a drain line.
- Choose a plumber if the line is hard-piped, the cabinet is crowded, or the system includes RO plumbing.
- Choose a plumber if you need the install to be tidy, serviceable, and code-aware from day one.
If your kitchen in Vancouver, Richmond, or Burnaby needs an under-sink filtration setup that fits the cabinet and connects cleanly to the existing plumbing, Encano Plumbing & Drainage Ltd. can handle the installation, repair, and maintenance work. Visit Encano Plumbing & Drainage Ltd. to book service and get the right setup for your sink, your plumbing, and your water quality goals.