A cold shower usually starts the same chain of thought. The old tank was “working fine” last week, there's water on the floor now, and the first question is whether this is a job you can handle yourself by the weekend.
Sometimes it is. Sometimes it absolutely isn't.
A proper water heater swap is less about lifting one appliance out and sliding another in. In Metro Vancouver, it often touches plumbing, gas, venting, electrical safety, pressure control, access clearances, and permit rules. In a detached house, that's already a serious checklist. In a condo or strata building, the job can also involve shutoff coordination, building access, shared mechanical space, and rules that generic DIY articles never mention.
This guide is written to help you make a smart call before you start cutting pipe. If you're looking for a real water heater installation how to guide, the best place to begin is with safety, fit, and code compliance, then with the step-by-step work.
Table of Contents
- Your Guide to Water Heater Installation
- The Crucial Planning Phase Before You Begin
- Safely Removing Your Old Water Heater
- Step-by-Step Water Heater Installation
- Final Connections and System Testing
- Common Pitfalls and When to Call Encano Plumbing
Your Guide to Water Heater Installation
Most homeowners start this job because they don't have much choice. The tank is leaking, the water isn't staying hot, or a renovation has forced the issue. A capable DIYer can sometimes replace a like-for-like electric tank in a straightforward utility room. That's the narrow lane where this project makes sense.
The trouble starts when people treat every install like a simple appliance swap. It isn't. A gas model brings venting and combustion concerns. A tankless unit changes the whole scope of the job. A condo install may look simple on paper but become complicated the minute you realise the shutoff affects more than one suite or the mechanical closet doesn't provide enough working room.
A practical example. If you're replacing an ageing electric tank in a Burnaby basement with the same general style of unit, with visible shutoffs, decent drainage, and clear access, the work may be manageable if you know how to isolate power and verify it's dead. If you're replacing a gas tank in a Vancouver condo with tight clearances and a shared vent path, that's not the same project at all.
Practical rule: If the job involves gas, new venting, major electrical work, or strata coordination, it usually stops being a DIY project and becomes a compliance project.
The safest way to use this guide is as a decision tool first and an instruction guide second. If you can identify the risk points before you begin, you'll save yourself money, time, and the kind of leak or startup mistake that causes damage long after the install looks “done.”
The Crucial Planning Phase Before You Begin
A water heater job can start looking simple at 8 a.m. and turn into a building issue by noon. The new tank is sitting in the hallway, the old one is half drained, and then you find a shutoff that serves more than your suite, a vent that does not meet current standards, or a strata rule nobody checked. In Metro Vancouver, that planning work decides whether the install stays manageable or becomes expensive.
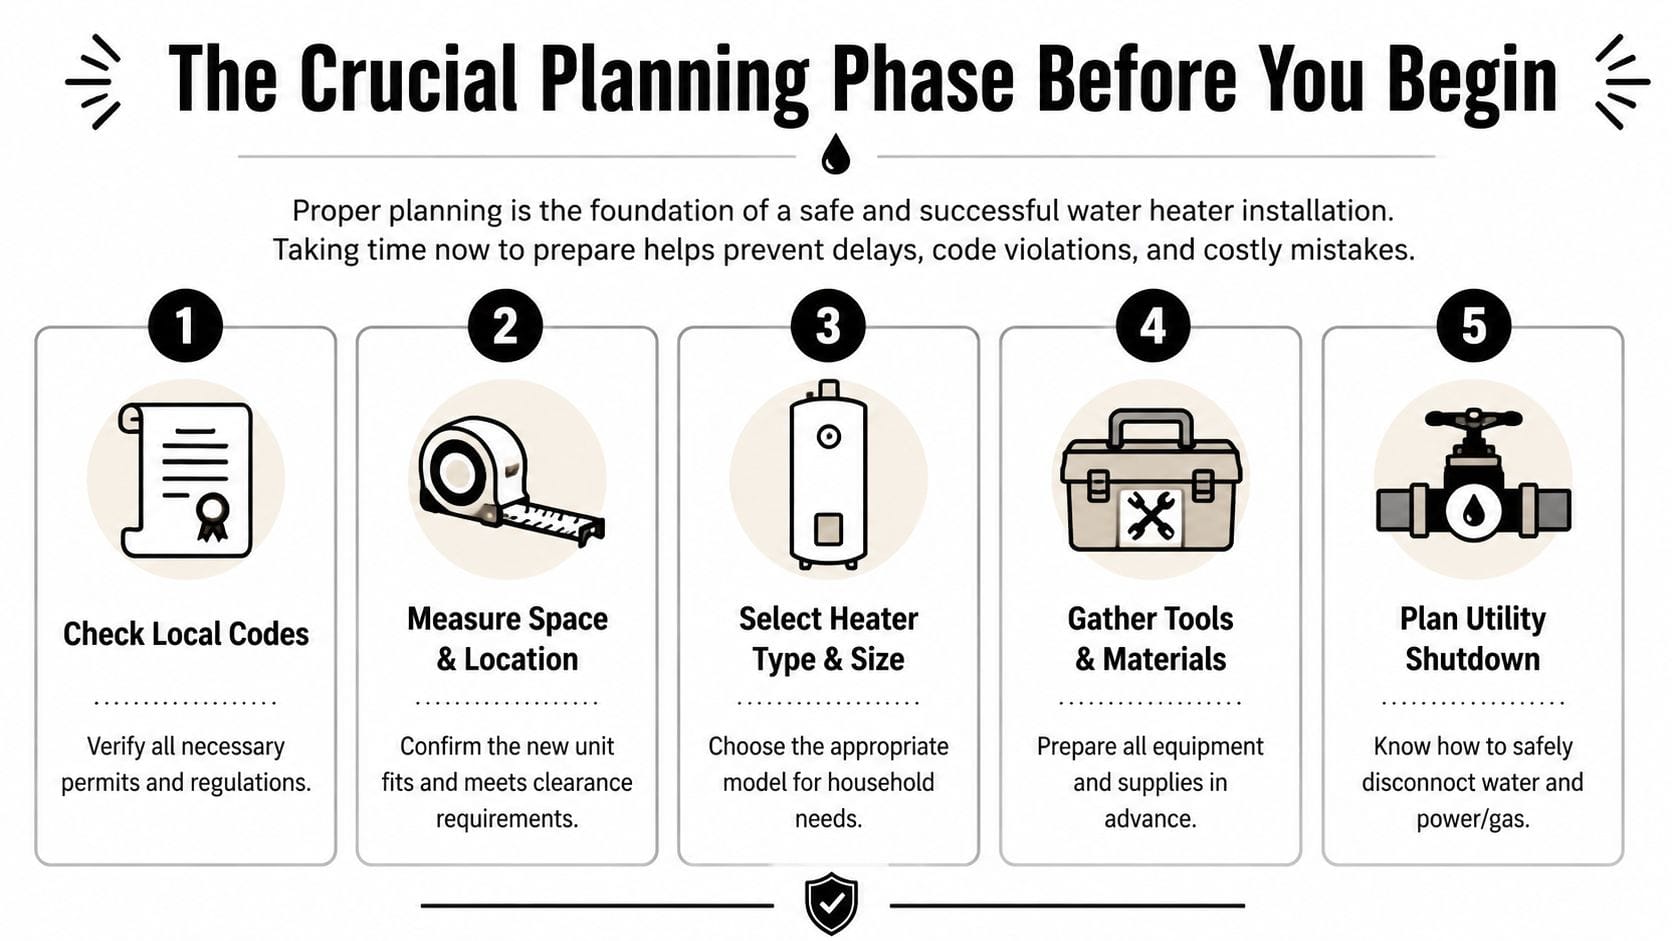
Start by confirming what you are actually replacing
Match the new heater to the job, not just the old label.
A straight tank-for-tank replacement is usually the only version of this project that stays within DIY range, and only if the location, fuel type, shutoffs, and service clearances already make sense. Once you change from tank to tankless, electric to gas, or one venting method to another, you are no longer swapping appliances. You are changing system requirements.
That is why the first check is physical and practical. Measure the closet, doorway, stairs, and removal path. Confirm the new unit's height, diameter, connection locations, and required clearances before you buy anything. In older Vancouver and Burnaby homes, I regularly see replacement plans fail because the new heater fits the mechanical room but will not turn the corner getting into it.
Tankless units can reduce standby losses, and the U.S. Department of Energy explains the efficiency trade-off in its overview of tankless or demand-type water heaters. They can also trigger more work than homeowners expect. Gas line sizing, vent routing, condensate disposal, mounting surface, and power supply all need to be checked up front. If you are still comparing both setups, this breakdown of traditional vs tankless water heater options gives a useful side-by-side view of installation trade-offs.
A quick field guide helps:
| Option | Usually fits the project when | What tends to add cost or risk |
|---|---|---|
| Tank to tank replacement | The new unit matches the existing fuel type, footprint, and basic connection layout | Corroded valves, bad shutoffs, limited access, no drain path |
| Tank to tankless upgrade | Space savings or lower standby loss matters enough to justify system changes | Gas supply upgrades, venting changes, condensate handling, electrical work |
| Electric replacement | Existing circuit and wiring are in good condition and correctly sized | Breaker issues, damaged wiring, incorrect reconnection, dry firing |
| Gas replacement | Venting, combustion air, and gas piping already suit the new appliance | Code compliance, leak testing, vent material compatibility, permit scope |
Check code, permits, and pressure before you touch the old unit
British Columbia work is governed by the BC Plumbing Code, and local municipalities across Metro Vancouver may also require permits or inspections depending on the heater type and the scope of work. Gas-fired units, venting changes, and many tankless installations deserve extra caution here. In practice, neglecting proper planning often leads homeowners to save an hour initially, only to lose a full day later.
Do not assume an older installation is acceptable just because it has been there for years. Existing venting may be outdated. Shutoffs may not operate properly. Seismic restraint, pan discharge, expansion control, or access clearances may fall short of current expectations, especially in condos and townhouse mechanical closets.
Water pressure deserves its own check. High incoming pressure shortens the life of connectors, valves, and the heater itself. In older Metro Vancouver neighbourhoods and in some multi-unit buildings, pressure conditions vary more than homeowners expect. If you do not know your static pressure, test it before installation day. If the pressure is high or unstable, fix that first instead of asking a new heater to live with the same problem.
One practical rule from our side at Encano Plumbing. If the permit path is unclear, or the installation involves gas, shared building systems, or any venting change, stop treating it like a weekend swap.
Condo and strata work has a different checklist
Generic DIY articles typically falter at this point.
A detached house gives you more control over timing and access. In a condo or strata building, you may need approval before the heater even arrives. Building management may require booked elevator time, protection for common areas, proof of licensed trade work for parts of the job, scheduled shutdown windows, and specific overflow or drain-pan details. Some buildings also have rules about working hours, disposal routes, and where drained water can go.
Shared infrastructure changes the risk. A shutoff may affect more than one suite. A vent path may tie into a building system you are not allowed to alter. The mechanical closet may technically fit the new unit while leaving too little room to service valves, T&P discharge piping, or electrical connections safely. I have seen simple Richmond condo replacements stall because the carton would not clear the suite entry and because strata required notice before any water isolation.
Check these points before buying the heater:
- Whether the shutoff serves only your unit
- Whether strata approval or a service booking is required
- Whether the route in and out protects floors, walls, and elevators
- Whether the drain pan and discharge arrangement meet building rules
- Whether access around the finished installation is still safe and serviceable
If any answer is uncertain, get the building manager involved early.
Gather the tools that prevent mistakes, not just the tools that remove fittings
A homeowner can own plenty of wrenches and still be missing the items that keep the install safe.
The must-have kit is straightforward:
- Safety gear: gloves, eye protection, proper footwear, and a second person for moving the old tank
- Electrical verification: a voltage tester for electric heaters
- Water management: drain hose, bucket, towels, and a clear plan for where water will go
- Basic install tools: wrenches, channel-lock pliers, tape measure, level, flashlight
- Connection materials: approved fittings, the right thread sealant for the connection type, and replacement shutoff parts if the existing valve is stiff, corroded, or unreliable
Keep one standard in mind. If you cannot test, isolate, and control the system, you are not ready to disconnect it.
That is the point where calling a licensed plumber is often the cheaper decision. Not because the work is mysterious, but because flood damage, failed inspections, and wrong startup procedures cost more than the service call.
Safely Removing Your Old Water Heater
Removal work isn't glamorous, but it's where many DIY jobs get into trouble. The old unit still has water in it, the power or gas source may not be fully isolated, and the room often gets tighter as soon as hoses and tools hit the floor.
Shut everything down in the right order
For an electric water heater, the safe sequence is clear. Shut off power at the breaker, then verify de-energisation with a voltage tester before you touch any wiring. One contractor guide notes that residential installs often take about 2 to 10 hours depending on whether plumbing, venting, or electrical upgrades are needed, which is a useful planning benchmark in the field, as described in Aero Energy's electric water heater installation process.
For gas models, close the gas supply first and make sure you understand how the appliance was vented before disconnecting anything. If you aren't confident reading that setup, that's the point to stop and bring in a licensed pro.
A simple real-world example. In an older Vancouver house, it's common to find an electric tank with a breaker that's labelled poorly or not at all. The homeowner flips what they think is the right breaker, tests nothing, and starts disconnecting. That's exactly why the voltage tester matters.
Drain and disconnect without flooding the room
Once the unit is isolated, shut the cold-water feed to the heater. Connect a hose to the drain valve and route it to a safe discharge point. Open a hot-water tap somewhere in the home to help the tank vent while draining.
If the drain is slow, don't assume the tank is empty. Sediment buildup often slows draining, especially on older tanks. Give it time, and keep towels or a wet vac ready if the drain setup isn't perfect.
Then disconnect in a clean order:
- Water lines first if the tank is drained enough to handle.
- Electrical conductors on an electric unit, after you've already verified no voltage.
- Gas connector and venting on gas units, only if you're qualified and sure of the reconnection requirements.
- Restraints, pan, or trim pieces that block removal.
Don't wrestle a “mostly drained” tank out of a closet. It's heavier than it looks, awkward to carry, and far more likely to gouge walls or injure your back.
Before the old unit leaves the room, inspect the floor and surrounding connections. A rust trail, a softened subfloor, or signs of past overflow can tell you the old problem wasn't just the tank. If the new heater goes back onto a bad surface, you're building the next problem in before startup.
Step-by-Step Water Heater Installation
Good installation work looks boring when it's done right. The unit sits level, the controls are accessible, the lines are neat, and startup happens without drama.

Installing a traditional tank water heater
Start by setting the new tank in place on a level surface with enough room to reach shutoffs, service points, and the control area. For gas or heat-pump style tank installs, best-practice guidance emphasises accessible controls, open intake-air paths, and hydraulic details such as using flex piping plus check valves or heat traps close to the tank to reduce vibration and natural-convection heat loss, according to A. O. Smith's water heater installation guide.
Placement matters more than many homeowners think. If the unit is jammed tight to the wall, future maintenance gets harder. If the drain pan and discharge path aren't thought through at this stage, you'll end up forcing a solution later.
Connect the cold and hot water lines carefully. Support the piping so you're not twisting fittings against the tank. Keep your joints clean, aligned, and tightened properly. Overtightening does just as much damage as leaving a fitting loose, especially on threaded connections and flexible connectors.
For electric models, the most important startup rule is absolutely critical. The tank must be completely filled with water before re-energising the circuit. Turning power on first will burn out the heating elements. Fill the tank, open hot taps, and wait until the air is purged and water runs properly before you touch the breaker.
For gas models, proper ventilation is critical, and the control panel needs to remain accessible. The tank also needs to be fully purged of air by opening hot taps until water flows steadily before ignition.
Here's a useful visual reference before you tackle the finer steps:
A practical example from the field. If you replace a tank in a Surrey utility closet and the old heater sat slightly out of level, don't copy that mistake. Correct the base now. An unlevel tank can complicate drainage later and make service access awkward from day one.
Upgrading to a tankless water heater
Tankless installs are where many DIY projects stop making sense. The wall mounting is only the visible part. What usually decides the project is everything behind the unit: gas supply capacity, vent route, condensate handling where applicable, electrical feed, isolation valves, and access for future service.
If you're moving from a storage tank to tankless, treat it as a system conversion, not a swap. The old location may not be ideal. The vent path may need to change. The gas piping that served a tank unit may not suit the new appliance setup.
Use this decision list before you commit:
- Mounting surface: it needs to support the unit securely and allow service access.
- Utility compatibility: confirm the unit's fuel and electrical requirements fit the home as installed, not as assumed.
- Isolation and shutoff hardware: service valves and shutoffs need to be reachable.
- Condo restrictions: wall penetrations, noise, and common-property approvals can affect whether the upgrade is even practical.
A tankless install often fails on planning, not on the final pipe connection.
One more Metro Vancouver-specific example. In a Burnaby condo, a homeowner may want tankless to reclaim closet space. On paper, that sounds reasonable. In practice, vent routing, building approval, and mechanical-room constraints may make a high-efficiency tank replacement the cleaner answer.
If you need support for the install itself or the broader plumbing scope around it, one available local option is Encano Plumbing & Drainage Ltd., which provides water heater installation and related plumbing services in Greater Vancouver.
Final Connections and System Testing
A water heater isn't finished when the pipes are attached. It's finished when it's filled correctly, checked methodically, and started without leaks or air problems.
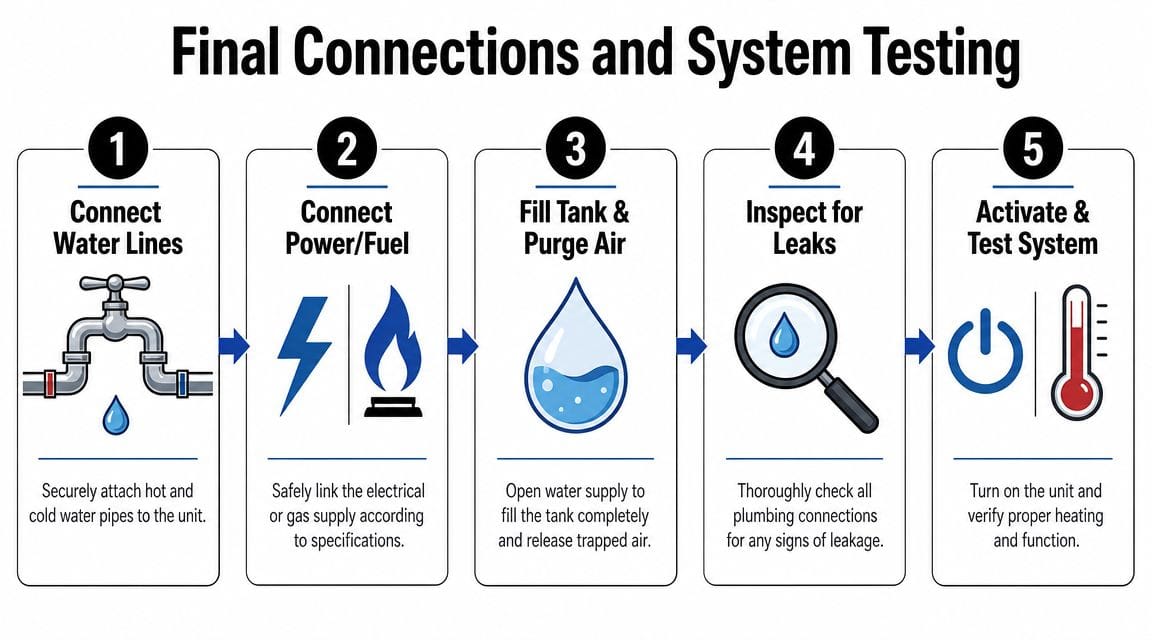
Fill and purge before startup
Open the cold-water supply slowly. Don't slam it open. As the tank fills, open multiple hot taps in the home and let the air push out of the lines. A. O. Smith's guidance is to open hot taps until water flows steadily without air bubbles, which confirms the tank is fully charged before power or ignition is restored, as noted earlier in their installation guidance.
This part is easy to rush and expensive to rush. If air remains trapped, you can get sputtering fixtures, odd noises, and startup issues that look like bigger faults than they are.
For troubleshooting after the unit is running, Encano's guide to common water heater heating problems and solutions is a useful next reference.
Check every joint and confirm operation
Do a full leak inspection before restoring normal operation. Use your eyes first, then your hand, then a dry paper towel on every connection and valve. Tiny drips often show on paper before they form a visible bead.
Work through the system in order:
- At the top of the heater: inspect hot and cold connections.
- At valves and unions: look for slow sweating or an uneven seal.
- At the drain and relief area: make sure nothing is seeping after fill.
- At gas fittings or vent interfaces: if that work was part of the job, don't guess. Verification has to be done properly and safely.
Once you're satisfied there are no leaks, restore the correct power or fuel source. Then confirm the unit begins normal heating operation and that hot water reaches fixtures cleanly.
Small leaks don't stay small when they sit over finished flooring, drywall, or a strata ceiling assembly.
A practical example. In a New Westminster condo, even a slow drip at a connector can mean damage shows up in the suite below before the owner notices the floor is damp. That's why leak checks need to be slow and deliberate, not a quick glance with the closet door open.
Common Pitfalls and When to Call Encano Plumbing
A lot of water heater installs go sideways in the last 10 percent of the job. The tank is in place, the piping looks close enough, and the temptation is to push through. That is exactly when expensive mistakes happen, especially in Metro Vancouver condos and strata buildings where one leak can involve the suite below, building management, and an insurance claim.
The pattern is usually the same. A homeowner assumes the replacement is a straight swap, then runs into a code issue, an access issue, or a building rule that was never checked at the start.
Mistakes that turn a simple swap into a repair job
One common problem is treating the new unit like it only has to fit the footprint. In practice, you also need working clearance, shutoff access, relief valve discharge routing, and a venting setup that matches the appliance. In older Vancouver-area homes, I often see replacement jobs stalled by seized valves, corroded connectors, or framing that leaves no room to service the unit safely.
Another mistake is getting the startup wrong. Electric tanks can burn out elements fast if power is restored before the tank is fully filled and purged. Gas units carry higher stakes. If venting, combustion air, or gas connections are questionable, stop there. That is not the place for trial and error.
Small leaks are the other repeat offender. A fitting can look dry at first and still seep once the system heats, cools, and builds pressure through a normal cycle. In a detached house, that can ruin flooring or drywall. In a condo, it can turn into a strata issue very quickly.
There is also the cost of rework. Homeowners often focus on the price of the tank and underestimate what happens when a bad install has to be corrected, patched, and inspected afterward. Angi's water heater replacement cost guide notes that labor is a major part of the job and that tankless installations usually cost more than standard tank replacements because the work often goes beyond a basic swap, according to Angi's water heater replacement cost breakdown. The practical takeaway is simple. One avoidable mistake can wipe out the savings from doing it yourself.
When hiring a licensed plumber is the smarter move
In Metro Vancouver, the decision to call a plumber is often about compliance as much as skill. BC code requirements, manufacturer instructions, and local building conditions all have to line up. In strata buildings, there is another layer. Some buildings require approved contractors, scheduled shutdowns, protection for common areas, and documentation for any work that affects plumbing, gas, venting, or fire-rated assemblies.
Call a professional if any of these apply:
- Gas is involved: gas piping, venting, and combustion safety need proper testing and code-compliant installation.
- You are in a strata or condo: building bylaws, access rules, and firestopping requirements can change the scope of a simple replacement.
- You are switching types or sizes: going from tank to tankless, changing fuel type, or upsizing often means system modifications.
- You see pressure or valve problems: high pressure, a failing shutoff, or a relief valve issue should be fixed at the system level.
- The electrical side is unclear: if you cannot verify the circuit, disconnect, and bonding with confidence, do not guess.
- The venting does not match cleanly: mismatched vent materials, slopes, or clearances are a stop-work issue.
That is the point where hiring a licensed plumber for water heater installation in Vancouver is usually the safer and less expensive move.
A capable homeowner can handle a lot. A careful one also knows when the job has crossed into gas fitting, code interpretation, strata compliance, or damage prevention. If any of those are in play, call Encano Plumbing before a manageable install turns into a repair project.